Monday was the kick-off of a “small” do it yourself projects around the House of zipping. Since we are getting a tax refund this year we thought it would be ok for us to “splurge” on gold-plating the house a little bit. Heck, it’s the time of year when there’s nothing better to do than be inside anyways. So I decided to install crown molding in our living room.
I’m psyched to be able to blog about the project. As you’ll see as you go on this journey with me, do it yourself projects in my world always cost twice as much, take twice as long, take twice as many trips to Lowe’s as a competent handyman would need.
The joy of it for me is doing something other than sit in front of the computer, which is what I do all day long. Wait a minute; I’m sitting here in front of my computer writing about the project that’s supposed to get me away from the computer. Hmph.
Read Also:
- Guide to Picking Trendy Home Décor to Revamp Your Old Boring Living Room into a Happening Place
- 6 Essential Tips for Converting Your Garage Into a Cozy Living Space
- DIY Deck Design Ideas: Tips on How to Build a Deck Step by Step
- Top 5 Ways to Transform Your House Using Crown Moldings
- DIY Storage Shelves, How to Build a Floating shelf
So, I embarked on this project first with a little trip to Lowes.com, since that is my closest Home Center. A quick search on crown molding revealed a fine-looking book with a URL on the cover, compoundmiter.com.
I went to the site and learned about what scares me the most about this project – the weird angles in the room. Never fear, it seems that there is a handy little angle gauge out there that will measure them for me and tell me the method of cutting crown molding.
Next, I sketched the entire room on a sheet of paper, taking measurements of the length of each wall. I know from past experience that most crown comes in 12′ lengths so I estimated that I’d need 6 lengths for the entire room. 8 pm… kids are in bed; off to Lowe’s I went….
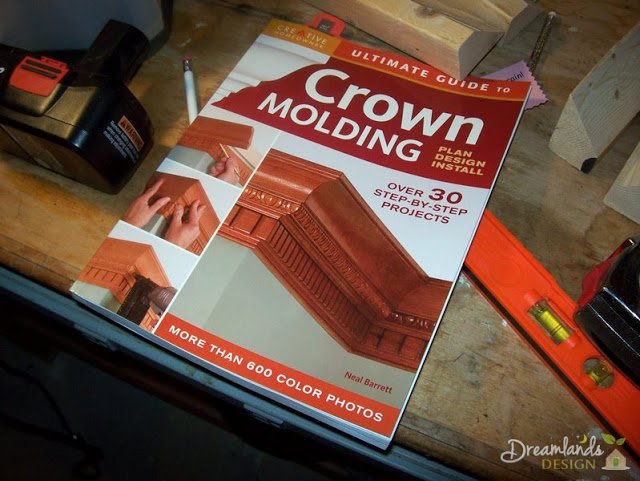
When I got there, I first searched for a book. I’ve done installing crown molding blindly before without a nice book to guide me. When I redid my basement in Chicago, I squinted at some grainy internet pics. This time it’s a pretty book for me.
I looked at the compoundmiter.com book but ended up with the Ultimate Guide to Crown Molding. I chose it because it has great photography and lists a lot of advanced installing crown molding projects with 2 3 and 4 pieces layered, that I was always curious about.
Next, I went off to find that magical angle gauge. No luck in the tool department. So, I went to look at the crown thinking perhaps there would be tools by the moldings.
No tools there either, but there was a knowledgeable guy there who led me back to the tool department to look at the $60 digital badass that can measure an angle to the micrometer and do all the miter-math for me, or the lowly yellow plastic itty-bitty one for $5 that I would actually have to make calculations from. Normally I’d buy the expensive tool because of the ready-made excuse.
Not this time. I bought the cheapy, figuring I might measure an angle 3 or 4 times in my life.
Finally, I went back to pick out the crown. I definitely wanted something even more dramatic than the standard 3-4″ crown that I’ve installed before. The ceilings in the living room are really tall, so I know that they can handle something bigger.
But all I could find was the small stuff. The helpful hardware guy told me to turn around and behold the mother of all crown – the 7″ wide MDF primed.
Now, that’s some molding, and relatively inexpensive compared to all the dentil plastic Greek Revival junk that was also there. I hemmed and hawed for an eternity trying to figure out whether I should back the crown or not.
Should I buy screws, nails, what else? “The time is now 9:59 pm and your neighborhood Lowe’s store would like you to get the heck out of here”. I took that as my cue to hurry up and grab my six crown boards and 3 12′ 2×4 backer boards. I bought the book, the cheapy gauge too. Final tally: 1 trip to Lowe’s $216.25.
Next, I’ll write about my initial battle with the backer boards. It took me all of Tuesday night to rip 3 stinking 12′ boards at an angle. My epic losing battle with the table saw.
The book said that I’d need backer boards on the ceiling to support the molding. Apparently, it is “convenient” to rip 2×4′s at an angle so that you get twice the backer board for the least money. So I got out all of my tools, focusing the majority of my attention on Ye Olde Table Saw, an early 80′s Craftsman cast-steel behemoth that my father-in-law let me have.
This saw weighs 100 pounds for sure, and with no wheels is like… Setting up the saw is a treat. The rip fence has to be attached to the table then positioned by measuring the distance from the blade.
Next, I had to raise the blade and then set it at a 45-degree angle, using super-human strength to turn the adjustment knobs that are frozen in place. I decided to run a little test board through first and flipped the makeshift on-off switch (a power strip lashed to the leg with some zip ties).
The electric motor revved and the blade spun 2 or 3 times. Next, I heard the electric motor-not-working noise before I heard a pop in the power strip. Reset the power strip, try again. Pop again… Alright, I must not have enough juice to run the saw from the power strip, I’ll just direct connect the saw to the wall outlet. Bink! I heard a not-so-good noise, and the motor quit.
Well, I had popped a breaker. The same breaker onto which all of the basement electricity is connected, and therefore the entire Internet network for the house. So, I spent 20 minutes getting the Internet back up and trying to figure out where I could get enough power to run the saw.
I ended up finding a 20amp breaker to the mudroom off the garage. I ran an extension cord into the bathroom and finally got the saw to turn on. I’m now an hour into the project, and I have yet to cut even one board.
I’m ripping 12′ boards. I remember the horror stories from the shop class where the teacher told us of a piece of wood hurling through the abdomen of a student because he saw bound while ripping. With this image in mind, I took great care to set up supports on both sides of the saw to set up the rip. There’s no safety cover on this widowmaker either, so I grabbed my guide stick.
The first cut made it about half way down the board before the saw started to bind. I decided then to cut that part off and start the remaining 6 ft from a fresh end. The rest of the rip went fine and I had my first lengths of wood 2 hours into the project.
Three feet into the second rip I could see a knot on the wood, but this novice had no idea what effect that would have. I figured I could take it real slow and power right through it. Nuh uh… the blade started to smoke, and then all of the sudden I saw a pulley rolling across the floor; then a high pitched whine; then another pulley rolling across the floor.
Finally, I was able to reach the kill switch to find out what had just happened. Basically, the pulley holding the belt to the motor, the belt itself and the pulley holding the belt to the saw blade all fell apart under the pressure.
I was left with a spinning electric motor screaming at me to shut it off. After a half-hour of monkeying around, I figured out that the saw was made to fall apart like this. I was able to screw the pulleys back on and reset the belt.
Here’s where my brain just exhibits no common sense. I figured it must have been a fluke that the saw exploded and went right about trying to cut through the knot again – the same result. I was left with a pile of pulleys and belts for another 15-minute assembly job. This time I cut out the knot. 2 inches into the clean part of the wood and the saw exploded again. That was ahem… It for me.
With my patience wearing thin and the four-letter words on the tip of my tongue, I pulled out the circular saw. I clamped the last 2 boards to the table saw and went foot by foot with a saw the cut the wood like it was butter. Here’s some footage of the triumph, shot and narrated by my trusty assistant.
In the next installment of this gripping reality series, I’ll show you how we actually got to installing the wood in the room. Lest you feel that my projects are riddled with difficulty throughout every step, you’ll find that our Saturday labor was efficient and without incident. Pinch Me
I’m not sure if going in and out from the garage cutting molding did it, or if my raging cold is from my kids bringing it home from school. Either way, I haven’t had the energy to keep up with my project progress until now. Day 3 was five days ago, but alas it seem like just yesterday…
I started by using a pencil to mark lines on the ceiling at a 4″ distance from the wall. And I also made 5″ marks on the ceiling and the wall to mark where the outside edges of where the crown would eventually be. I made the measuring easier by cutting 4″ and 5″ blocks of wood as measuring guides.
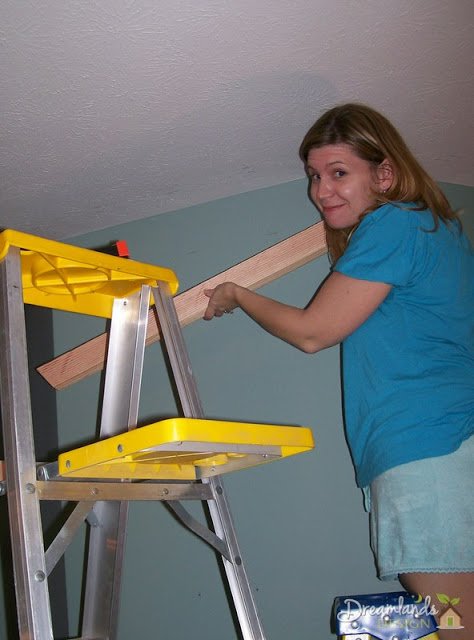
Thank goodness it was a Saturday because I really needed my trusty assistant for the next part of the project. We started on one side of the room with my flaky stud finder marking joists on the ceiling where we could screw the backer boards in.
Then I drilled pilot holes into the wood while we held the board to the ceiling and drove 3″ screws in with a power cordless drill-screwdriver. This was a slowly choreographed maneuver where Tricia and I were juggling 2 drills, some screws, the wood, etc. on step ladders. Each piece of backer board was carefully measured, then I went out to the garage to cut it and back inside to install it.
When we made the turn onto a wall where no ceiling joists were available we got into a rhythm. We brought a big board inside and drilled all the holes on the ground. Next, we drilled and screwed one end to keep the board on the ceiling.
I then drilled all the ceiling holes for the rest of the board to mark where we might (or might not) need anchors. Then we took down the board, and I poked Buildex EZ Anchors into every hole. If it hit a stud, no anchor, otherwise I screwed the anchor in. No need for the stud finder.
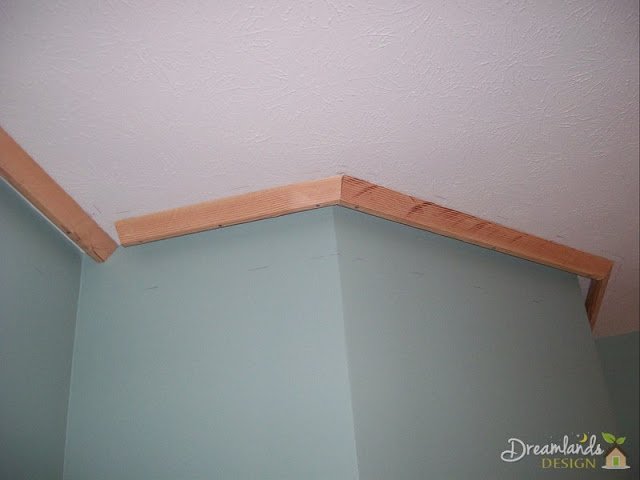
There is one angled wall in the living room that caused me fits and starts. It definitely took some extra time to figure out the angles needed to miter the corners.
Apart from the fact that I needed Tricia to head to the store for another box of anchors (now trip #3 to a store for this project), this phase was relatively painless, and the last backer board was going in before dinner.
We also painted the molding pieces so that we could get down to the fun of actually putting it up. We decided to paint inside the house so there would be an appropriate temperature for drying and a long-lasting finish. And we put all the pieces on saw horses to make it easier to paint the edges and prevent our backs from breaking.
Monday and Tuesday nights I finally made it to the actual installation of the crown molding for the project. This was not before plenty of hand-wringing over how I was actually going to cut the stuff. 7″ crown is too wide to be cut by a 10″ compound miter saw, or so I thought. I called friends and neighbors asking for ideas. One thought was to rent or buy a compound sliding miter saw.
At $500 for the saw, I was going to rent for sure. Another friend said I could use a table saw. I was all set to do that until I realized there’s no way to make a cross cut with 12′ of molding hanging off one end. At last, I called one more wood-working neighbor who suggested that I use my 10″ compound miter, but just complete the cuts with a hand saw.
I had nothing to lose with this approach, as it cost me nothing to try it. It ended up working fine.
I also needed to figure out how to nail the molding. I could have used finishing nails pounded by hand, but that would have been a real pain. Especially since MDF molding needs pilot holes drilled before nailing through it.
Instead, I called up my in-laws from whom I’ve borrowed the magical pneumatic nailer before. I brought that home and loaded it up with 1.5″ nails and I was ready to go.
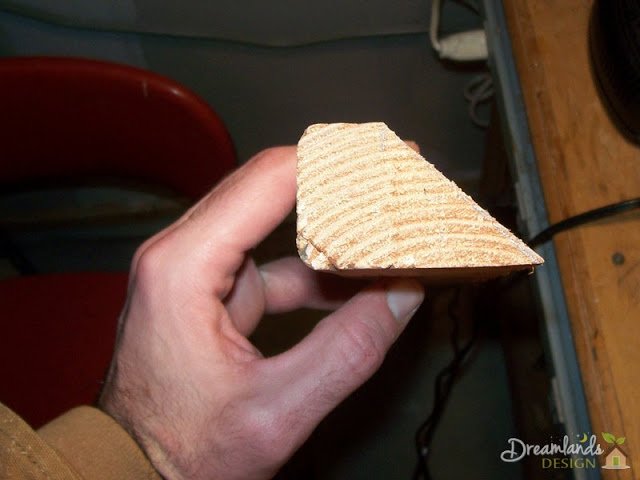
The first piece of molding went up without a hitch; because of course it had no angles or coping. It was great to finally see what the wall would look like finished off. Tricia and I had that momentary euphoria as if the project would take only 10 more minutes to complete. That wasn’t exactly what happened. I tried to cut my first inside corner angle at a 45-degree angle and 45-degree miter. I even coped the profile.
When I put it in place it was the wrong angle. Ugh. So, I eyeballed the angle and went outside to make another cut, again coping the molding and again trying a dry fit. I had cut another wrong angle. I’m just not the sharpest tool in the shed, so it took me these 2 failures before it dawned on me to open the book that I bought and read the angle proper angle measurement. The third time was a charm. 2 hours into my installation I had the second piece installed.
What stopped me in my tracks on day 4 was the small angled wall. This wall had the only outside corners in the room. When I measure the angle of the corners they were 47 degrees. I looked up the angle in my trusty book only to find measurements that I could not do on my saw. So I tried doing half the angle. That wasn’t right.
Then I sat down at the table with Tricia and did some Course III Trigonometry to try and figure out a logical angle. That wasn’t right. Finally, I went to bed defeated not knowing if I was going to ever get the proper angle, or if I would have to buy more crown so that I could continue to create useless angled triangle bits of wood.
Tuesday evening I had a conversation with another friend, who in no uncertain terms, told me to eyeball the damn thing and stop calculating it. He was right. I kept nipping away at the angle until I had something close enough. The rest of the install was straight forward until I got to the very last piece. This is where I had one coped end to do, and the other was a joint that I had to get just right. This piece took me about 10 trips in and out of the house to the saw.
And with that, the cutting, coping and nailing was complete. It was just in time for me to reset the room for our small group meeting on Wednesday. The only thing left to do now is lots of tedious caulking and touch up painting. When that is done I’ll summarize the project in one final post.
To call the finishing stage of the crown molding project all one day is a bit of a misnomer. The reality is that it took small parts of about 4 days to caulk and do the finishing touches, all adding up to about a day worth of effort. I went around the room sealing the gaps between the molding and the ceiling and the molding and the wall with DAP Alex Plus Caulk. It is a latex caulk that can be painted.
I also needed to fill in each inside corner, and the outside corners so that there were no visible gaps between the pieces of wood. Perhaps the most challenging part of the finish work was the 3 joints in the room where I had didn’t have enough molding length to span the entire wall. On those joints as well as every place I had nailed, I used DAP Fast N’ Final Spackle.
I put many thin coats of spackle on the joints, then let it dry, sanded and applied it again so that it would in theory disappear. Well, after about 4 layers, I gave up trying to get them all perfectly smooth. In retrospect, I wish I had made tighter joints, to begin with, but we learn.
After all of the fillings was complete I took out the trim paint and painted over the caulk and spackle. My last step was to take out the wall paint and touch up any spots on the wall where white caulk was too visible.
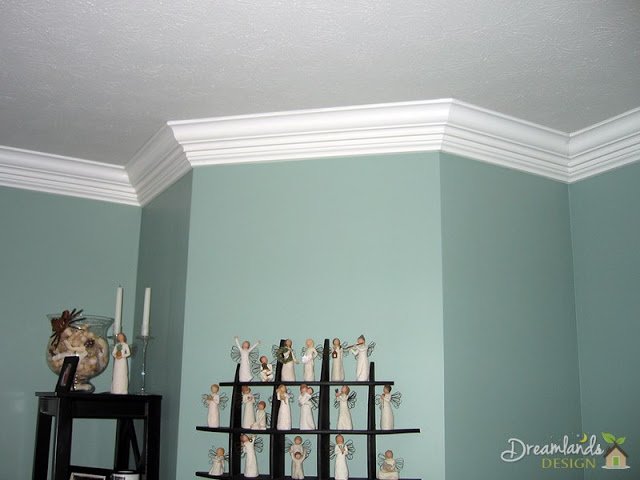
The best part of the installing crown molding project is that it is now done. The results are great. It looks like the crown molding has been there all along, and really provides some nice architectural detail for the room. The do it yourself projects wasn’t overly difficult. It just took patience and a tolerance for having the house and garage in disarray for about a week.
The total bill for the project was probably about $250 which included molding, paint, screws, caulk, book, angle measuring tool, etc. It will probably be a bit before I do another room, as I want to let the memories of coping corners fade a bit, but I wouldn’t hesitate.
Glass partitions and doors bring a gloss and style to virtually any interior, from minimalistic…
Managing residential properties is integral to real estate as it ensures that the investment is…
Explore top bathroom taps: mixer, automatic & single-lever faucets. Upgrade for style & efficiency with…
Low water pressure in the house can be more than just a minor inconvenience; it…
Crowdfunding is a busy world, and an attractive video can make all the difference between…
Find the ideal prayer mat for a deeper spiritual experience with our guide on materials,…