Dream Lands Design
  • Home Improvement
    • DIY
    • Remodeling
    • Woodworking
    • Accessories
    • Home Design
      • Furniture
      • Organize
      • Tips
      • Decor
        • Interior
        • Exterior
  • Design Ideas
    • Bathroom
    • Bedroom
    • Dining Room
    • Living Room
    • Kitchen
  • Gardening
    • Backyard
    • Front Yard
    • Landscaping

Categories

  • Accessories
  • Backyard
  • Bathroom
  • Beauty
  • Bedroom
  • Cars
  • Decor
  • Design Ideas
  • Dining Room
  • DIY
  • Entertaining
  • Exterior
  • Finance
  • Front Yard
  • Furniture
  • Gardening
  • Green Living
  • Home Design
  • Home Improvement
  • Interior
  • Kitchen
  • Landscaping
  • Lifestyle
  • Living
  • Living Room
  • Organize
  • Photography
  • Real Estate
  • Remodeling
  • Tips
  • Uncategorized
  • Wall Improvement
  • Woodworking

Archives

  • March 2023
  • February 2023
  • January 2023
  • December 2022
  • November 2022
  • October 2022
  • September 2022
  • August 2022
  • July 2022
  • June 2022
  • May 2022
  • April 2022
  • March 2022
  • February 2022
  • January 2022
  • December 2021
  • November 2021
  • October 2021
  • September 2021
  • August 2021
  • July 2021
  • June 2021
  • May 2021
  • April 2021
  • March 2021
  • February 2021
  • January 2021
  • December 2020
  • November 2020
  • October 2020
  • September 2020
  • August 2020
  • July 2020
  • June 2020
  • May 2020
  • April 2020
  • March 2020
  • February 2020
  • January 2020
  • December 2019
  • November 2019
  • October 2019
  • September 2019
  • August 2019
  • July 2019
  • June 2019
  • May 2019
  • April 2019
  • March 2019
  • February 2019
  • January 2019
  • December 2018
  • November 2018
  • October 2018
  • September 2018
  • August 2018
  • July 2018
  • June 2018
  • May 2018
  • April 2018
  • March 2018
  • February 2018
  • January 2018
  • December 2017
  • November 2017
  • Privacy Policy
  • Terms of Use
  • Disclosure
  • Sitemap
  • Contact Us
29K
98K
0
Dream Lands Design
  • Home Improvement
    • DIY
    • Remodeling
    • Woodworking
    • Accessories
    • Home Design
      • Furniture
      • Organize
      • Tips
      • Decor
        • Interior
        • Exterior
  • Design Ideas
    • Bathroom
    • Bedroom
    • Dining Room
    • Living Room
    • Kitchen
  • Gardening
    • Backyard
    • Front Yard
    • Landscaping
You're here: Home Decor Stairs Railing: Building a Staircase Railing with Balusters – Stairway Building

Stairs Railing: Building a Staircase Railing with Balusters – Stairway Building

  • Perla Irish
  • April 28, 2018
Total
14
Shares
1
0
13
0
0
Table of Contents Hide
  1. Installing Stair Railing
  2. Cut Railings to Fit Between Posts
  3. Layout and Cut Balusters
  4. Final Assembly
    1. Credits and Resources
  5. Building a Staircase
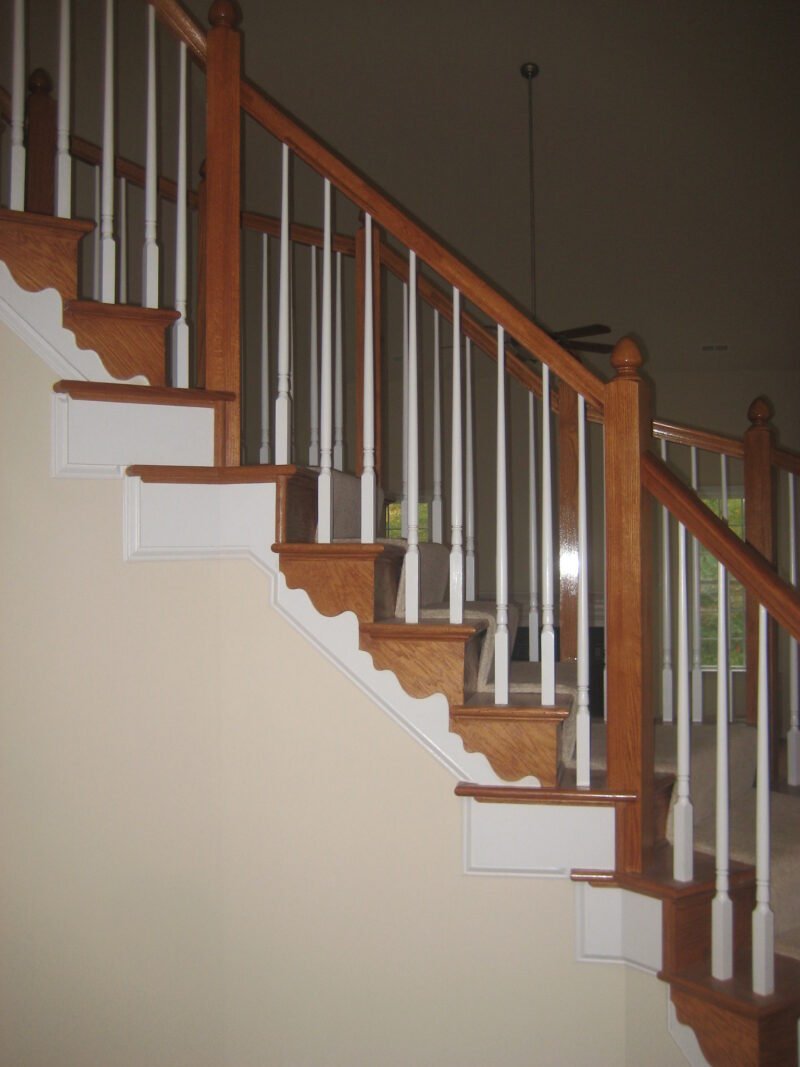
After tread and post installation, we move on to installing the railings and balusters. The railings by themselves are not that hard, but fitting the balusters and getting everything to line up is a little more difficult. Follow these steps for a successful and good looking installation.

Staircase Railings
Staircase Railings – By Brian Moloney Via (CC BY 2.0)

Installing Stair Railing

Installing a stair railing between two posts doesn’t seem that hard and it isn’t. Measure carefully, cut the right angle and screw the railing to the posts. Let’s not forget the balusters however. Every step needs at least two and some building codes require three. Let’s take a look at a stair railing installation.

Cut Railings to Fit Between Posts

Verify all your posts are plumb (vertically level). Clamp the railing to the post sides at the correct height. Make a mark on a 4-foot level at 31 1/4 inches. Stand the level at tread nose and center the bubble. The mark should align with the bottom of the railing.

Verify again that the posts are plumb and use the side of the post as a marker to scribe your cut line on the railing and use the railing to mark the bottom location of the railing on the post.

Cutting Stair Railing

Cut the railing on a miter saw but leave it slightly long. This gives you the opportunity to adjust the angle slightly if necessary and fine tune the cut until it’s perfect. Don’t force the railing to fit between posts and push them out of plumb. Adjust the railing cut to fit right and the finished job will look better.

Drill countersunk pilot holes at each end of the railing and into the post. You will have to plug these holes later. Add lag screws to hold the railing in place, but don’t sink them all the way in yet.

Layout and Cut Balusters

Layout the balusters on the steps so they are evenly spaced on each step and from one step to the next. Don’t forget about the tread overhangs as they can get in the way if you’re not careful. To be consistent, mark a small board with the baluster locations for one step and use it to mark all the steps. Mark the baluster locations on each step on a line centered on the newel posts.
Balusters
Balusters

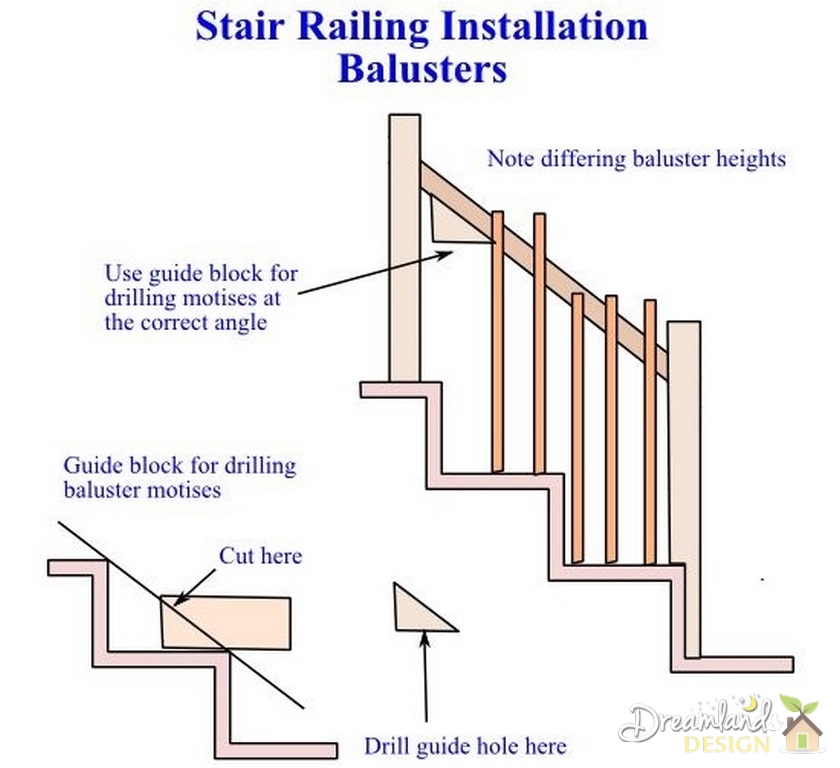
Transfer the baluster locations to the railing with a level. Place the edge of the level at the mark on the tread, center the bubble and mark the railing side. Make a guide block as shown for drilling the baluster mortises in the railing and drill all the mortises in both the railing and the steps. If the tenons that fit into the tread or railing are square, use a chisel to square the holes. Number each mortise in the steps.

Each of the balusters on a step is a different length and lengths may vary slightly between steps. Each baluster must be measured, cut to fit and numbered so it is put in the right location. Cut all the balusters and fit them into place under the railing. Verify the railing is not bowed, the balusters all fit and everything looks good. Take your time–this is your chance to fix problems before the final assembly.

Final Assembly

A helper will make this part easier. Being quick is important, but so is being accurate. Disassemble the test fit railing from the balusters and the newel posts. Place a dollop of construction adhesive in the baluster mortise on each step, but not the railing. Spread a small amount of adhesive on the tenon of each baluster and set it into the hole–match the balusters to the correct holes using the numbers and immediately wipe up any adhesive that squeezes out.

Apply yellow wood glue to the ends of the railing. Set the railing loosely on the newel post tenons and begin fitting the baluster tenons into the railing mortises beginning at one end and working towards the other. After you fit all the balusters into the railing, look over the installation to make sure it looks good. This is your last chance to make any adjustment before the adhesive sets.

Make sure the balusters are aligned on the centerline on each step. Balusters with square bottoms and round tenons may not be square to each other or centered correctly–rotate them to make them square or center them. Look for and wipe glue squeeze out you may find.

Plug the screw holes with matching wood plugs and cut off the ends. Give everything a final sanding and the stair railing installation is ready for finishing with stain.

Credits and Resources

  • Photo of Staircase Railing by Crown Molding at Flickr.com: https://www.flickr.com/photos/crown_molding/5569970548

Building a Staircase

A staircase can be the focal point of a room or entryway and you want to show it off. Architects often place the main stairway of a home near the main entrance so it can be seen. With patience and attention to detail, you can build your own finely crafted staircase yourself.

  1. Stairway Building
  2. Building a Staircase: How to Install Stair Treads
  3. Installing Posts for a Staircase Balustrade
  4. Building a Staircase Railing with Balusters
  5. Add a Landing to Existing Stairs
Total
14
Shares
Share 1
Tweet 0
Pin it 13
Share 0
Share 0
Related Topics
  • building
  • construction
  • cottage
  • deck
  • materials
  • patio
  • renovation
  • staircase
  • stairways
  • storage
  • woods

Subscribe

Subscribe now to our newsletter

You May Also Like
Featured image - Pest Control Methods and Management by Las Vegas Exterminators
View Post

Pest Control Methods and Management by Las Vegas Exterminators

  • March 26, 2023
featured image - 7 Things You Need to Know about Long-distance Moves
View Post

7 Things You Need to Know about Long-distance Moves

  • March 25, 2023
featured image - Types of Home Loans
View Post

Types of Home Loans

  • March 25, 2023
featured image - Happy Hosting: 6 Things Guests Wish You Had in Your Airbnb
View Post

Happy Hosting: 6 Things Guests Wish You Had in Your Airbnb

  • March 25, 2023
featured image - The Benefits of Installing a Water Filtration System with the Help of a Plumber in Point Cook
View Post

The Benefits of Installing a Water Filtration System with the Help of a Plumber in Point Cook

  • March 24, 2023
How to Save Money and Streamline Operations on Next Construction Project
View Post

How to Save Money and Streamline Operations on Next Construction Project

  • March 23, 2023
Featured image - New Country? Home Moving and Remodeling Tips
View Post

New Country? Home Moving and Remodeling Tips

  • March 23, 2023
featured image - Efficient and Effective The Advantages of Trusting Experts for Residential Window and Door Repairs
View Post

Efficient and Effective: The Advantages of Trusting Experts for Residential Window and Door Repairs

  • March 23, 2023
1 comment
  1. Ashley Maxwell says:
    August 10, 2017 at 11:28 pm

    Thanks for your comment on how balusters help the staircase stay lined up. I didn’t know that architects normally put the grand stairway near where you normally enter your home. I loved your tips, and since my husband and I work all day, we will most likely look into finding a professional to install new stairs and balustrades in our main foyer.

    Reply

Leave a Reply Cancel reply

Your email address will not be published. Required fields are marked *

This site uses Akismet to reduce spam. Learn how your comment data is processed.

Dream Lands Design
  • Privacy Policy
  • Terms of Use
  • Disclosure
  • Sitemap
  • Contact Us

Input your search keywords and press Enter.

Add Dream Lands Design to your Homescreen!

Add