
Table of Contents Show
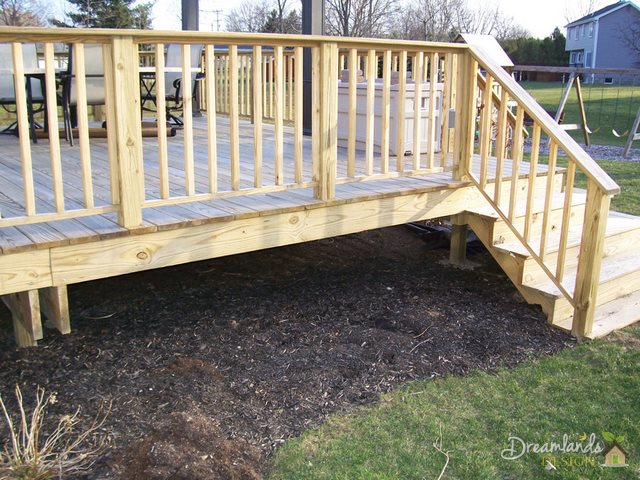
We decided to tackle an annoying outdoor project before we could have any fun. Since building our deck last year, various animals have discovered our deck as the ideal spot to hang out. We’ve unknowingly given shelter to a family of robins, a rabid possum, moles, mice, and bunnies.
To reclaim our backyard from the wild kingdom, we opted to install skirting around the pressure-treated wood deck. Additionally, we believed that skirting would enhance its overall appearance.
In this blog post, we’ll share the decisions we made and the steps we took to accomplish this simple backyard project.

Key Takeway: Installing skirting around your deck not only hides the unsightly space underneath but also helps keep critters out. It’s a simple DIY project that can significantly improve the look and functionality of your outdoor space. So, let’s dive in and see how we tackled this task!
The Shopping Trip
Day 1
We took some measurements of the pressure-treated deck skirting and made a quick napkin sketch to take to Lowes for some ideas. The maximum height of the pressure-treated deck skirting from the top to the ground was around 32″.
We headed first to the lumber department to check out the lattice. Our initial thought was that lattice could be an easy solution, yet practical considerations quickly emerged. The holes in the lattice would be big enough to allow mice, moles, and eager birds through them. This just wouldn’t do.
To evaluate alternatives, we costed out the number of board feet it would take to use pressure-treated deck skirting boards instead. The resulting estimate nearly gave us a heart attack due to its high cost.
Our epiphany came in the garden department where we found stacks of Dog-Ear Wood Fence Board. This material is rough cut and primarily intended for fences but seemed like a perfect fit for our needs. Here are some key advantages:
- Thin Profile: The thinness of the wood fits nicely under the overhang of the pressure-treated deck skirting boards.
- Cost-Effective: At $1.69 for 6′ boards, we figured we could get 2 slats per board.
Calculations then showed that it would take about 70 boards to face the entire deck, costing just under $120.

Next, we needed to determine how to securely attach the slats along the ground. I ended up with a very simple idea: staking 2×4′s horizontally into the ground. For this purpose, I purchased (6) 12′ 2×4′s.
To provide one more critter barrier, I thought installing a bit of stone beneath the skirt might frustrate those trying to dig under the skirt. For this, we bought:
- 20 bags of drainage rock
Luckily, screws were not something I needed to purchase because we had an ample supply of FastenMaster Deck screws left over from building our kids’ playset. These screws feature square heads and are corrosion-resistant, making them suitable for use with pressure-treated wood deck skirting.
This shopping trip laid a solid foundation for our DIY project, ensuring we had all materials on hand before starting construction.
Figuring out the Technique
Day 2
The first real day of construction took the longest because I needed to build the base plate into which we would fasten the bottom of the skirt. This required meticulous planning and precise measurements. Using my chop saw, I first cut 18″ stakes to drive into the ground.

I used a plumb line to establish the face of the skirting and left 1.5″ of space behind the plumb line for the 2×4 to fit securely. The plumb line ensured that everything would be straight and true, which is crucial for a professional-looking finish.
After pounding the stakes in with a sledgehammer, I put stone underneath where the base plate would be attached. This stone layer serves multiple purposes:
- Drainage: Helps prevent water accumulation that could lead to wood rot.
- Stability: Provides a solid foundation for the base plate.
Then, I attached the base plate to the stakes, ensuring it was level and securely fastened.

With the base plate in place, we were able to begin installing the skirting. We started under the stairs; working our way from the most complicated end to the least. Under the stairs, we had to notch some boards to match the rise and run perfectly.
The length of the skirt boards varied slightly as the distance between the top of the pressure-treated deck skirting and the ground changed. We butt each board against one another, knowing that as they dry they will shrink slightly, creating natural gaps for ventilation.
At one point, there appeared to be a tilt to the boards left to right, so we began using our level more frequently to ensure each board was true and aligned properly.
By the end of this meticulous first night, I had completed part of one side—a rewarding start despite its challenges.
Getting in a Rhythm to Finish the Job
Day 3
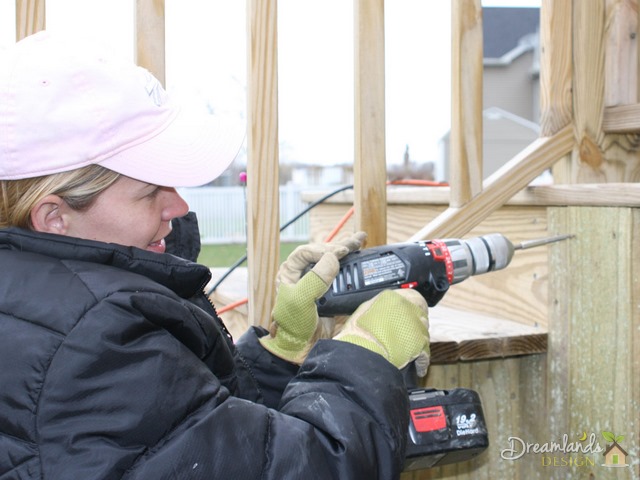
The third day was a Saturday, so we could count on a full day of work. We set up our worksite with an electric drill for pilot holes and a cordless drill to drive the screws. Having a well-organized workspace helped us maintain efficiency and reduce downtime.
Tricia could bark the lengths of the boards to me for cutting while she was installing the boards. This system allowed us to keep a steady pace, minimizing interruptions. We made it through two sides of the project before we couldn’t bend over anymore due to fatigue.

By the end of Day 3, we were beginning to see significant progress. The skirting added a polished look to the deck, making all our hard work feel worthwhile.
Day 4
On Day 4, we rounded the last corner of the 20×25′ deck and installed the final board. Completing this last section felt incredibly satisfying. To ensure no animals would get through our fortress, we plugged up any small holes between the skirt and the house with foaming insulation.
Key Steps Taken:
- Measured and Cut Boards: Tricia called out measurements while I cut each board.
- Installed Boards: We used both electric and cordless drills for efficiency.
- Secured Final Section: Ensured no gaps by using foaming insulation around potential entry points.
Overall, we are very pleased with the project. It was straightforward, simple carpentry with very few challenges. The skirt makes the DIY pressure-treated wood deck skirting ideas look clean and finished. We will give the wood a year to rest before we seal it.
Bonus: Finishing our Deck With Paint
We thought it was a brilliant idea to paint our old deck.
As you probably know, painting is preferred over other finish options like staining or using a sealer. Painting can provide a more uniform and vibrant look, which is especially beneficial for older decks showing signs of wear and tear. And since our deck wasn’t that new, we picked the best deck paint for old wood to make our deck look better.
Steps We Took to Paint Our Deck
1. Cleaning the Deck:
- Before applying the paint, we had to clean the deck thoroughly. This involved removing any dirt, debris, and old peeling paint.
- We used a combination of a pressure washer and a deck cleaner solution to ensure all grime was removed.
2. Sanding:
- After cleaning, we lightly sanded the surface to smooth out any rough spots and ensure better paint adhesion.
- A fine-grit sandpaper worked well for this step.
3. Priming:
- For older wood, it’s crucial to apply a primer before painting. This helps seal the wood and provides a good base for the paint.
- We chose a high-quality exterior primer suitable for wood surfaces.
4. Painting:
- Once primed, we applied the first coat of deck paint using both brushes and rollers for even coverage.
- After allowing ample drying time as per manufacturer instructions, we applied a second coat for durability and color depth.
Why Choose Paint Over Stain or Sealer?
- Durability: Paint offers better protection against UV rays and moisture compared to stains or sealers.
- Aesthetic Appeal: You can choose from various colors to match your home’s exterior or personal style preferences.
- Maintenance: Painted decks often require less frequent maintenance than stained ones.
For those looking for a more natural-looking deck, you might prefer not finishing with deck paint. Stains or clear sealers allow the wood’s natural grain to show through while still offering some protection.

The choice between paint, stain, or sealer depends on your personal preference and the specific needs of your deck. Consider factors like the look you want, how much maintenance you’re willing to do, and the weather conditions to find the best option. Regardless of the finish you choose, regular maintenance and proper application are essential for keeping your deck a beautiful and functional outdoor space for years to come.
FAQs (Frequently Asked Questions)
The DIY deck skirting project can be completed in four days, with each day dedicated to specific tasks such as measurements, construction, and finishing touches.
You will need pressure-treated wood for the deck skirt, along with tools for measuring, cutting, and possibly painting or sealing the wood.
Preparation involves thoroughly cleaning the deck to remove dirt and debris, lightly sanding the surface to smooth it out, and applying a primer especially if the wood is older.
Priming is crucial for older wood as it helps improve paint adhesion and provides an extra layer of protection against moisture and UV rays.
Painting offers better durability against UV rays and weathering compared to stains or sealers, providing enhanced protection and longevity for your deck.
On Day 3, focus on getting into a rhythm to finish constructing the deck skirting. This day allows for full-time work on the project, ensuring efficient progress.


1 comment
It’s perfect time to make a few plans for the future and it is time to be happy.
I have learn this publish and if I may just I desire to counsel you few attention-grabbing issues or tips.
Maybe you can write next articles regarding this article.
I desire to read even more issues about it!