Table of Contents Show
Ground Protection Mats make for the perfect solution to any DIY home renovation. Perhaps that’s why they’re so versatile, they’re used in various job settings.
These ground guards also keep your work areas, machinery, and the ground itself safe from any damage. Not to mention, these mats protect you from sustaining any injuries.
A heavy-duty mat may keep you safe on the job, but you should also know how to properly install it. A DIYer especially must know what they’re doing, since they’re relying on themselves to get the job done. Otherwise, you could risk having your equipment break down or worse, knock your back out.
By using a trusted supplier like Mytee Products, you’ll have all the ground protection you need. By the end of this blog, you’ll be a pro DIYer at using these mats and know how to do the following:
- Know Which Type of Mat to Use
- How To Prep the Ground for Installation
- How To Secure Your Mats
- Why You Need to Maintain Your Mats
The Tools You’ll Need
- Ground protection Mats: These HDPE ground protection mats come pretty durable, and are strong enough to protect your materials as well as the ground. Some mats even promote grass growth while you work.
- Measuring tape: Before installing your mats, you’ll need to use a measuring tape to determine how big of a workspace you have. The bigger the area, the more mats you’ll need.
- Marking Paint: Similarly, marking paint can be used to help you plan the layout of the mat. You need to know where and how you want your mat placed before installing it.
- Rubber Mallet: Oddly enough, a rubber mallet can be useful in installing mats by locking them in place. Using the mallet, give your mats a firm tap, securing them in place, and making sure they’re anchored to the ground.
- Work Gloves: To add even more protection, make sure you have your best pair of work gloves. You wouldn’t want to injure yourself while installing these mats.
Before Placing Your Mats Over the Ground
Have A Plan
Installing your mats may sound like an easy enough job. However, there are a few steps you have to take into consideration. One of the most important steps includes planning the layout of the mats.
Knowing how and where you plan to place your ground guards will prevent you from wasting unnecessary time. If you’re in a time crunch and have a certain deadline to meet, then you definitely want to get to work as soon as possible.
Mapping out your layout with tools like marking paint can help you determine how many mats you need and what type will best work for your DIY project.
Read Also:
Test the Ground Condition
For starters, you should check the condition of the ground you plan to work over. Some mats, like Mytee Products 3’x8’ black Ground Protection Mats, can conform to uneven terrain and create temporary access ways.
These pads are even considered to be ‘Ground Protection Mats for heavy equipment’ since they’re popular on construction sites. They’re even great to use over uneven or wet grounds at the work site.
It’s no wonder that the company has so many high-quality and affordable Ground Protection Mats up for sale. Overall, knowing the condition of the ground will help you choose the best mat for the job.
Measure the Area
In addition to testing the ground’s surface, you also want to measure your work area. First, remove any dirt or debris from the site to avoid any miscalculations of measurements.
Next, measure the size of your work area and determine the shape of it. Is it rectangular, square, or oddly shaped? This may seem silly but in actuality, it’ll help you determine how many mats you’ll need to cover the area.
The bigger your work area is, the more mats you’ll need more than likely. Even the thickness of the mats can help you determine how many mats you’ll need.
Sometimes you might even need to overlap your mats in order to provide an adequate amount of coverage. This should also be factored into your measurements as well. There might be times when you require access to the matted area as well, in which case, you should definitely measure and mark those areas.
If you’re still lost as to how many mats you’ll need, talk with the manufacturer. Ask them for suggestions about the type of mat and the quantity you need based on your measurements. As a DIYer, you can have the satisfaction of knowing how to place Ground Protection Mats yourself.
How to Install Your Mats
Prep the Ground
Prepping your ground for installation could also help protect your ground guards from any type of damage. Start by checking your work area for any potential problems like soil condition and drainage.
If you spot the latter of the two, address it immediately by creating systems like ditches or gravel beds to promote natural water runoff. Water that pools under the mat will lead to soil erosion and even make the ground unstable.
Removing debris and using a grading tool will help level out the ground as well. That way you won’t have to worry about an uneven weight distribution over your mats. Additionally, installing a Geotextile fabric under your mats can enhance the ground’s stability and avoid problems like rutting.
Putting Down Your Mats
Now that you have the prep work out of the way, you can start placing the mats down. Refer back to the manufacturer’s instructions to help you with laying out your Ground Protection Mat. Here’s a short and sweet step-by-step guide to follow:
- Place your mats down in your work area. Make sure they’re properly aligned and cover your workspace properly.
- Next, start connecting your mats together using their connectors. They must be lined up before you lock them in place with your bolts.
- Also, check for the manufacturer’s suggestions about overlapping your mats as well.
Mytee Products Ground Protection Mats come with the reassurance that they can protect your work area. They can be easily installed and removed without breaking a sweat.
More importantly, their sizes, such as the 2’ x 8’ mat, and a relative 0.5” thickness, make them perfect for providing optimal coverage over your work area.
Their high-density polyethylene material even makes them strong enough to support heavy machinery and prevent soil compaction at the same time. The company’s mats are basically designed to handle any DIY project you throw at it.
What If I Need to Use More Mats?
Keep in mind that the size of your work area often determines how many mats you’ll need to use. You may find yourself needing additional mats to help better protect your lawn.
Simply place your new pads down, line them up with the others, find out where they met up, and start connecting them with their connectors. In some instances, you may have to purchase the mats and connectors separately.
Lucky for you, Mytee Products’ mat bundle packs come ready-made with connectors. Their industrial ground protect mats offer both double and single connectors, depending on the type of project you’re working on.
Simply line up your additional mats with the others and place your connectors on the bottom and top ends. Make sure everything is lined up before you start bolting down your mats. Otherwise, you could end up with crooked mats and insufficient coverage.
Not to mention, the trusted supplier’s Ground Protection Mats offer a unique interlocking system that separates them from those other guys. It allows the mats to form one long and secure platform to walk along.
Also, it enhances stability and prevents any type of shifting while you work on your home project. You can’t go wrong with this ecommerce trucking company.
Lock Those Mats into Place
The final step in preparing your worksite is making sure that the mats are secure. Ensuring that your ground guards are firmly in place will help prevent them from shifting. An unstable platform can lead to a fatal accident or even destroy your garden bed.
In some cases, you might even need to add another layer of security with various accessories, such as rubber mallets. As previously mentioned, this hammer-like tool can secure your mats with a firm tap and anchor them down to the ground.
Mytee Products offers a wide variety of hardware to help secure their Ground Protection Mats. These include their 2-Way Single and 4-Way Double Connectors and Outrigger Pads. Of course, the connectors will ensure that your mats remain connected throughout the job.
However, our Outrigger Pads make the mats that much more secure and stable to traverse along. Using accessories like these in conjunction with your heavy-duty mats can help you get your landscaping project done in no time.
Double-Check Your Work
You might be eager to start working on your home renovation right now. Fortunately, you just have one more step to complete before getting started: double-check the installation of your mats. The last thing you want is to have your mats shift, slide, bend or even break halfway through your renovation.
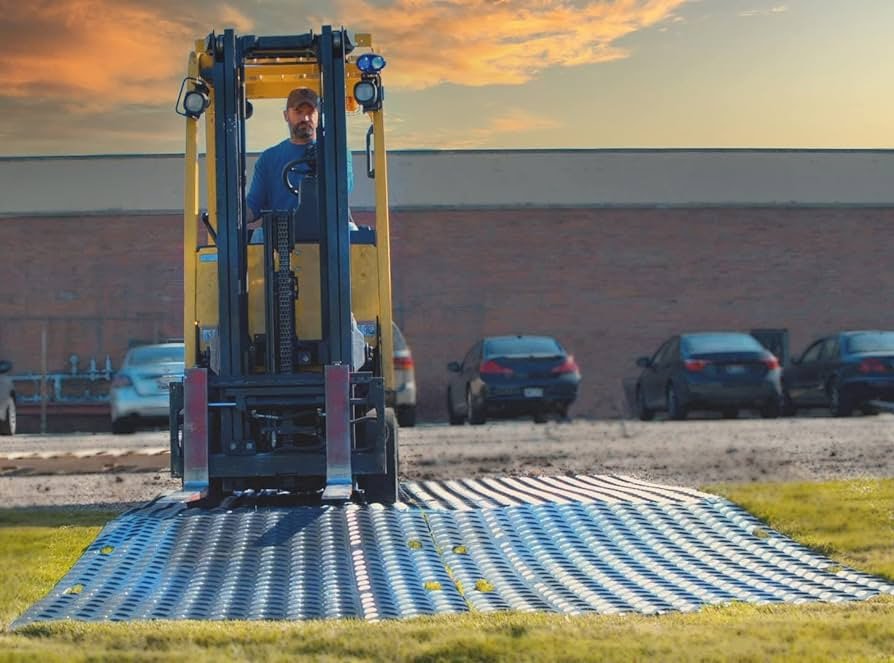
Perform a test and drive your Bobcat onto the mats to eliminate any potential issues. If your mats can support the weight of your equipment without breaking under pressure, then they’ve passed the test. Now you can get to work.
Some Maintenance Tips to Keep in Mind
Ensuring that your mats are in good condition before and after the installation process is also important. Like your car, mats need a “tune-up” every now and then. Sweeping, using a pressure washer and mild detergent can keep them looking pristine with each use.
A damaged mat, however, will either require patchwork or a replacement. If you find yourself doing the latter of the two, don’t worry. The neat thing about using a Ground Protection Mat is that you won’t go broke buying replacements within a year.
Mytee Products’ mats are no different. Their ground guards can be cleaned with a little detergent and water. Additionally, you can store them away in a cool and dry storage area to prevent them from sustaining any damage. More importantly, you’ll promote their longevity.
Protecting Your Ground with A Sense of Confidence
Properly placing your mats over your work area will ensure that you get your job done right. Mapping out the layout of your mats, prepping the ground for installation, and how to secure your mats will help you establish a stable working area.
With Mytee Products’s mats, you’ll especially have the promise of working over a secure platform. You want a product that can support the weight of your machinery. As a do-it-yourselfer, you want to pay for a product that’ll make your job easier, not harder. Not to mention, you take pride in the work you’ve done.