Dream Lands Design
  • Home Improvement
    • DIY
    • Remodeling
    • Woodworking
    • Accessories
    • Home Design
      • Furniture
      • Organize
      • Tips
      • Decor
        • Interior
        • Exterior
  • Design Ideas
    • Bathroom
    • Bedroom
    • Dining Room
    • Living Room
    • Kitchen
  • Gardening
    • Backyard
    • Front Yard
    • Landscaping

Categories

  • Accessories
  • Backyard
  • Bathroom
  • Beauty
  • Bedroom
  • Cars
  • Decor
  • Design Ideas
  • Dining Room
  • DIY
  • Entertaining
  • Exterior
  • Finance
  • Front Yard
  • Furniture
  • Gardening
  • Green Living
  • Home Design
  • Home Improvement
  • Interior
  • Kitchen
  • Landscaping
  • Lifestyle
  • Living
  • Living Room
  • Organize
  • Photography
  • Real Estate
  • Remodeling
  • Tips
  • Uncategorized
  • Wall Improvement
  • Woodworking

Archives

  • February 2023
  • January 2023
  • December 2022
  • November 2022
  • October 2022
  • September 2022
  • August 2022
  • July 2022
  • June 2022
  • May 2022
  • April 2022
  • March 2022
  • February 2022
  • January 2022
  • December 2021
  • November 2021
  • October 2021
  • September 2021
  • August 2021
  • July 2021
  • June 2021
  • May 2021
  • April 2021
  • March 2021
  • February 2021
  • January 2021
  • December 2020
  • November 2020
  • October 2020
  • September 2020
  • August 2020
  • July 2020
  • June 2020
  • May 2020
  • April 2020
  • March 2020
  • February 2020
  • January 2020
  • December 2019
  • November 2019
  • October 2019
  • September 2019
  • August 2019
  • July 2019
  • June 2019
  • May 2019
  • April 2019
  • March 2019
  • February 2019
  • January 2019
  • December 2018
  • November 2018
  • October 2018
  • September 2018
  • August 2018
  • July 2018
  • June 2018
  • May 2018
  • April 2018
  • March 2018
  • February 2018
  • January 2018
  • December 2017
  • November 2017
  • Privacy Policy
  • Terms of Use
  • Disclosure
  • Sitemap
  • Contact Us
29K
98K
0
Dream Lands Design
  • Home Improvement
    • DIY
    • Remodeling
    • Woodworking
    • Accessories
    • Home Design
      • Furniture
      • Organize
      • Tips
      • Decor
        • Interior
        • Exterior
  • Design Ideas
    • Bathroom
    • Bedroom
    • Dining Room
    • Living Room
    • Kitchen
  • Gardening
    • Backyard
    • Front Yard
    • Landscaping
You're here: Home Design Ideas How to Add an Interior Wall into Your House: Interior Design Styles

How to Add an Interior Wall into Your House: Interior Design Styles

  • Perla Irish
  • May 1, 2018
Total
1
Shares
1
0
0
0
0
Table of Contents Hide
  1. Design Aspects of a Non-Bearing Interior Wall Partition
  2. Layout Process and Structural Considerations
  3. Framing and a Note on References
    1. References
Interior Design Styles – Learn how to build an interior wall in three distinct steps involving design, layout, and interior wall framing. Do not, however, use this general guide to replace a load-bearing wall, as the structural requirements are different.
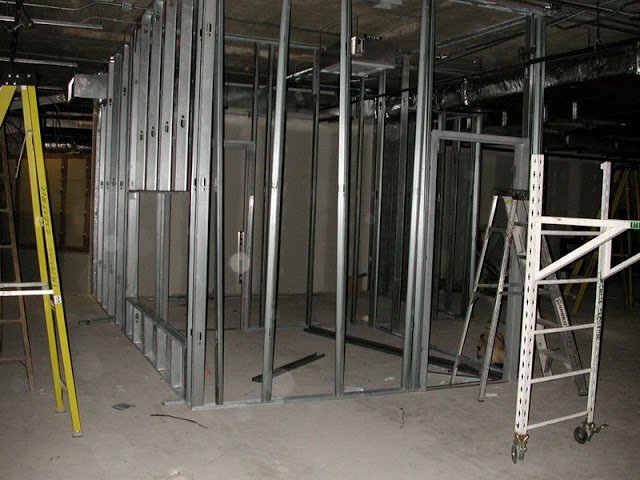
Light gage metal framing
Metal Framing

Design Aspects of a Non-Bearing Interior Wall Partition

The first consideration in adding an interior wall to your house involves the design. This includes considerations of both what is functional, and what is acceptable, especially when building a partition wall to create a separate room. Generally, no room should be less than seven feet by ten feet in dimension, except for bathrooms and kitchens.

This type of project will also usually require a permit. If one is needed, an owner’s permit may be an option, as long as plans are drawn to a standard ¼” scale, and the necessary knowledge can be demonstrated. It is also generally a requirement that licensed contractors perform electrical and plumbing installations, if such are necessary.

Asides from code considerations, functionality should also be kept in mind. Visualize the project, and consider the possible changes to the general path of movement within the home.

Layout Process and Structural Considerations

The layout process consists of marking out the location for the interior wall framing, starting with the bottom and top tracks or plates, depending on wood or steel framing as the material choice. Wood may prove to be a more forgiving material for most DIY projects, although metal framing is fast and efficient, provided that one has the tools and the ability to use the material. If using metal studs, the process is similar, aside from different requirements for fastening.

When working perpendicular to ceiling joists, the top plate (2” x 4”) can be attached to each joist. When working parallel to joists, then it may be necessary to install wood supports between joists to be able to fasten the top plate, unless the wall will be directly aligned with the joist. Measure from a point of reference, and mark the location of the top plate in the desired location with a pencil at several intervals, or at least at both ends of the wall, and use a chalk line to mark the layout.

Bear in mind that the ends must also be attached to any existing wall, and that the wall you are planning to build should be as close to a 90 degree angle with a connecting wall as is possible, excepting any special designs.

Use a plumb bob, or a piece of 2” x 4” and level, to mark the place for the bottom plate location, and make sure that there are adequate supports to attach it to, if the subfloor is wood construction. If not, then support needs to be added. In the case of a concrete slab, a pressure treated 2” x 4” should be used, and fastened to the concrete with appropriate fasteners. Use a chalk line to mark this layout as well.

Framing and a Note on References

Attach the top and bottom plates first according to specifications, and then the end studs. Pick one end, and measure 16” or 24” (whichever spacing is required, depending on what the wall-covering will be) from the inside or outside edge, and mark the location of the next stud. Make sure that the next stud follows the measurement according to the inside or outside edge, whichever you measured from. 

Always double-check that each stud is at the specified distance apart, which should be either 16” or 24” on-center. These should be cut so that they fit snugly between the bottom and top plates, and toe-nailed according to specifications, generally four 16d nails, two from each 4” side of a stud at the top and bottom.

When planning to add a door, make sure to incorporate a door frame into the design of the wall.

There are many documents online that illustrate how to build an interior wall framing. “Details for Conventional Wood Frame Construction” published by the American Forest & Paper Association is an indispensable visual guide. The local building code should be your main reference, however.

References

  • “Details for Conventional Wood Frame Construction” American Forest & Paper Association: http://www.awc.org/pdf/codes-standards/publications/wcd/AWC-WCD1-ConventionalWoodFrame-ViewOnly-0107.pdf
  • Image Credit: Wikimedia Commons/P199: https://commons.wikimedia.org/wiki/File:Light_gage_metal_framing.JPG
Total
1
Shares
Share 1
Tweet 0
Pin it 0
Share 0
Share 0
Related Topics
  • decorate
  • house interior
  • interior design house
  • room decor ideas
  • room design

Subscribe

Subscribe now to our newsletter

You May Also Like
Featured image - What You Need to Know About Refinancing Your House
View Post

What You Need to Know About Refinancing Your House

  • February 2, 2023
Featured image - 3 Constructive Hiring Trends for Construction Managers to Try in 2023
View Post

3 Constructive Hiring Trends for Construction Managers to Try in 2023

  • February 2, 2023
Featured image - Pros of Using Cordless Vacuum Cleaner for Hardwood Floors
View Post

Pros of Using Cordless Vacuum Cleaner for Hardwood Floors

  • February 2, 2023
featured image - Create Your Sanctuary
View Post

Create Your Sanctuary

  • February 1, 2023
Fetured image - 8 Things You Can Expect When Moving to Texas
View Post

8 Things You Can Expect When Moving to Texas

  • February 1, 2023
featured image - How To Make Luxurious Bathroom Traits of James Martin Malibu Vanity 72″ Model 2023
View Post

How To Make Luxurious Bathroom: Traits of James Martin Malibu Vanity 72″ Model 2023

  • February 1, 2023
featured image - Read This Before Replacing Your Oven Light Bulb
View Post

Read This Before Replacing Your Oven Light Bulb

  • January 31, 2023
Featured image - How to Deal with Overgrown Plants: 4 Options
View Post

How to Deal with Overgrown Plants: 4 Options

  • January 31, 2023
1 comment
  1. White Oyster Interiors says:
    August 1, 2017 at 9:33 am

    Great Post…Adding a wall to an existing space is a cinch for any do-it-yourselfer who’s handy with tools.

    Reply

Leave a Reply Cancel reply

Your email address will not be published. Required fields are marked *

This site uses Akismet to reduce spam. Learn how your comment data is processed.

Dream Lands Design
  • Privacy Policy
  • Terms of Use
  • Disclosure
  • Sitemap
  • Contact Us

Input your search keywords and press Enter.

Add Dream Lands Design to your Homescreen!

Add