Table of Contents Show
Introduction
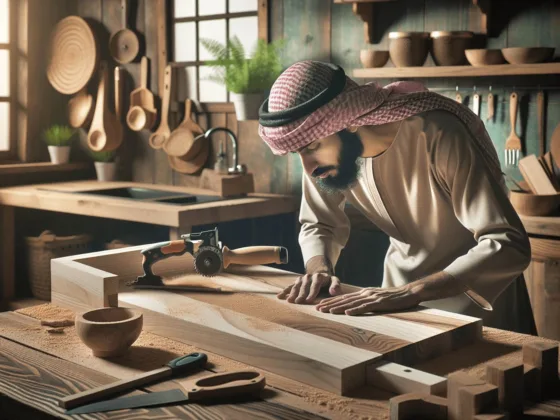
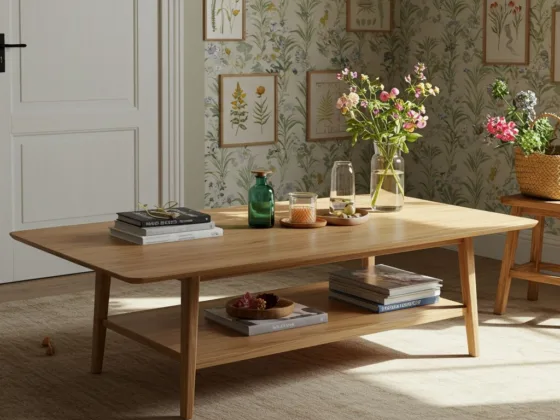
A butcher block table is more than just a functional kitchen staple. It’s a blend of durability, beauty, and practicality that brings warmth and charm to any culinary space. Building your own butcher block table can be an incredibly rewarding project, offering both a sense of accomplishment and a custom piece that perfectly fits your home.
In this guide, you’ll learn how to make a butcher block table from start to finish. We’ll cover:
- Selecting the right materials
- Essential tools and supplies
- Step-by-step instructions for assembly
- Tips for customizing and maintaining your table
This DIY project is perfect for beginners looking to add a personal touch to their kitchen decor. By following these steps, you’ll create a beautiful and functional piece that can withstand the rigors of everyday use.
Ready to get started? Dive in and discover how to build a butcher block table that will become the centerpiece of your kitchen!
Selecting the Right Materials
When it comes to selecting materials for your butcher block table, you want to ensure durability and aesthetic appeal. Consider using hardwoods like maple or oak which are known for their resilience. You could even explore some cool wood projects such as DIY wood countertops that could complement your butcher block table.
Essential Tools and Supplies
Before you begin the assembly process, it’s crucial to gather all necessary tools and supplies. Make sure you have everything from saws to sandpaper at hand for a smooth construction process.
Step-by-Step Instructions for Assembly
Now comes the fun part – assembling your butcher block table! Follow our detailed instructions carefully for the best results.
Tips for Customizing and Maintaining Your Table
Once your table is built, you might want to personalize it further or maintain its condition over time.
Remember, a butcher block table doesn’t have to be plain or unadorned. You can always consider dressing it up with some stylish table skirts which are standard furniture accessories used by catering companies and hotels. They can add a touch of elegance to any table setting.
Additionally, if you have an old card table lying around that needs a makeover, you could transform it into an entirely new piece of furniture with fitted card table covers. With just a little time invested, you can create loose or fitted covers that will give your card table a fresh look.
By following these steps, you’ll not only create a beautiful and functional piece that can withstand the rigors of everyday use but also have the opportunity to explore other exciting DIY projects related to home decor!
Understanding Butcher Block Tables
Definition and Purpose of a Butcher Block Table
A butcher block table is a sturdy and versatile surface commonly used in kitchens for food preparation. Its design involves gluing together small, individual wood strips to create a thick, solid surface. This construction method not only enhances the table’s durability but also provides a unique aesthetic appeal that can complement any kitchen decor.
Types of Butcher Block Surfaces
When considering butcher block design options, understanding the differences between end-grain and side-grain surfaces is crucial:
End-Grain Surface
Construction: Made by arranging the ends of wood strips upright.
Pros:
- Extremely durable and resilient to knife marks.
- Gentle on knife edges, reducing wear.
Cons:
- Typically more expensive due to labor-intensive construction.
- Requires more maintenance to keep it looking pristine.
Side-Grain Surface
Construction: Created by laying wood strips side by side with the grain running parallel to the surface.
Pros:
- Cost-effective and easier to manufacture.
- Offers a smooth and uniform appearance.
Cons:
- Less resistant to deep cuts and scratches compared to end-grain surfaces.
- May dull knives faster over time.
Benefits of Using Hardwoods
Selecting the right wood is essential when you build a butcher block table. Hardwoods like beech and hard maple are highly recommended for several reasons:
- Durability: These woods are dense and robust, making them perfect for high-use surfaces like kitchen tables or diy butcherblock desks.
- Aesthetics: Both beech and hard maple offer beautiful, natural grain patterns that can enhance the visual appeal of your kitchen space.
- Maintenance: Hardwoods are generally easier to maintain, requiring regular oiling or sealing to keep their luster and functionality over years of use.
Creating your own DIY butcher table allows you to tailor every aspect, from the type of wood used to the final finish. By understanding these fundamental elements, you’re well on your way to crafting a functional yet stylish piece that will stand the test of time.
Moreover, it’s important to note that butcher blocks are made with tiles of different hardwood glued together for a reason – this construction method not only provides durability but also adds versatility in terms of design and functionality.
Selecting Materials for Your Butcher Block Table
Choosing the right wood is crucial when aiming to build your own butcher block table that is both durable and aesthetically pleasing. Here are some key recommendations and considerations for selecting the best wood for a butcher block table.
Recommended Woods
Two popular choices stand out:
- Maple: Known for its hardness and fine grain, maple is a top pick. It’s resilient to wear and tear, making it ideal for kitchen use.
- Walnut: Offers a rich color and smooth texture. While slightly softer than maple, walnut’s beauty makes it a favored choice for those looking to add elegance to their homemade butcher table.
Factors to Consider
When selecting the wood, consider these essential aspects:
Grain Orientation:
- End-Grain: Provides a self-healing surface as the fibers absorb cuts. Ideal for heavy-duty chopping.
- Side-Grain: Easier to construct but may show knife marks more prominently over time.
Wood Toxicity:
- Some woods can be toxic or cause allergic reactions. Avoid species like yew or laburnum. Instead, opt for non-toxic hardwoods such as beech or hard maple.
Overview of Adhesives
Using the right adhesive ensures your butcher block table remains sturdy and long-lasting:
- Titebond II: A popular choice among woodworkers due to its strong bond and water-resistant properties.
- Epoxy: Offers excellent gap-filling capabilities, making it suitable for less-than-perfect joints.
When assembling your materials, remember these points to make sure you craft a butcher block table that stands the test of time both in function and form.
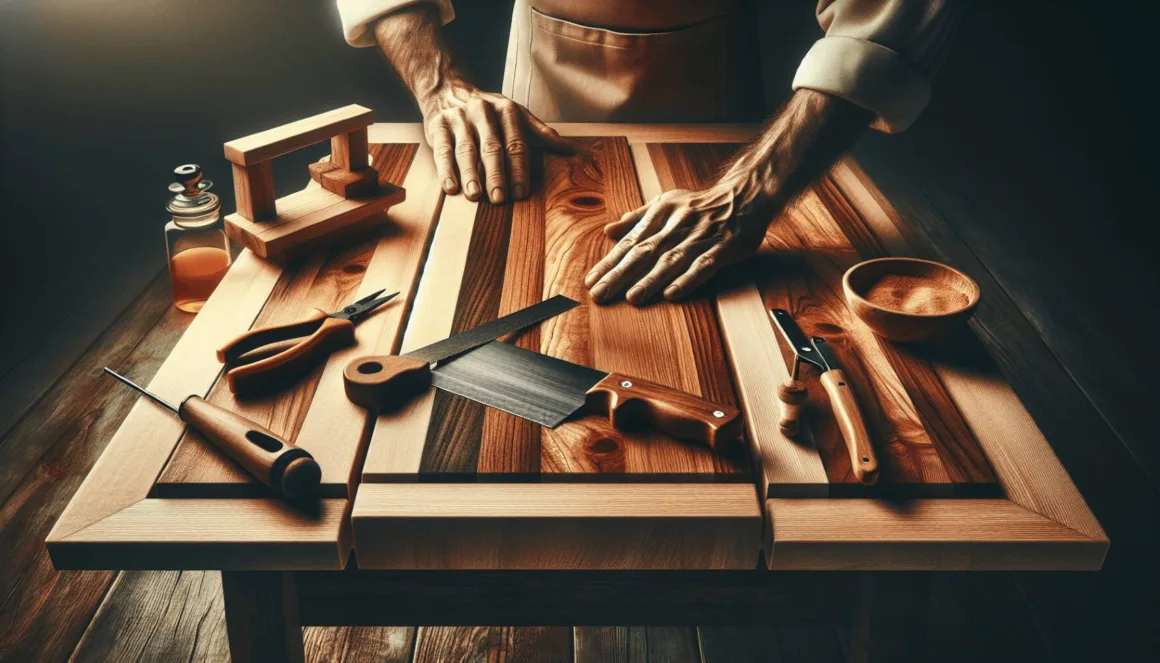
In addition to selecting the right materials, it’s also important to understand that woodworking can be beneficial, providing numerous advantages beyond just creating furniture. To successfully turn these raw materials into a beautiful piece of furniture, you will need some specific tools. Here are some essential woodworking tools every woodworker needs that will help you complete your carpentry projects with ease.
Essential Tools and Supplies Needed
Creating a stunning butcher block table requires having the right tools and materials on hand. Here’s a detailed list of what you’ll need to embark on your DIY butcher block countertop project.
Tools Required
1. Saws:
- Skill Saw: Perfect for making rough cuts.
- Miter Saw: Ideal for precise, angled cuts.
2. Clamps: Necessary for holding wood pieces together while the glue dries.
3. Sanders:
- Orbital Sander: For smoothing the surface.
- Sanding Block: Handy for finer details and edges.
4. Measuring Tools:
- Tape Measure
- Carpenter’s Square
5. Drill and Bits: Essential for attaching legs and any other hardware.
6. Safety Gear:
- Safety Glasses
- Ear Protection
- Dust Mask or Respirator
Materials Needed
- Wood Boards: Choose hardwoods like maple or walnut for durability and beauty.
- Glue: High-quality wood glue such as Titebond II or epoxy, ensures strong joints.
- Finish Products: Wood Oil or Varnish: Protects and enhances the wood’s natural beauty.
- Sandpaper: Various grits (80, 120, 220) for sanding down surfaces smoothly.
Safety Tips
Working with power tools can be dangerous if proper precautions aren’t taken:
- Always wear safety glasses to protect your eyes from flying debris.
- Use ear protection to prevent hearing damage from noisy tools like saws and sanders.
- A dust mask or respirator is crucial when sanding to avoid inhaling fine wood particles.
Following these guidelines ensures you have a safe and enjoyable experience while building your own butcher block table. With the right tools and materials ready, you’re well-equipped to move on to the next step in creating a beautiful piece of furniture for your home.
For beginners who are just starting their woodworking journey, it’s essential to familiarize yourself with some basic principles. You might find our beginner’s guide to must-have basic tools for woodworking helpful. It provides a comprehensive overview of the necessary tools you’ll need.
Additionally, understanding some woodworking techniques & tips can significantly boost your efficiency in this craft. We also recommend reading up on woodworking safety tips every woodworker should know to ensure a safe working environment.
Lastly, don’t forget about these invaluable woodworking tips and tricks for beginners that can help you navigate through your initial projects with ease and confidence.
Step-by-Step Guide to Building a Butcher Block Table
1. Preparing the Wood Boards
Accurate preparation of your wood boards is essential for a high-quality butcher block table. Here’s how to do it:
Selecting and Measuring Your Wood
First, choose your hardwood boards. Popular choices include maple, walnut, and beech due to their durability and aesthetic appeal. Ensure each board is straight and free from knots or defects.
- Length: Measure the desired length of your butcher block table.
- Width: Decide on the width of each strip. Common widths range between 1 to 2 inches.
- Thickness: Ensure all boards have a consistent thickness.
Cutting Wood Strips for Tabletop
Using a table saw or circular saw cut the hardwood boards into uniform strips.
- Marking: Use a pencil and measuring tape to mark where each cut should be made.
- Setting Up Your Saw: Adjust your saw’s fence to the desired width of each strip.
- Safety First: Wear safety goggles and ear protection.
- Cutting: Feed the wood through the saw slowly and steadily, keeping hands clear of the blade.
Pro Tip: If you’re unsure about using power tools, consider taking a quick safety course at your local hardware store.
Ensuring Uniformity
Uniformity in wood strips is crucial for a seamless tabletop surface.
- Calibrate Tools: Regularly check that your saw is cutting at precise angles.
- Double-Check Measurements: Measure each strip after cutting to confirm they match your specifications.
Dry Fitting
Lay out all the cut strips on a flat surface before gluing. This allows you to:
- Check for any inconsistencies in size.
- Arrange the strips in an aesthetically pleasing pattern.
- Identify any warped or defective pieces that might need re-cutting.
Dry fitting also helps visualize the final look of your butcher block table.
With your wood boards accurately prepared and uniformly cut, you’ve set the foundation for an eye-catching and durable butcher block tabletop.
2. Gluing the Strips Together
Building your own butcher block table top is a rewarding endeavor. Once you have your hardwood boards cut into uniform strips, the next step is gluing them together to form a solid and sturdy tabletop.
Arranging Your Strips
- Pattern Selection: Begin by arranging your wood strips in your desired pattern. Common patterns include alternating colors or creating a more random look. This is an opportunity to get creative and add a personal touch to your butcher block table.
- Dry Run: Before applying any glue, lay out all the strips on a flat surface as a dry run. Ensure that the edges align nicely and there are no large gaps between the strips.
Applying Glue for a Strong Bond
- Choosing the Right Glue: For best results, use high-quality wood glue such as Titebond II or epoxy. These adhesives are known for their strong bonding properties, essential for creating durable butcher block surfaces.
- Glue Application: Apply an even layer of glue along one edge of each strip using a brush or roller. Make sure to cover the entire edge without over-applying, which can cause excessive squeeze-out.
Pro Tip: To avoid glue stains on the surface, wipe away any excess immediately with a damp cloth.
Clamping and Drying
- Clamping Process: After applying glue, clamp the strips together tightly. Use bar clamps or pipe clamps spaced evenly along the length of the strips to ensure even pressure across the entire surface.
- Alignment Check: During clamping, frequently check that all edges remain flush and aligned. Adjust clamps as necessary to correct any misalignment that may occur.
- Drying Time: Allow the glued assembly to dry for at least 24 hours before removing clamps. This ensures that the glue cures completely, providing maximum strength.
Safety Tip: Always wear protective gloves when handling glue and clamps to prevent skin irritation and accidents.
Mastering this gluing process is key to learning how to build a butcher block table top that is both beautiful and functional. Proper alignment and secure bonding create a stable foundation for further steps like sanding and finishing. Keep these tips in mind as you move forward with your project.
3. Sanding and Finishing the Tabletop Surface
Creating a butcher block tabletop involves multiple steps, with sanding being crucial for achieving a smooth finish. This step ensures your table not only looks professional but also feels comfortable to use.
Steps Involved in Sanding
1. Initial Sanding:
- Begin with a coarse-grit sandpaper (around 60-80 grit).
- Use an orbital sander to evenly sand the entire surface.
- Focus on removing any glue residue and leveling out uneven edges from gluing the strips together.
2. Progressive Sanding:
- Gradually move to finer grit sandpapers (120, 180, and then 220 grit).
- Each pass should smooth out scratches left by the previous grit.
- Ensure you cover all areas uniformly to avoid any dips or high spots.
3. Edge and Corner Sanding:
- Hand-sand the edges and corners using a sanding block.
- This step helps in rounding off sharp edges, making your tabletop safer and more comfortable to use.
Finishing Touches
Once your surface is perfectly smooth, it’s time to apply the finishing touches:
1. Cleaning:
- Wipe down the entire tabletop with a damp cloth to remove dust particles.
- Allow it to dry completely before moving on to the next step.
2. Applying Finish:
- Choose a food-safe finish like mineral oil or beeswax if you plan to use the table for food preparation.
- For a more durable finish, consider polyurethane or varnish.
3. Application Process:
- Apply the chosen finish using a clean cloth or brush, following the wood grain direction.
- Let it soak in as per the manufacturer’s instructions before wiping off any excess.
- Repeat this process until you achieve your desired level of protection and sheen.
4. Buffing:
- Once the final coat is dry, lightly buff the surface with a fine steel wool pad for an extra smooth feel.
By following these steps, you’ll create a beautifully finished butcher block tabletop that’s ready for any kitchen task. Make sure each phase is done meticulously to ensure durability and aesthetic appeal.
4. Attaching Legs and Completing Assembly Process
Attaching legs to your butcher block table is a crucial step in ensuring it stands stable and functions effectively. Whether you opt for pre-made legs or decide to craft custom ones, securely attaching them requires some key considerations and precise techniques.
Pre-Made Legs vs. Custom-Built Legs
- Pre-Made Legs: These are widely available in various styles and materials, offering convenience and a wide range of aesthetic options.
- Custom-Built Legs: Building your own legs allows for a tailored look that perfectly complements your butcher block tabletop. This option requires additional woodworking skills but offers a unique touch.
If you’re considering making custom legs, you might want to explore the exceptional uses of a sawhorse in woodworking. A sawhorse is a beam that has four legs, and its primary use is to support a board during sawing, which can be very helpful when crafting your custom legs.
Methods for Attaching Legs
To attach the legs securely, follow these steps:
1. Positioning the Legs:
- Decide on the placement of each leg at the corners of your tabletop.
- Measure an equal distance from each edge to ensure uniform positioning.
2. Marking Drill Holes:
- Use a pencil to mark where you’ll drill holes for screws or bolts.
- Ensure these marks are centered on the width of each leg to provide maximum stability.
3. Drilling Pilot Holes:
- Using a drill bit slightly smaller than your screws or bolts, create pilot holes at each marked spot.
- This step prevents the wood from splitting when inserting screws or bolts.
4. Attaching the Legs:
- Align the legs with the pilot holes and insert screws or bolts through pre-drilled holes.
- Tighten securely using a screwdriver or wrench to ensure no wobble.
5. Adding Reinforcements (Optional):
- For added strength, consider using metal brackets or corner braces.
- Attach these reinforcements where the legs meet the tabletop for extra stability.
6. Leveling the Table:
- Once all legs are attached, place the table upright on a flat surface.
- Check for any wobbling and adjust as necessary by tightening screws or adding shims under uneven legs.
Completing this process ensures that your butcher block table not only looks fantastic but also stands firm during use. Taking time to attach the legs correctly pays off in terms of durability and functionality, making your DIY project truly rewarding.
Customizing Your Butcher Block Table Further
Personalizing your butcher block table goes beyond size variations. There are various ways to add unique design elements that reflect your style and enhance the table’s functionality.
Decorative Edges and Contrasting Wood Species
Decorative Edges:
- Chamfered Edges: Smoothing the edges slightly for a subtle touch.
- Rounded Corners: Softening sharp edges to prevent injuries and add a contemporary look.
- Beveled Edges: Creating an angled edge for a sophisticated appearance.
Contrasting Wood Species:
- Strip Patterns: Alternate strips of different wood species like walnut and maple for a striking visual effect.
- Inlays: Incorporate decorative inlays using different colored woods or even materials like resin or metal. For beginners, wood inlay techniques such as the bow tie joint can be a great starting point.
Maintaining and Restaining
Keeping your butcher block table looking fresh over time involves regular maintenance and occasional restaining. Here are some techniques to ensure longevity:
Regular Maintenance:
- Cleaning: Wipe down the surface with a damp cloth and mild soap. Avoid using harsh chemicals that might damage the wood.
- Oiling: Periodically apply food-grade mineral oil or beeswax to keep the wood hydrated and protected.
Restaining Furniture Over Time:
- Sanding: Lightly sand the surface to remove any stains, scratches, or uneven areas. Start with coarse-grit sandpaper and finish with fine-grit for smooth results.
- Staining: Choose a stain that complements your existing decor. Apply with a brush or cloth in the direction of the grain, allowing it to penetrate for several minutes before wiping off excess.
- Sealing: Once dry, seal the surface with a protective finish like polyurethane or butcher block conditioner to preserve the stain and provide durability.
Experimenting with these customization ideas will help you create a distinctive butcher block table that is not only functional but also an expression of your creativity.
Cost Considerations & Budgeting Your Project Wisely
Building a butcher block table is a rewarding DIY project, but knowing the costs involved can help you plan better and avoid surprises. Let’s dive into the estimated expenses and some budget-friendly tips for this cost-effective furniture project.
Estimating Realistic Costs
When budgeting for your butcher block table, consider:
- Wood Costs: High-quality hardwoods like maple or walnut can range from $5 to $20 per board foot. The total cost depends on the size of your table and the wood type you choose.
- Adhesives & Finishes: Wood glue (like Titebond II) costs around $10-$15 per bottle. Finishing products like mineral oil or varnish can range from $10 to $30 depending on the brand and quantity.
- Tools: If you don’t already own essential woodworking tools, these can add up. Here’s a rough estimate:
- Saws (circular saw or table saw): $50-$300
- Clamps: $10-$30 each
- Sanders: $20-$100
- Safety gear (gloves, goggles): $10-$30
- Delivery Fees: Don’t forget about potential delivery fees if ordering larger quantities online.
Budget-Friendly Tips
To keep your project cost-effective:
- Reclaimed Wood: Sourcing reclaimed wood from local sellers or second-hand stores not only cuts costs but adds unique character to your table.
- Local Lumberyards: Check local lumberyards for deals on wood offcuts or less popular species that are still durable and attractive.
- Tool Rentals: Instead of purchasing expensive tools, consider renting them from a local hardware store. This option is especially useful for tools you may not use frequently.
By planning and sourcing materials wisely, you can create a beautiful butcher block table without breaking the bank.
Conclusion: Enjoy Your Beautifully Crafted Butcher Block Table!
There’s nothing quite like the satisfaction of completing a DIY project. As you admire your beautifully crafted butcher block table, a sense of accomplishment will be evident. Imagine preparing meals right atop your own creation—it truly brings a unique joy to everyday activities.
Exploring further into woodworking can open doors to more exciting projects. Whether it’s countertops, tables, or chopping boards, the skills you’ve honed in building your butcher block table are invaluable. The same gorgeous materials and techniques can be applied to countless other items, adding a personal touch to your home. For instance, you might want to consider some of these popular countertop ideas to inspire your kitchen remodel.
Feeling inspired? Dive into more resources and guides on how to make a butcher block table and other similar projects—transforming your living space has never been more rewarding!
Ready to start another project? Keep this guide handy, embrace the creative process, and enjoy every step of crafting pieces that reflect your style and dedication. Happy woodworking!
FAQs (Frequently Asked Questions)
A butcher block table is a sturdy work surface made from hardwood, designed primarily for food preparation. Its durability and aesthetic appeal make it an essential piece in any kitchen, providing both functionality and style.
Hardwoods such as maple and walnut are highly recommended for their durability and attractive grain patterns. It’s important to consider factors like grain orientation and potential toxicity when selecting wood.
Essential tools include a skill saw, miter saw, clamps, sanders, and safety equipment. Additionally, you’ll need materials like wood boards, glue, and finishing products to complete your project.
The process involves preparing wood boards by cutting them into uniform strips, gluing them together in your desired pattern, sanding the surface for smoothness, and finally attaching legs to complete the assembly.
You can personalize your butcher block table by adding unique design elements such as decorative edges or contrasting wood species. Techniques for maintaining or restaining the table can also help preserve its character over time.
It’s important to estimate realistic costs for materials and tools needed for the project. Look for budget-friendly options such as reclaimed wood or second-hand supplies to keep expenses manageable.