
Table of Contents Show
Learning how to build DIY wood countertops for your cool wood projects not only means you have a unique worktop for your kitchen, but you can customize it according to your kitchen’s color and style, as well as save money.
Cool Wood Projects for Guys, Build Your Own DIY wood Countertops

What Wood Is Best to Build Your Cool Wood Projects?
The first “how to build” step to build your cool wood projects is finding out what wood for DIY cool wood countertops is best to use. This depends on two factors:
- The style and color of your kitchen.
- What kind of wear the DIY wood countertops are likely to receive.
The best wood for DIY wood countertops is, hardwearing, resistant to knocks, able to cope with high temperatures, and be water-resistant.
Light Color Woods for DIY Wood Countertops
- Beech is light in color and one of the cheaper options. Needs frequent oiling (every 3 months) as it doesn’t resist water well.
- Bamboo is not just an Eco-friendly choice it is also robust and water-resistant.
- Maple can be white/cream, to pink-tinged with an interesting grain. Hard-wearing and long-lasting (is often used on dance floors).
- Rubberwood can accept different finishes, so can be made to look like oak or rosewood at a lower cost. Environmentally friendly option for a wooden countertop, as rubberwood trees are at the end of their life after latex production, so this is getting further use out of a tree that would otherwise have been destroyed. Resists water well, is durable.
- Ash is the palest option, varying from cream to light brown, with an even texture. Tough but elastic too, so stands up to shocks well.
- Birchwood varies in color from white/cream to red-tinged light brown. Extremely durable and water-resistant, ideal for busy kitchens.
Medium Color Woods
- Cherry wood is a good choice for more traditional kitchens, with its reddish appearance that darkens over time creating a more aged look. It is also fairly robust.
- Oak adds character to any kitchen, with its small knots. Very durable and a classic choice.
Dark Color Woods
- Iroko is becoming a favorite for contemporary DIY wood countertops because of its dark appearance. Has a naturally high oil content so is more water-resistant than most other woods.
- Wenge is the darkest wood you are likely to find, its color varying from dark brown to black, and the most expensive too as it only grows in West Africa. The most water-resistant option though.
- Walnut is recognizable for its dark color and is very heavy and durable. Despite this, it is an easy wood to work with.
Remember that the color of the finished DIY wood countertops will appear darker once it has been treated with oil. However, you choose the wood, to build your DIY wood countertops from, buy it quartersawn where possible, as it is more stable.
Read Also:
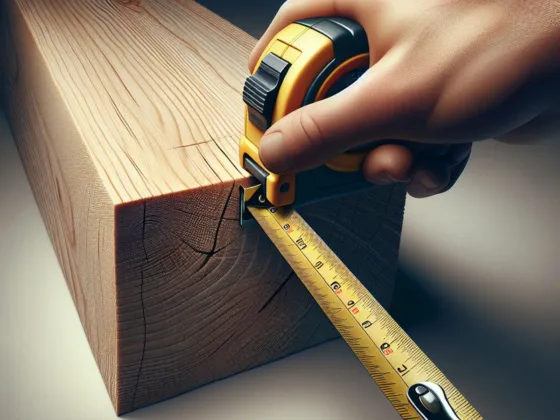
Measuring Up the DIY Wood Countertops
The next step in learning how to build DIY wood countertops for your cool wood projects is measuring up.
- Measure from the back of the cabinet that’s against the wall, to the front of the cabinet door – it’s important you include the door
- In the measuring, and don’t just measure the cabinet carcass. It’s also important to factor in any backsplash or tile that currently exists, that may be removed when you install the DIY wood countertop as this will impact on your measurements.
- Add 1 inch to this measurement to allow for an overhang, to get the overall width of the DIY wood countertop you need.
- Along the back edge of your cabinets, or existing countertops, measure from one side to the other side of each wall, to get the length of DIY wood countertops you will need to cut.
- If you have a U-shaped, or L-shaped kitchen, that you only need to measure into each corner once, to ensure there is no overlap. i.e., if the longest piece you’ve measured goes right from one side to another, the piece that will butt against it at a right angle should be measured from the corner where the cabinet doors meet, rather than from the wall corner, as this has already been included in the first measurement. Use existing countertops as a guide to what lengths to cut, if this helps.
- Remember to exclude free-standing stoves etc. from your measurements, that aren’t surrounded by a countertop. Equally remember that built-in hobs and sinks, still need to be included in the measurement of DIY wood countertops.
How to Make DIY Wood Countertops for your Cool Wood Projects, Continued
Cutting & Finishing
Now you’ve done your measuring, and you know how to choose which wood is best for you, you just have to make your DIY wood countertops – it’s put it all together time! It may be worthwhile looking into how much the renting of some of these tools would cost before you begin.
You really need the best tools for the job to save costly mistakes, and buying them for a one-off project just isn’t feasible.
You may not be able to buy your wood of choice in the width you want, so gluing together several planks may be necessary before you begin the actual cutting. Use a strong epoxy glue between each plank and secure with bar clamps to hold until set – at least 24 hours.
- Wipe off any excess glue.
- Use this method too, if you want to build a DIY wood butcher block countertops – use strips of wood rather than planks, and organize them in a staggered fashion (like the pattern of a brick wall).
- Next, secure your wood on a stable work surface with clamps, and cut to your measurements using a jigsaw or bandsaw.
- If any sections are particularly uneven on the surface then plane them down.
- Use a drum sander, or belt sander to smooth the surface.
Read Also:
With this “Cool Wood Projects for Guys, How to Build Your Own Countertops” article to build a wood countertop yourself, you need to know how to finish and treat your DIY wood countertops. Oiling DIY wood countertops is necessary before installation, and again every 3-6 months, depending on the wood.
Mineral oil should be rubbed into the wood in the direction of the grain, and allowed to sink in until it can take no more. This is usually around 4 applications.
Leave 8 hours between each application, and wipe off any excess that hasn’t been absorbed, when you are finished.
So, now you know how to make DIY wood countertops style, you should be left with a beautiful and unique piece that will last for years to come – now you just have to install it!
Resources
- http://www.hardwood-kitchen-worktops.co.uk/
- wiseGEEK; What is Mineral Oil?; http://www.wisegeek.com/what-is-mineral-oil.htm
- DIY Manual by Albert Jackson, Collins, 2001
Image Credits
- Countertop featuring different woods by Aaron Gustafson
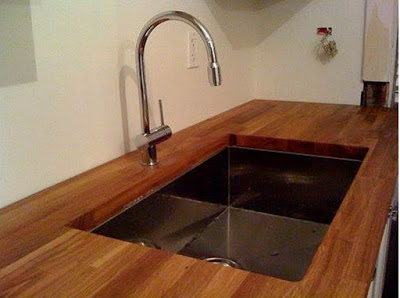
- Sink & countertop by Matt MacGillivray
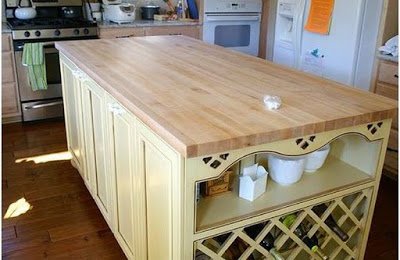
- Unoiled kitchen island by Barron Fujimoto
- All images are released under a creative commons license.


3 comments
As a little aside, I found that the piece removed for the sink cutout makes a great chopping board when cut and finished accordingly. It’s a nice little freebie, and it looks great a standalone decoration when not in use.
If you are a beginner or have done some woodworking you will find these plans: http://www.bestquicktips.com/woodworking-projects easy-to-follow as the instructions are very clearly written. Even if you are a total newcomer to woodworking you will be able to master all the techniques that are needed and the woodworking skills very quickly.