Dream Lands Design
  • Home Improvement
    • DIY
    • Remodeling
    • Woodworking
    • Accessories
    • Home Design
      • Furniture
      • Organize
      • Tips
      • Decor
        • Interior
        • Exterior
  • Design Ideas
    • Bathroom
    • Bedroom
    • Dining Room
    • Living Room
    • Kitchen
  • Gardening
    • Backyard
    • Front Yard
    • Landscaping

Categories

  • Accessories
  • Backyard
  • Bathroom
  • Beauty
  • Bedroom
  • Cars
  • Decor
  • Design Ideas
  • Dining Room
  • DIY
  • Entertaining
  • Exterior
  • Finance
  • Front Yard
  • Furniture
  • Gardening
  • Green Living
  • Home Design
  • Home Improvement
  • Interior
  • Kitchen
  • Landscaping
  • Lifestyle
  • Living
  • Living Room
  • Organize
  • Photography
  • Real Estate
  • Remodeling
  • Tips
  • Uncategorized
  • Wall Improvement
  • Woodworking

Archives

  • March 2023
  • February 2023
  • January 2023
  • December 2022
  • November 2022
  • October 2022
  • September 2022
  • August 2022
  • July 2022
  • June 2022
  • May 2022
  • April 2022
  • March 2022
  • February 2022
  • January 2022
  • December 2021
  • November 2021
  • October 2021
  • September 2021
  • August 2021
  • July 2021
  • June 2021
  • May 2021
  • April 2021
  • March 2021
  • February 2021
  • January 2021
  • December 2020
  • November 2020
  • October 2020
  • September 2020
  • August 2020
  • July 2020
  • June 2020
  • May 2020
  • April 2020
  • March 2020
  • February 2020
  • January 2020
  • December 2019
  • November 2019
  • October 2019
  • September 2019
  • August 2019
  • July 2019
  • June 2019
  • May 2019
  • April 2019
  • March 2019
  • February 2019
  • January 2019
  • December 2018
  • November 2018
  • October 2018
  • September 2018
  • August 2018
  • July 2018
  • June 2018
  • May 2018
  • April 2018
  • March 2018
  • February 2018
  • January 2018
  • December 2017
  • November 2017
  • Privacy Policy
  • Terms of Use
  • Disclosure
  • Sitemap
  • Contact Us
29K
98K
0
Dream Lands Design
  • Home Improvement
    • DIY
    • Remodeling
    • Woodworking
    • Accessories
    • Home Design
      • Furniture
      • Organize
      • Tips
      • Decor
        • Interior
        • Exterior
  • Design Ideas
    • Bathroom
    • Bedroom
    • Dining Room
    • Living Room
    • Kitchen
  • Gardening
    • Backyard
    • Front Yard
    • Landscaping
Featured of Staircase Landings, Add a Landing to Existing Stairs
You're here: Home Home Improvement Staircase Landings, Add a Landing to Existing Stairs

Staircase Landings, Add a Landing to Existing Stairs

  • Perla Irish
  • February 21, 2018
Total
186
Shares
8
0
178
0
0
Table of Contents Hide
  1. Staircase Landings
  2. Getting Started: Staircase Landings
  3. Build a Landing
    1. Consideration:
  4. Reattach the Stringers
    1. Image Credit
  5. Building a Staircase
  6. Best Free 8+ DIY Staircase Landings Plans & Ideas to Build Yourself
    1. Building a Large Outdoor Staircase by April Wilkerson | Youtube Video

Learn about adding a stairway landing in the middle of a stair run. This is often used on basement stairs during a basement finishing project, on deck projects, and sometimes on tall stairways in homes with ceilings higher than nine feet.

See the steps necessary for adding a landing to existing stairs to turn a stairway or provide a resting place on tall stairs.

image - Staircase Landings, Add a Landing to Existing Stairs
Staircase Landings, Add a Landing to Existing Stairs

Staircase Landings provide a place to stop and rest or change the direction of a staircase. In most cases, adding a landing in the middle of a stairway is not very difficult and the average homeowner with some DIY know-how and basic framing skills can easily manage the project.


Read Also:

  • Stairs: Stairway Building Terms – Building Deck Stairs
  • Building Deck Stairs: Directions For Building Stairs Railing for Deck
  • How to Build Deck Stairs, Directions For Building Stairs Railings Deck
  • How to Make Stair Stringers, Stringer Attachment Methods
  • 7 Ideas on How to Find an Interior Decorator That’s Right for You

Staircase Landings

Often in a home, a staircase is a straightforward affair between floors. On homes with high ceilings, this makes the staircase long, which can take up a lot of floor space.

Some building codes specify that a landing is required on staircases that rise above a certain height.

Whatever the reason, you can add a landing to an existing staircase. An important factor to remember is that each step on a staircase must rise the same amount as the others.

You can’t have a rise of 7 inches on one step and 8 inches on another step. None of the steps may vary in height more than 1/4 inch than any other step.

If you’re cutting off the stairs and adding a landing, usually this won’t be a problem. You’ll use the cut off stringers for the second set of steps and they’ll be exactly the right size, as long as the original steps met the code in the first place.

If not, you may have to obtain permission from the building department to make one set of steps different from the other set.

The average do-it-yourself homeowner will need a full 8 to 10 hour day for this project, so let’s take a good look at how to change stairs into a landing.

Need online stair calculator? check this useful tool by concalculator.

Getting Started: Staircase Landings

Stairways with finished treads, risers, moldings, and skirts are cut and fitted together. Each part fits into the next and the finished staircase is a complete woodworking project.

Use care when disassembling a finished staircase to avoid damaging the parts and moldings. Take additional care in planning the cutting of the moldings.

image - Adding a Staircase Landings, Cutting the Stringers
Adding a Staircase Landings, Cutting the Stringers

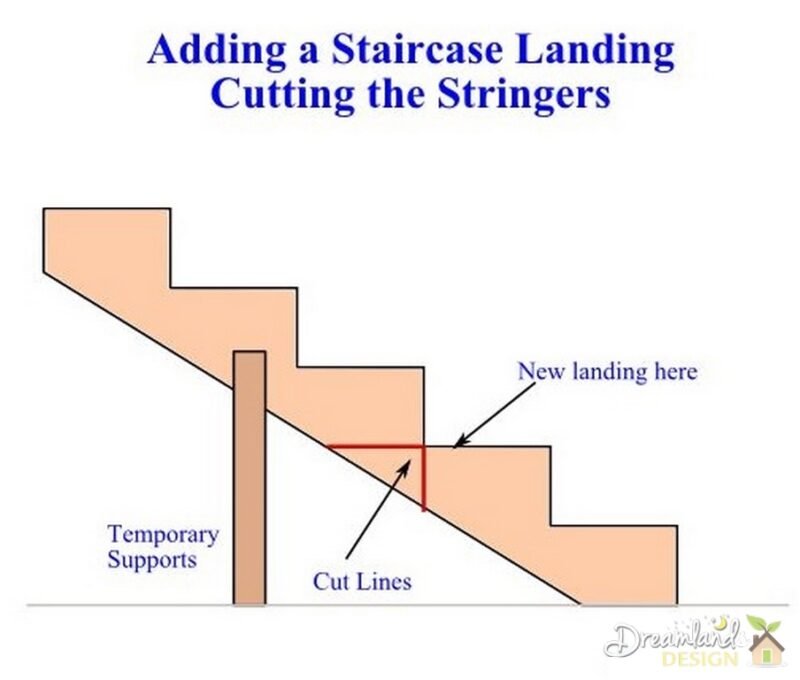
First, remove any wall sheathing like drywall from the framing underneath the stairs so you can evaluate the support system. Determine where the landing will go and mark the stringers at the bottom of the last riser. See the sketch.

Some stairs don’t have a frame that supports the stringers. If this is the case, you’ll need a temporary support structure to hold the stairs up while you build the landing and reattach the cut off stringers. Install a pair of 2-by-4s to support each stringer just above the cutoff point.

Remove the stair treads and risers just above the cut point and all the treads and risers below the cut point. Draw a vertical and horizontal cut line on each stringer using a level. Cut the stringers with a circular saw and make the horizontal cut first, and the vertical cut second.

Set the cut off stringers aside, you’ll use them later.

Build a Landing

A landing is nothing more than a small floor supported on four sides. The landing is a rectangle made from strong materials built to fit under the stairs to support them and extend in front of the stairs to the floor of your landing. Build the landing frame with 2-by-8 lumber much like a regular floor.

The joists connect to the ends with joist hangers. Keep the frame square and place interior joists on 16-inch centers.

image - Adding a Staircase Landings, Landing Frame
Adding a Staircase Landings, Landing Frame

Raise the landing frame up to the bottom of the stair stringers and build a support wall under each side. Connect the support walls to the landing frame with nails or screws.

Plumb the walls and fasten them to the floor. Connect the landing frame to the stair stringers with mending plates. Recess the wall on the side that will have the bottom set of stairs by 1 1/2 inches to allow room for a header plate.

Tip: Depending on the height of the landing, the space underneath can offer a fair amount of storage. Take that into consideration when you frame the walls that support the landing frame.

Replace the treads and risers on the stairs leading up from the landing. Cover the landing floor with 3/4 inch plywood, then use a second covering to increase the landing floor thickness to the same thickness as the stair treads.

Consideration:

If you need a railing on the landing, attach the railing posts to the framing with 1/2 inch carriage bolts before installing the floor sheathing.

Then cut the plywood to fit around the posts. Few landings on the stairs will not have a wall or railing. Check with your building department for local codes and rules.

Reattach the Stringers

Cut a 2-by-8 to fit below the landing frame on the side the bottom set of steps will attach to, and fasten it to the wall frame with deck screws.

This provides an attachment point for the stringers. Attach the stringers to the landing frame and support the header with stringer hangers.

These look very much like joist hangers and work the same way. Use a level to keep the step cutouts on the stringers level from front to back while you attach them. Also, check for level across the tread cutouts from stringer to stringer.

image - Adding a Staircase Landings, Bottom Stairs
Adding a Staircase Landings, Bottom Stairs

Set a tread on the top step cut out and measure from the top of the tread to the top surface of the landing floor. The distance should be exactly the same as the distance from the top of one tread to the top of the next on the upper set of stairs.

Remove the bottom tread and measure between the stringers. Cut 2-by-4s to fit between them and place the 2-by-4s on the floor between the stringers and against the riser.

Nail the 2-by-4s to the floor and nail the stringers to the 2-by-4s. This stabilizes the bottom of the stairs and keeps them from moving.

Reinstall the treads and risers on the bottom set of steps. Build railings or walls to enclose the landing and install new stair rails on the lower set of steps.

If in need of other home repairs EmerGenie can supply easy access to traders’ live.

Image Credit

  • Photo of Adding a Staircase Landings, Steep Staircase by Erich Ferdinand at Flickr.com: https://www.flickr.com/photos/erix/2380715186/

Building a Staircase

A staircase can be the focal point of a room or entryway and you want to show it off. Architects often place the main stairway of a home near the main entrance so it can be seen. With patience and attention to detail, you can build your own finely crafted staircase yourself.

  1. How to do Stairs, DIY Guide to Building a Stairway
  2. Building a Staircase: How to Install Stair Treads
  3. Installing Posts for a Staircase Balustrade
  4. Building a Staircase Railing with Balusters
  5. Staircase Landings, Add a Landing to Existing Stairs

Best Free 8+ DIY Staircase Landings Plans & Ideas to Build Yourself


image - Plan and Build Stairs With Landings by DoItYourself.com
Plan and Build Stairs With Landings by DoItYourself.com

Building a Large Outdoor Staircase by April Wilkerson | Youtube Video


image - A Guide to Stair Landings: Stairs with Landings via MyCarpentry.com
A Guide to Stair Landings: Stairs with Landings via MyCarpentry.com

image - Stair & Landing Construction via Fields Home Center
Stair & Landing Construction via Fields Home Center

image - 3 Easy Steps to Build Stairs via Popular Mechanics
3 Easy Steps to Build Stairs via Popular Mechanics

image - Stairs, steps, and landings by Decks.com
Stairs, steps, and landings by Decks.com

image - How to Build Stairs With Landings via Hunker
How to Build Stairs With Landings via Hunker

image - Step by Step on How to Build via The Balance
Step by Step on How to Build via The Balance

image - Building Stairs with a Landing via The Home Depot Canada
Building Stairs with a Landing via The Home Depot Canada
Total
186
Shares
Share 8
Tweet 0
Pin it 178
Share 0
Share 0
Related Topics
  • building
  • construction
  • materials
  • renovation
  • staircase
  • stairways
  • woods

Subscribe

Subscribe now to our newsletter

You May Also Like
Featured image - 10 Tips To Give Your Home’s Exterior That WOW Factor
View Post

10 Tips To Give Your Home’s Exterior That WOW Factor

  • March 29, 2023
featured image - Exploring the Benefits of Business Insurance Companies
View Post

Exploring the Benefits of Business Insurance Companies

  • March 29, 2023
featured image - Understanding Title Insurance
View Post

Understanding Title Insurance

  • March 29, 2023
Featured image - Utilize Existing Space with a Basement Renovation
View Post

Utilize Existing Space with a Basement Renovation

  • March 29, 2023
featured image - 5 Ways People Use Personal Loans
View Post

5 Ways People Use Personal Loans

  • March 29, 2023
Featured image - How to Find the Perfect Moroccan Rug in Australia?
View Post

How to Find the Perfect Moroccan Rug in Australia?

  • March 29, 2023
Featured image - How to Identify a Leaking Pool
View Post

How to Identify a Leaking Pool

  • March 29, 2023
Featured image - 6 Types of Patios Doors
View Post

6 Types of Patios Doors

  • March 29, 2023
2 comments
  1. Lovingda says:
    February 11, 2017 at 6:15 pm

    Thanks for sharing such a good thought, post is good, thats why i have read it entirely

    Reply
  2. Pingback: Guide Woodworking – Mississauga On – Legal Esclarin

Leave a Reply Cancel reply

Your email address will not be published. Required fields are marked *

This site uses Akismet to reduce spam. Learn how your comment data is processed.

Dream Lands Design
  • Privacy Policy
  • Terms of Use
  • Disclosure
  • Sitemap
  • Contact Us

Input your search keywords and press Enter.

Add Dream Lands Design to your Homescreen!

Add