Dream Lands Design
  • Home Improvement
    • DIY
    • Remodeling
    • Woodworking
    • Accessories
    • Home Design
      • Furniture
      • Organize
      • Tips
      • Decor
        • Interior
        • Exterior
  • Design Ideas
    • Bathroom
    • Bedroom
    • Dining Room
    • Living Room
    • Kitchen
  • Gardening
    • Backyard
    • Front Yard
    • Landscaping

Categories

  • Accessories
  • Backyard
  • Bathroom
  • Beauty
  • Bedroom
  • Cars
  • Decor
  • Design Ideas
  • Dining Room
  • DIY
  • Entertaining
  • Exterior
  • Finance
  • Front Yard
  • Furniture
  • Gardening
  • Green Living
  • Home Design
  • Home Improvement
  • Interior
  • Kitchen
  • Landscaping
  • Lifestyle
  • Living
  • Living Room
  • Organize
  • Photography
  • Real Estate
  • Remodeling
  • Tips
  • Uncategorized
  • Wall Improvement
  • Woodworking

Archives

  • March 2023
  • February 2023
  • January 2023
  • December 2022
  • November 2022
  • October 2022
  • September 2022
  • August 2022
  • July 2022
  • June 2022
  • May 2022
  • April 2022
  • March 2022
  • February 2022
  • January 2022
  • December 2021
  • November 2021
  • October 2021
  • September 2021
  • August 2021
  • July 2021
  • June 2021
  • May 2021
  • April 2021
  • March 2021
  • February 2021
  • January 2021
  • December 2020
  • November 2020
  • October 2020
  • September 2020
  • August 2020
  • July 2020
  • June 2020
  • May 2020
  • April 2020
  • March 2020
  • February 2020
  • January 2020
  • December 2019
  • November 2019
  • October 2019
  • September 2019
  • August 2019
  • July 2019
  • June 2019
  • May 2019
  • April 2019
  • March 2019
  • February 2019
  • January 2019
  • December 2018
  • November 2018
  • October 2018
  • September 2018
  • August 2018
  • July 2018
  • June 2018
  • May 2018
  • April 2018
  • March 2018
  • February 2018
  • January 2018
  • December 2017
  • November 2017
  • Privacy Policy
  • Terms of Use
  • Disclosure
  • Sitemap
  • Contact Us
29K
98K
0
Dream Lands Design
  • Home Improvement
    • DIY
    • Remodeling
    • Woodworking
    • Accessories
    • Home Design
      • Furniture
      • Organize
      • Tips
      • Decor
        • Interior
        • Exterior
  • Design Ideas
    • Bathroom
    • Bedroom
    • Dining Room
    • Living Room
    • Kitchen
  • Gardening
    • Backyard
    • Front Yard
    • Landscaping
Featured image - How to Distress Wood Furniture
You're here: Home Furniture How to Distress Wood Furniture

How to Distress Wood Furniture

  • Perla Irish
  • November 21, 2020
Total
1
Shares
0
0
1
0
0
Table of Contents Hide
  1. Get Prepped
  2. Get Started
    1. Step One
    2. Step Two
    3. Step Three
    4. Step Four
    5. Step Five
  3. Renovating Soon? Selling Your Home?

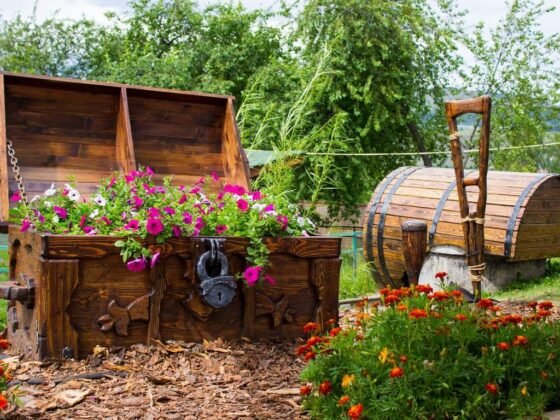
It’s interesting how what might have been unfashionable in the furniture and decor world 60 years ago is all the rage now.

Nowadays, individuals will go out of their way to modify existing pieces to look ‘rougher’ or make it a point to hit every thrift store within a 50-kilometer radius to find just the right ‘one of a kind’ piece for their home or renovation project.

image - How to Distress Wood Furniture
How to Distress Wood Furniture

If you’re into the look but aren’t into poring over old furniture in a thrift store or you shopped for hours and have hauled home some new pieces, read on.

We’ve put together a comprehensive guide to distressing your wooden furniture.

Get Prepped

First thing’s first. We don’t advise ripping out the sander in your living room with abandon. Here are a few things you should make sure you have available to make your DIY project a success:

  • Paint (color of your choice)
  • Paintbrush
  • Sanding paper & steel wool
  • Rags/tack cloths
  • Drop cloths (can be old towels in a pinch)
  • Polyethylene
  • Stain (not 100% necessary)
  • A candle (not in a jar or container)

Get Started

This is doable in any space, but you’ll want to make sure you clear the area of anything you don’t want to accidentally get dirty.

We recommend sanding outdoors or in your garage, but certainly, you can sand and finish indoors. However, make sure you have proper ventilation and a good vacuum or drop cloth to collect dust.


Read Also:

  • Choose Durable and Long-Lasting Timber Wood Furniture for Your Home!
  • How to Paint an Exterior Wall to get a Smooth Result?
  • DIY Repainting: How to Paint Your Old Wood Furniture
  • How to Protect Your Home from Exterior Damage

Step One

Sand your piece. If your furniture is unfinished, you only need to lightly sand. If it has paint or stain on it already, you’ll want to spend more time on it. When you’ve completed this, wipe it down with a tack cloth or rag as best as you can. Make sure there’s no dust left behind.

Step Two

This one is pretty simple. Paint your piece of furniture and allow it to dry. Some DIY’ers like to do two colors, to give the illusion of ‘old’ paint peeking through the ‘new’ paint.

If you only want the wood to peek through, leave it at just one color. A second coat is optional but not necessary.

Step Three

This step goes hand in hand with step two. If you’re going for a ‘two-color’ look as mentioned above, wait for your base coat to dry. Then rub your candle over areas that would naturally ‘distress’ before others. These include edges, spots where you’d put plates and cups, and areas that nick or scratch easily.

After you’ve done this, paint it over with your second color. The wax will prevent the second coat from fully adhering to the base coat – doing a lot of your work for you.

If you aren’t doing a two-toned look, you’ll (of course) skip this step and go straight to sanding.

Step Four

Time to do the actual distressing work! Use your steel wool and sandpaper to rough up where you applied the wax to reveal the paint underneath.

If you opted for wood underneath only, you’ll use sandpaper and wool to reveal the wood.

This step is completely up to personal preference. Make it as distressed as you like! Wipe off excess dust and paint flecks with your tack cloth.

Step Five

You can take this time to apply a stain if you wish (be sure to use a straight line motion instead of circular) or skip right to sealing and protecting with polyethylene. Allow to dry completely, and voila! You’ve distressed your furniture!

Renovating Soon? Selling Your Home?

Looking to get your rental space or home set up for an open house in an up and coming, millennial neighborhood? Combining the shabby chic, DIY look with professional renovation services with Codam Building Solutions is the way to go!

Total
1
Shares
Share 0
Tweet 0
Pin it 1
Share 0
Share 0
Related Topics
  • paint
  • wood furniture
  • woods

Subscribe

Subscribe now to our newsletter

You May Also Like
Featured image - Office Interiors: Tips to Upgrade the Reception Area
View Post

Office Interiors: Tips to Upgrade the Reception Area

  • February 17, 2023
featured image - The Best Multifunctional Furniture to Maximize a Small Space
View Post

The Best Multifunctional Furniture to Maximize a Small Space

  • February 12, 2023
Featured image - Upgrade Your Home with Modern Luxury Furniture
View Post

Upgrade Your Home with Modern Luxury Furniture

  • January 15, 2023
Featured image - Perfect Luxury Furniture for Your Home
View Post

Perfect Luxury Furniture for Your Home

  • January 15, 2023
Featured image - House of Hackney's Interior Design Solutions
View Post

House of Hackney’s Interior Design Solutions

  • January 15, 2023
Featured image - The Benefits of a Good Bedroom Furniture Set
View Post

The Benefits of a Good Bedroom Furniture Set

  • January 12, 2023
Featured image - 8 Epoxy Resin Furniture Ideas to Elevate Your Home's Interior Design
View Post

8 Epoxy Resin Furniture Ideas to Elevate Your Home’s Interior Design

  • December 11, 2022
View Post

Tangerine Tango: Color Named 2012’s Color of the Year

  • October 31, 2022
Dream Lands Design
  • Privacy Policy
  • Terms of Use
  • Disclosure
  • Sitemap
  • Contact Us

Input your search keywords and press Enter.

Add Dream Lands Design to your Homescreen!

Add