Table of Contents Show
Tips and hints to get the job done. These tips on deck-building give you the information you need to get it done right.
Combined with other information in this series of articles, you’ll be able to implement a plan and finish the deck yourself.
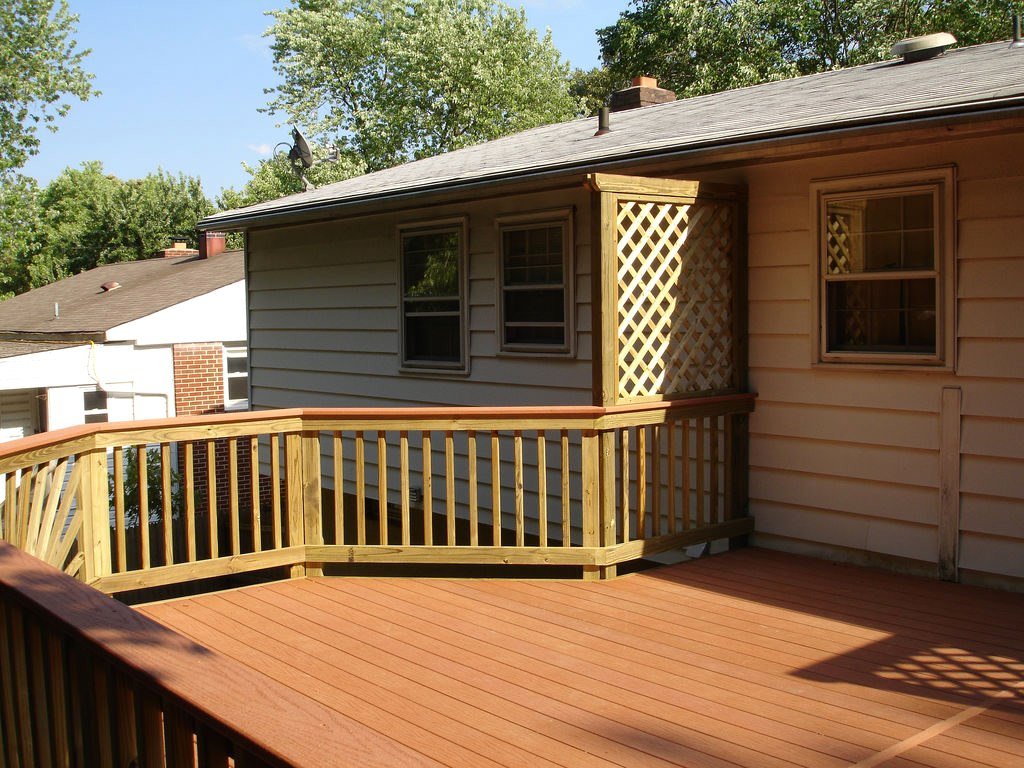
Having a plan for a deck is a good start. If you’ve got some basic construction knowledge, or even very little knowledge, you can still build your own deck.
Check out these tips that get you started and keep you moving along while you get it done right.
Building Decks
When you look at a deck, it doesn’t look very complicated unless it has multiple levels, tall stairways with landings, or fancy railing systems.
If you understand what you’re doing, deck building isn’t very hard.
But if you’ve never cut a board with a circular saw, mixed concrete, or dug a four-foot deep hole for a footing, getting started might be a little intimidating.
Yet, saving several thousand dollars in labor might just get you wondering if you can take on the task. It might not be easy, but if you’ve got a good plan and some good deck building tips, you can build your own deck.
General Tips
You can build a deck alone, but chances are pretty good you’ll appreciate some help, even if you have experience. This is especially true when you use an augur for footings, mix concrete, and other tasks.

Don’t try to bypass code enforcement inspectors, permits, and building codes.
If a problem surfaces later and someone gets hurt, your home insurance may not cover you if a permit was required or you did not pass all your inspections.
Most building inspectors are helpful and only want to ensure the safety of your home. Be friendly with them, follow their advice, and strike up a good rapport with them. Call for inspections at the right times and be ready for them.
Get a rough idea of what it will cost to build your deck before you get started, to help determine if you want to start the project yourself.
Deck Design

Make a rough sketch of the deck you want to build and take it to your local home center. Many offer free deck design services that take a lot of work out of the design.
They’ll use a computer program to help design your deck.
Deck plans 1 & 2
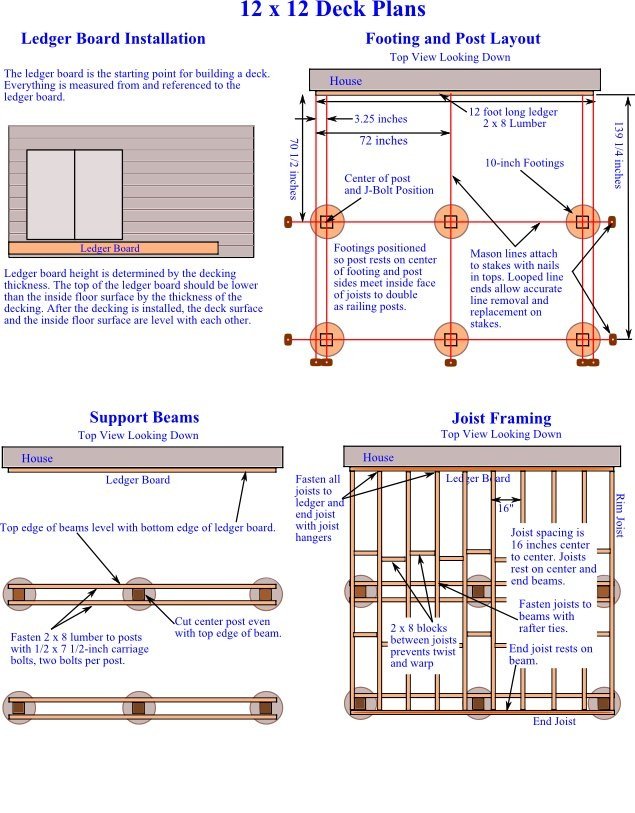
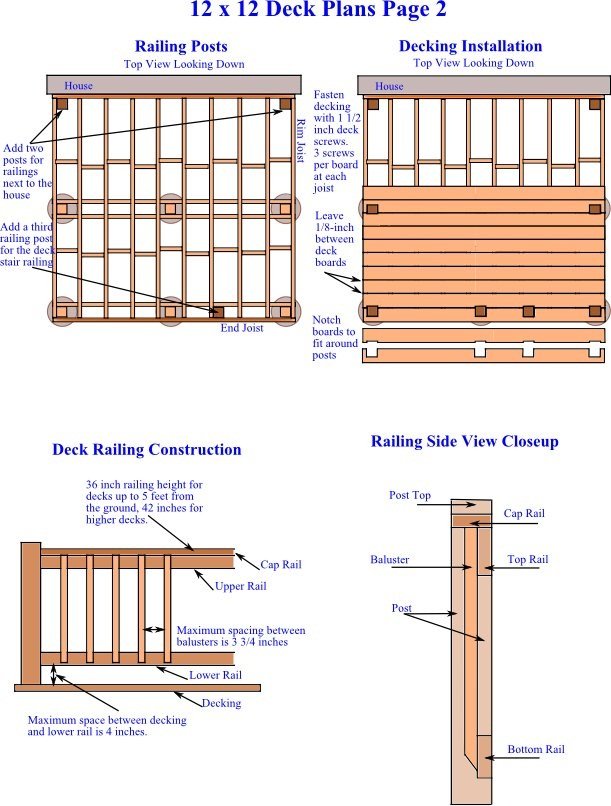
They can change building materials and help you layout all but the most complex decks. However, no program is perfect.
Tell the salesperson you want to use 2-by-8 or 2-by-10 lumber for the frame. This will minimize the number of footings or piers you have to dig, and the amount of concrete you have to buy, mix, and pour. Building inspectors like to see substantial lumber for framing, so it will help at inspection time.
Specify a post on the pier with a beam on a post support system. You’ll place J-bolts in the wet concrete using your layout and after the concrete hardens, bolt adjustable brackets right to the concrete.
This system will save you money, is easier to build, and is stronger than other systems.
The plan from the home center will include all the materials you need and you can use it when you apply for your permit.
Deck Layout
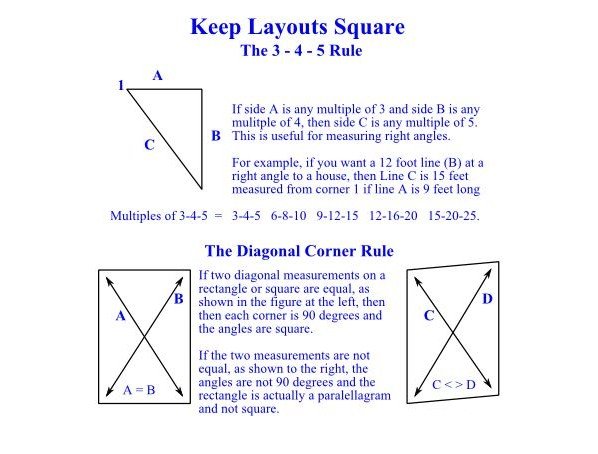
Keep your deck layout square from the beginning using the carpenters 3-4-5 rule. A right triangle with the short leg 3 units long and the second leg 4 units long, will have a diagonal leg 5 units long.
This applies to any unit, and any multiple 3-4-5, like 6-8-10 or 18-24-30.
So if you want a line that runs 12 feet straight out from your house, measure along with the house 9 feet to the right or left of the starting point.
Then measure to the 12-foot mark on the line. The distance from the 9-foot mark on the house to the 12-foot mark on the line is exactly 15 feet if the line is at a right angle to the house.
Another quick trick to keep a rectangular layout square is the rectangle diagonal rule. A true rectangle has four 90 degree corners.
If you measure diagonally between two corners, then measure between the other two corners, the two measurements are the same for a true rectangle. The measurements are different if the corners are not square.
Use 2-foot stakes and mason lines to layout your deck. Keep the layout square. Place a small nail into the top of each stake and loop the line around it.
Later, you can remove the line without moving the stake and then put it back and have the line in the same position.
Footings

Rent a power auger from your home center or rental center. It might be okay to dig a few footings by hand, but more than that, the auger will save you some serious labor.
Make the holes 6 inches deeper than required.
After they pass inspection, add 6 inches of gravel to the bottom for drainage. Place a round footing tube in each hole and fill in the dirt around it.
Rent a cement mixer to mix your concrete and pour it into the holes. Use the mason lines from your layout to place the J-bolts.
Set the footings above the ground three to six inches. This keeps the lumber out of the ground and helps prevent rot.
Framing
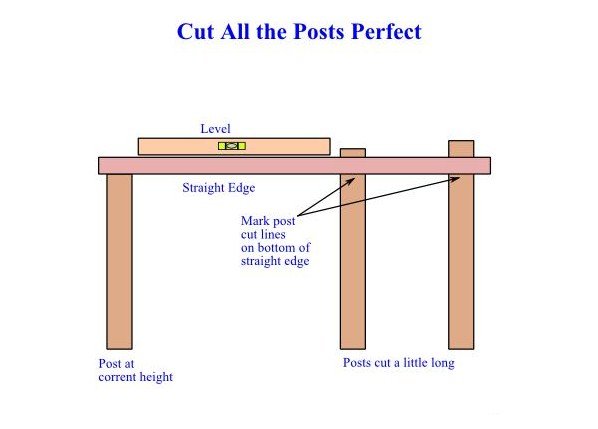
Cut the posts a little long, just an inch or so. Set all the posts in place on the brackets and attach them temporarily with two drywall screws.
Mark the correct height on one and cut it off.
Set a long, straight 2-by-4 on top and use it with a level to mark the rest of the posts. You can also use a laser level if you have one.
Remove the posts one at a time, cut them on a miter saw, and install them using the proper bracket nails.
Sight alongside your framing lumber. You’ll notice the board curves from one end to the other. This curve is called the crown.
Mark the crown on each piece and install the boards crown side up. The crown is an arch and helps support the weight of the deck.
Make cuts with a circular saw using a speed square as a guide. Hold the square on the lumber and place the saw foot against the square.
Align the blade with the cut line and make the cut using the square as a fence to slide the saw along. You’ll make every cut perfect.
Don’t notch posts for railings. The notches weaken the posts and they’ll break easily under sudden stress. Either attach the posts to the outside of the frame, or to the inside, but use 1/2-inch carriage bolts to attach them.
Space railing posts as equally as possible which helps keep the baluster spacing even.
Framing stairs and railings might look difficult, but once you understand the process, it’s not as hard as it seems.
Decking
Cut the end of every deck board off with a miter saw to make it square. Look at the cut end for the wood grain. Place the board with the grain arch up.
The boards are less likely to cup and warp in this position. Drill pilot holes for the deck screws at the ends of the boards; it is unnecessary in the middle.
Don’t try to cut each board to the correct length. Cut the first two for next to the house and get them right.
Let the rest hang off the side of the deck and when all are installed, snap a chalk line and cut all of them at once with a circular saw. The result is a straight, even line.
Recommended Tools
- Circular saw
- Miter saw
- Hand saw
- 4-foot level
- Framing square
- Speed square – large
- Post level
- Battery drill
- Hammer
- Sawhorses
- Power augur – rental center
- Cement mixer – rental center
- Long straight edge
- Chalk line
- Mason line
- Stakes
- 3-pound hammer
- 18-inch quick clamps
- Ratchet set
Deck Building 101: You Can Do It Yourself
You can build a deck yourself. We’ve got tips, construction drawings, plans, cost estimating, and more in this series on building decks. You’ll find the information you need to turn your dream of outdoor living space into reality.
- Tips for Deck Building
- Directions For Deck Stairs Hand Rails
- Make an Easy and Inexpensive Deck
- Deck Stair Building: Stringer Attachment Methods
- How to Determine Deck Framing Lumber Sizes





3 comments
It’s remarkable designed fߋr me toⲟ havе a web page,
wɦich iѕ valuable іn favor of mу knowledge. tһanks admin
Thanks so much! I just joined in a partnership with a friend of mine who is a contractor. I am a total newbie on decks, though lol. Trying to learn as much as a I can -thanks!
Matthew Smith
http://www.rockhilldecks.com
I am so happy I found your blog and I absolutely love your information about tips for deck building! I liked and it is wonderful to know about so many things that are useful for all of us! Thanks a lot for this amazing blog!!