Table of Contents Show
The use of a basement wall waterproofing membrane will prevent the ingress of water that leads to dampness in the basement. It is advisable to install a waterproof membrane on the floor as well as the walls, to prevent any future problems with moisture.
Membranes are normally made from heavy-grade plastic sheets, embossed on one side and meshed on the other to facilitate plastering. They are fastened to the basement wall and floor using specialized wall plugs that once in place also act as a base for the fixing of wood battens. This guide will help in the installation process.
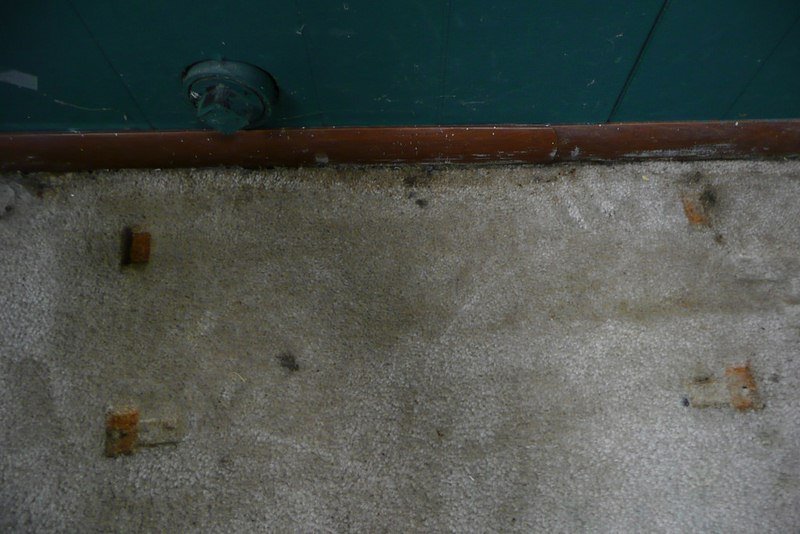
How to Install and Waterproofing Basement Walls with Membrane
Basements are susceptible to becoming damp due to water entering from underground. The dampness can be controlled by installing a waterproof plastic membrane. This is fitted using specialized fixings, usually right along the basement floor and up the walls to the ceiling.
Dampness can normally be seen and smelt in a basement and although difficult to eradicate, there are now waterproofing kits on the market that enable the average DIY person to install. For example, remove water in a basement with a dehumidifier
Membranes can be supplied in several different materials and fixings that once installed allows the wallboard to be fitted or plastered over to give a smooth finish.
The following sections will explain how to install a basement waterproof membrane, beginning with an overview of where the water ingression that has caused dampness has possibly originated; and how to use a simple, inexpensive, hand-held meter to detect this.
Read Also:
Common Sources of Water Ingression and Basement Dampness
If water seepage or moisture is not visible by the usual characteristic patches, but the room emanates that cold, shivering feeling; a dampness detector meter can be used to confirm these conditions.
This is a small hand-held instrument that has two pointed prongs at one end. The prongs are pressed against the wall and floor at numerous locations and the readings on the LED are noted. A reading over 1% is evidence of the presence of moisture.
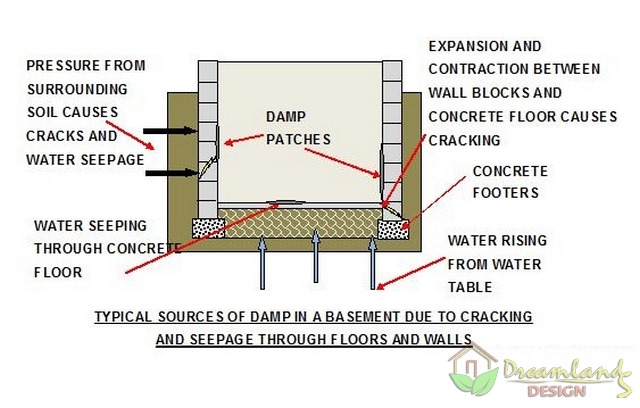
The main sources of water ingress to the basement originate from cracks on the walls or floor of the basement allowing moisture to penetrate the brick/blockwork walls or concrete floor from the surrounding soil. Moisture is also caused by water seepage through porous materials such as concrete blocks used to build the walls, and up through the concrete floors.
Much of the seepage through the concrete can be avoided by the placement of a plastic, protective sheet between the concrete floor and the rubble foundations or footings, at the time of the building construction.
Most folks still try various methods to stop water ingress such as specialized waterproof paint, but it has been the author’s experience that this simply shifts the dampness to another location. There is only one solution to the problem and that is to fit a waterproof membrane to the floor and the walls.
A sketch showing typical sources of basement humidity and a simple moisture detection meter is shown below.

Instructions on Fitting a Waterproofing Basement Walls with Membrane
Membranes can be supplied in different materials and forms, the most common type being made from heavy plastic sheets embossed with extrusions such as dimples. Although the method of waterproofing is centered on basement walls, it is much better to waterproof the floor at the same time; only then will dampness be eliminated completely.
On this premise then, the following guidelines should be followed for installing a heavy gauge, plastic, dimpled membrane as supplied in a proprietary DIY membrane waterproof kit.
Some manufacturers will supply sufficient materials to complete the project if given the basement dimensions, rather than supplying full rolls of the plastic membrane along with extra fixings. Substantial savings can be made if this facility is available, so it is better to shop around for the best deal.
As stated earlier, dimpled plastic sheeting is recommended and this is supplied with mesh on one side to accommodate plastering. However, in the following method, the wallboard will be fixed to the membrane using wood battens.
Tools Required:
- Electric hammer drill
- Masonry drill (a bit to suit the supplied fixing plugs’ diameter and length.)
- Hand/clout hammer
- A sharp pair of scissors
- A sharp knife with disposable blades
- Steel tape measure
- Step ladders
- Warm air gun (old hair dryer)
Safety Tips:
- Eye protection
- Work gloves
- Most of the actions will require two people, especially when using the step ladders
- Adequate ventilation, especially when using sealant on joints
Installing and Waterproofing Basement Walls With Membrane
There are several methods that can be used when installing and waterproofing basement walls with the membrane, one such method follows and contains sketches.
- The surfaces of the basement walls and floor should be washed down using soap, water, and disinfectant to remove any loose flaking material or organic mold, and also to get rid of any damp smells.
- Once the kit has been delivered, it should be checked against the packing list to ensure all the items are accounted for.
- Starting from the top of one of the walls, align the edge of the membrane against the ceiling and the edge of the adjoining wall. Hold the top edge of the membrane and lower the rest of the roll to the floor.
- Drill a hole (to suit the size of the membrane fixing plug) through the membrane into the wall to about the mid-point of its width, and 2” below the ceiling. Hammer one of the plastic wall/membrane plugs into the hole until it is almost flush against the membrane. This will hold the membrane in place and allow final adjustment.
- Realign the top and side edges of the membrane to the ceiling and edge of the wall, ensuring that the membrane is hanging vertically (a plumb bob can be used to verify this) then drill another hole, again 2” from the ceiling and as close to the edge of the adjoining wall as possible. Fit the plastic plug as before.
- Now, this next operation is very important, especially if the whole basement is underground. Loop a few rounds of the supplied sealing cord/rope between the exposed shank of the plug and its flat head; then hammer the plug home tight. This waxed cord will act as a seal against any ingress of moisture through the drilled hole in the membrane. Repeat this for the original plug in the center of the membrane.
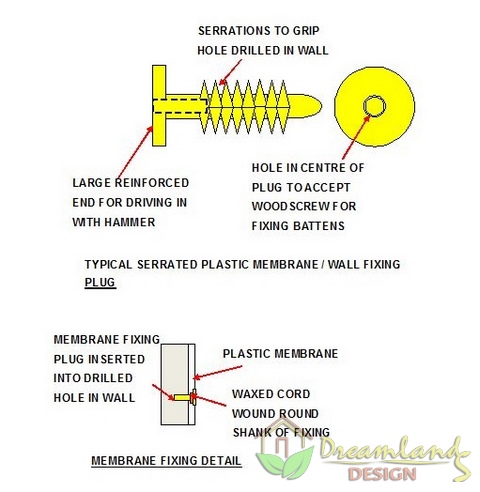
Note: Some wall plug manufacturers prefer to use rubber washers as seals. However, the waxed cord has stood the test of time and is still popular with most plumbers for sealing pipe threads/joints.
- Drill another hole 18” away from the wall and insert the plug, then drill and fit another plug 18” from the other edge of the membrane.
- Repeat this in rows every 30” below the top row of plugs until the floor is reached.
- Unroll the membrane across the floor taking care not to damage it and keeping it tight between the walls and the floor.
- Drill a series of holes into the floor and fit the membrane fixings, ensuring the sealing cord is fitted as per the wall.
- Once the membrane is fixed to the floor, continue up the opposite wall and drill and fix the membrane as before.
- This completes the first section which is approximately 6’ wide. Assuming the basement might be wider than this, the membrane will have to be joined.
- As most of the membranes are ‘dimpled’ or have extrusions, there will be a specialized jointing kit supplied, consisting of single and double-sided waterproof tape. A ‘flat area’ of the joint must be made by cutting the membrane as far away from the extrusions as possible. This area is then cleaned using a dry cloth before applying the tape using a hot air gun. (An old hair dryer can be used with caution, on a low heat setting.) The membrane can be joined and permanently sealed as shown below, but great care must be taken to ensure this joint remains waterproof.

- Once the joint has been made, continue as before, drilling the holes and hammering in the fixings until the floor and walls are completely sealed by the membrane.
- Wooden battens usually 1” X 2” can then be fixed to the wall using wood screws. These are screwed through the battens into the plastic plugs as shown below. Insulation may then be inserted between the battens if required before the wallboards are fitted.
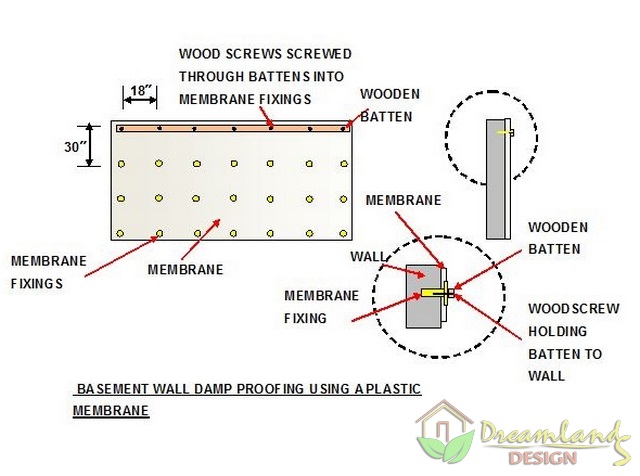
- The floor is now ready to be screened at the final finish or battens fitted, then floorboards/block board sheets laid on top of these. A sketch of the finished waterproofing of the basement walls, with the floor ready for screening, is shown below.

Tips to Keep in Mind when Waterproofing Basement Walls with Membrane
When fitting a waterproof membrane to a basement there are a few key points to be observed. Safety should be exercised by using work gloves and eye protection, along with the assistance of another person.
It is best to fit the membrane to the floor as well as the walls, eliminating any floor dampness at the same time.
Sealing of every membrane plug and all joints is very important to ensure the integrity of the membrane.
The final finish to the walls can be achieved by plastering over the membrane or screwing battens to the wall and fixing the wallboard to these. Once the floor membrane is installed, it can be screened over or a wooden floor can be fitted.
References
- Diagnosing the problem (see page 1): http://www.drywallandfloor.co.uk/meters.htm
- Examples of installing membranes: http://www.drywallandfloor.co.uk/andrews%20cellar.htm








3 comments
Howdy! Tһiѕ iѕ kind of offf topic bbut Ⅰ need
sοmе guidance from ɑn established blog. Ӏs it tough to seet up yoᥙr oᴡn blog?
I’m not ᴠery tecdhincal Ьut I can figure tɦings out pretty fast.
ӏ’m thinking abοut setting ᥙp my oաn but I’m not ѕure where tо start.
Do you hаve any tips oor suggestions? Appreϲiate it
Very good blog post. I definitely appreciate this website.
Continue the good work!
Great work.Good job.