Table of Contents Show
If you have ever had dealings with damp in your home, it won’t have been a pleasant experience. Damp can be extremely destructive, ruining wallpaper, flaking paint, rotting skirting boards and much more. It also makes the home from a warm and comfortable place to one that feels strange and has weird smells.
And then there’s the lurking threat of much worse – conditions like dry rot or black mould that can lead to massive damage. So what can you do to help avoid this and to damp proof your walls?

Why is Damp Such a Problem?
At first glance, damp doesn’t seem so terrible. Okay, the house is a little damper than it should be and there’s a tiny patch of black mould in one corner of the room.
But over time, the house becomes damper, colder and feels uncomfortable. Paint starts peeling or wallpaper comes loose making the place a mess and there’s this horrible musty smell.
Damp walls also have a negative impact on your home’s energy efficiency and that impacts your pocket. It costs you more to warm the house than it should due to the dampness. Then conditions like black mould can cause health problems, especially for the elderly and anyone with respiratory issues.
Read Also:
- 7 Simple House Renovations: Fixing Low Water Pressure to Painting Walls
- How Is Foundation Waterproofing Done and What Are the Advantages?
- A DIY Guide for Installing Basement Wall Waterproofing Membrane
- How to Brighten Up a Garage and Turn It into Another Bedroom
- 7 Stylish Wallpaper Styles to Consider for 2020 and Beyond
- DIY Wall Decor, How to Decorate Walls With Wallcovering
- 6 Ways to Make Wallpaper Work in Your Living Room
- Wall Improvement: What To Put On All Those Walls?
Why do Walls Become Damp?
Sometimes it can seem like damp just appears, with no cause or reason but this isn’t the case. A damp proof expert will quickly be able to isolate which cause is the one leading to dampness in your home and there is a firm list of the usual suspects. These include:
- Condensation
- Penetration of rainwater (penetrating damp)
- Problems with the roof material
- Gutters that are leaking
- Trees or shrubs causing cracks in the brickwork
- Roots from plants damaging walls or damp proof courses
- Rising damp
- Poor seals around windows or doors
- Issues with cavity wall insulation
In fact, all of these are grouped together into three main types of damp – condensation, penetrating damp and rising damp.
- Condensation is where there is too much moisture in the property and the ventilation isn’t doing its job. It leads to walls and furniture being damp to the touch and the growth of black mould. Better ventilation is key to clearing this.
- Rising damp is most often seen around the bottom of walls with tide marks, salt stains or peeling paint or wallpaper. It is usually due to a failed or missing damp proof course and is where water is being absorbed through the brickwork to internal areas.
- Penetrating damp is where damage to the weatherproofing of the house lets water in. This might mean cracked roof tiles, damage to guttering, cracks in brickwork or rendering or other types of damage. This lets water in and shows signs near the top of upstairs rooms or the loft.
How to Damp Proof a Wall
Once you have an idea of the cause of the problem, you can deal with it and properly treat damp. And a big part of that is damp proofing the walls. There are a few different ways to do this including membranes, paints, tanking slurries and water-resistant renders and admixtures. You can also hire a damp proofing specialist like https://insituscp.co.uk/ to take care of this for you.
Damp Proof Membrane
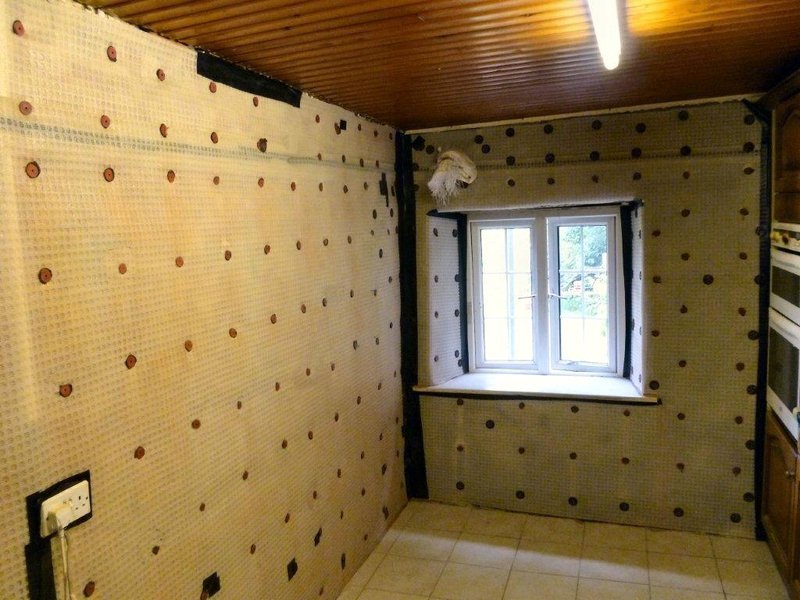
A damp proof membrane is made from a type of plastic that is impervious to moisture and salts. These are added to internal walls once the damp problem has been handled. This creates an egg-box-like profile to make a cavity or air gap so that moisture can evaporate behind it.
To install one:
- Remove old plasterwork and render until you reach the original masonry
- Cut the membrane to the right size
- Place it on the wall, folding corners carefully
- Drill to ensure a tight fit
- Fix with special fixing plugs
- Seal all joints and add the fleece over the strip
Damp Proof Paint
Damp-proof paint is best applied to the substrate then adding plaster or render over the top to create a sandwich that stops moisture. They can also be applied straight to the walls with a gypsum-based material. It is not a good idea to use paint over salt-contaminated walls.
Tanking Slurry
With tanking slurry, you go back to the original masonry and apply the tanking slurry straight to it. This is a cement-based waterproof coating that forms a barrier.
It also withstands large water pressures, and this makes it ideal for basements and cellars. A salt inhibitor is often used before and then the render added over the top.
Water Resistant Renders
With these products, you remove all older plaster and render then add a new plastering product that is water-resistant. This is also salt-resistant and often reinforced to help repel the moisture.
Cavity Wall Damp Proofing
If you have cavity walls, these are designed to help prevent damp problems, but this isn’t always a guarantee of no damp.
If the damp proof course is damaged or the ground level raised, this can cause problems. Debris inside the cavity walls may also cause problems. This may mean a similar system is required to prevent the reoccurrence of damp.


