Table of Contents Show
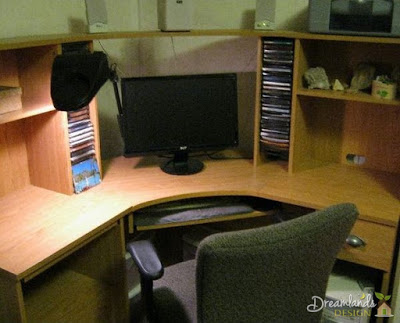
Build Your Own Computer Desk Plans. – This DIY Corner Computer Desk Plans has it all, vertical storage space as well as horizontal. These computer desk plans are detailed in a step-by-step layout to guide you through the process of building it yourself. Let’s get started.

Build Your Own Computer Desk Plans: DIY Corner Computer Desk Plans
Pre-Assembly Instructions for DIY Corner Computer Desk Plans
When building your DIY corner computer desk plans remember, it is important to pre-cut all of your pieces and gather all of your supplies. Have the area you intend to place the desk cleaned and ready to accept this massive desk. Unless you have a large doorway and strong helpers, moving this desk is a monumental task, so build on site. You may ask, “Do I have to pre-cut my pieces?” No you don’t, but it makes the process go much faster.
* Tip: Cutting off site is the smartest way to go. Utilize a garage or workshop for the prep work.
What You Will Need to Build Your Own Computer Desk Plans
3/4″ Plywood or laminated wood
- 4- 27 1/2″ x19″ cut pieces for the base legs (A)
- 2- 281/4″x5 1/2″ cut pieces for the center legs (B)
- 2- 23 3/4″x8″ cut pieces for the center leg braces (C)
- 1- 111/4″x63/4″ cut piece for the drawer front (D)
- 2- 13 1/2″x4 3/4″ cut pieces for the drawer sides (E)
- 1- 8 1/8″x 4 3/4″ cut piece for the drawer back (H)
- 2- 20 3/4″ cut pieces for the right desk top (G)
- 6- 20″x9 3/4″ cut pieces for the upper shelf legs (I)
- 1-4’x4′ Piece to cut out the desk center, and desk top center shelf out of (J,K)
- 2- 20 3/4″x 9 3/4″ cut pieces for the top shelf end pieces (L)
- 2 14 3/4″x4″ cut pieces for the keyboard side boards (N)
- 1-24″x12″ cut piece for the keyboard drawer (O)
- 1- 20 3/4″x19 1/2″ cut piece for the left side bottom (P)
- 2- 15 1/2″x 17 3/4″ cut pieces for the bottom instant shelves (Q)
- 2- 17 3/4″x 9 1/4″ cut pieces for the top instant shelves (R)
- 1- 19 3/4″x 113/4″ cut piece for the right side bottom (S)
- 1-15 1/2″x 10 1/2″ cut piece for the side door (T)
1/4″ Plywood or laminated wood
- 1-13 1/2″x8 1/8″ cut piece for the drawer bottom (F)
- 1-25 1/2″x 4’5″ cut piece for the left side back panel (M)
- 1- 25 1/2″x 21″ cut piece for the right side back panel (M-2)
Miscellaneous Items Needed to Build Your Own Computer Desk Plans
- 2- sets of 12″ drawer slide
- 1- decorative drawer pull
- 2- hinges with 1/2″ screws
- 1- door latch (to be used to keep the side door closed)
- 8- “T” brackets with 1/2″ screws
- 20 – “L” brackets with 1/2″ in screws
- 75 – 1″ self starting screws
- 2 – CD tower inserts
- 16- small shelf brackets
Tools Needed to Build Your Own Computer Desk Plans
- Circular saw, or table saw
- Drill
- Jig saw
- Drill bits smaller than your screws
- Painters tape ( if you are using laminated wood)
- Drill bit with a 1/4″ stop on it
- Sander and medium- fine sandpaper ( if you are using plywood)
Must Read:
Step #1 of DIY Corner Computer Desk Plans
To begin building your DIY computer corner desk, find the center leg pieces you precut. These are labeled (B). Butt them together and screw them together at the joint with 1″ screws.

Next, measure down 3″ from the end that will be the top. Place 2- 1″ screws on each (B) panel, screwing this corner piece onto the center leg braces which measure (C).
* Tip: You can pre-drill a small pilot hole if you wish, but if you buy self starting screws it will make the process so much faster.
Step #2 of DIY Corner Computer Desk Plans
Now that you have the center leg assembled, it is time to put together the left side leg. This leg sits on a platform which also doubles as a bottom shelf. Start by placing the left side bottom piece (P) on the floor in the general area you wish the left side of your corner desk to be. You may need a helper to assemble the legs and the back piece.
To do this, begin by screwing the back panel (M) to the bottom piece (P), forming an “L” shape. The proper placement of the back panel is on center. Screw them together, keeping the back panel on the outer edge next to the floor, not on top of the bottom piece.

Now tip the bottom piece (P) on end, laying the back on the floor. Butt up the side panels (A) one at a time to the bottom piece, securing the piece with 1″ screws. You will notice remaining room extending on the sides and front. You will have 1/4″ on the outside edge. This is correct.
* Note: As you may have noticed by now, your assistant is invaluable to you. They will need to hold these pieces as you screw them together.
After you have secured the leg panels (A) to the bottom (P), it is time to raise the entire section back upright. Now screw the back panel to the legs with 1″ screws to secure the whole section.
Must Read:
Step #3 of DIY Corner Computer Desk Plans
Next, you will want to add the left desk top (G) to the unit. To do this, place the top on the bottom legs (A), keeping a slight overhang on the left and front. Make this the same as the bottom piece (P).
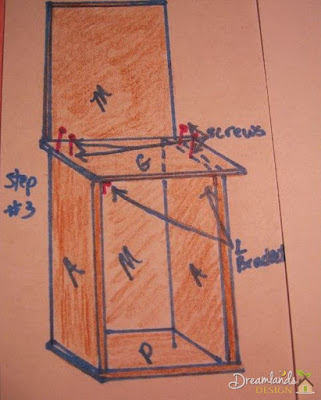
* Note: It will hang over considerably more towards the right or middle of the piece. This is what you want.
Now screw this down to the bottom legs with two 1″ screws, making sure not to place them within 9″ from the back panel.
Step #4 of DIY Corner Computer Desk Plans
- Now that you have your base for the left side complete, it is time to add the legs for the top shelf to the unit.
- Secure the panels to the right desk top with 2 “L” brackets each. Follow the diagram for the placement.

* Note: The placement doesn’t have to be exact, but it is a good idea to be consistent in the placement. Keeping the “L” brackets near the edges is best.
Step #5 of DIY Corner Computer Desk Plans

- Next, place the top shelf end piece (L) on top of the top legs (I).
- Secure them with “L” brackets, following the diagram.
- Continue securing by screwing the back to the back of the top shelf end (L). Use 1″ screws and evenly space them along the top back edge of the shelf.
Must Read:
Step #6 of DIY Corner Computer Desk Plans
- Now it is time to connect the center leg to the left side leg unit.
- To do this, butt the center leg section (C) up to the right side of left leg unit, connecting to section (A) with 1″ screws.

- Achieving proper placement requires measuring from the inside back of the section 8″.
- Next, measure from the floor to the base of section (C). Subtract 3/4″ and that is where you should begin placing screws in the inside of section (A). Follow the diagram for proper placement.
Step #7 of DIY Corner Computer Desk Plans
- Continue by next assembling the right inside leg (A).
- To do this, you will need to place the right side bottom (S) on the floor. Next, attach your leg (A) on the left side with “L” brackets. The allowance on that edge is 1/4″ and flush with the back.
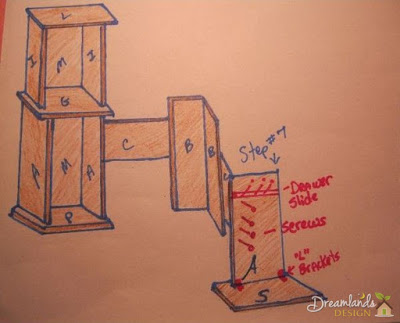
- Next, screw the leg to the center section. Follow the specific directions for finding the placement of the screws in step #6. Continue to refer often to the diagram.
- Lastly on step #7, you need to attach the left drawer slide while you can get to it. The placement of this is 5 1/4″ from top of leg (A).
How-To Magic
When you know how to make things yourself, there is a sense of pride in that. When you find just the right instructions to help you in your adventure, that is a match made in Heaven. Dream Lands Design strives to bring you just that. Concise clear, visual instructions on things you want to know how to do.
- DIY Corner Computer Desk Plans, Build Your Own Computer Desk Plans
- Moving Made Easy: How to Pack a House
- DIY Plans for an Entertainment Center with Download
- Easy Directions for How to Make a Decorative Wishing Well