Table of Contents Show
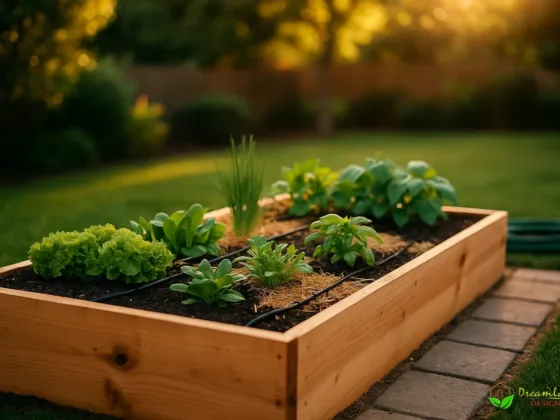
Bring the wonders of nature closer to your home with DIY wood planter boxes that are simple to make and complement beautifully whatever flowers, herbs, and other plants you have growing inside them. So, how to build a wooden planter box easy for your deck? Read below to learn more.

How to Build a Wooden Planter Box Easy for Your Deck
Add color and life to the outside of your home with wood planter boxes for your deck filled with flowers, herbs, and other beautiful plant life. Build your wooden planter boxes yourself to give the finished product an even more personal touch.
Learning how to build a wooden planter box for your deck is surprisingly easy and can even save you money on the endeavor.
Styles of Boxes
You could build small, long, and rectangular wooden planters to mount as window boxes overlooking your deck or build large, square planters to sit out on the deck itself, either lining the edges, framing the opening to a pathway, or pressing up near the side of the house.
Which type and size of the wooden planter box do you build, depending on the design and possible limitations of your deck as well as the types and sizes of plants you wish to grow inside your DIY wood planter boxes? At the end of this article, you’ll find suggestions of several creative touches you can give to these basic DIY wood planter boxes.
What Type of Wood to Use
In choosing the type of wood to use for your DIY wood planter box, consider natural woods, like pine, rather than plywood or pressure-treated wood, which can leach chemicals into the soil that can be harmful to your plants. Cedar and redwood are particularly suitable types of lumber to use for building planter boxes.
Tools & Materials
Tools
- Tape measure
- Handsaw, scroll saw
- Speed square
- Drill
- Screwdriver
- Scissors
Materials
- Wood boards approx. 1″ thick
- Pen or carpenter’s pencil
- Galvanized screws
- Wood cleats
- Screen (nylon or vinyl, ie. window screen)
- Sandpaper
- Mountain brackets (optional)
- Wood stain, finish, or paint (optional)

Step-By-Step Instructions for Building Wooden Planter Boxes
Here’s how to build a wooden planter box easy for your deck in 7 easy steps:
1. Cut the Boards
Measure the space where you intend to place the planter box and figure out the dimensions for the box you’d like to build, including length, width, and height. There are a few important considerations to take into account when figuring out the dimensions for your box:
- When measuring out the bottom panel for the box, be sure to account on all four sides for the overhang from the other panels that will attach to it. The best way to do this is to subtract double the thickness (or depth) of your boards from your desired box’s length and width.
- Similarly, the side panels should be measured with twice the board’s depth subtracted from your desired box’s width so they will fit comfortably between the front and back panels to which they will attach.
To illustrate this point, and for easy reference, here are two sets of measurements, one for a sample window box and one for a sample free-standing planter box:
Sample Measurements for an 8″ x 8″ x 48″ Window Box:
- Front/back panels: 1″ x 8″ x 48″
- Side panels: 1″ x 6″ x 8″
- Bottom panel: 1″ x 6″ x 46″
Sample Measurements for a 24″ Square Free Standing Planter Box:
- Front/back panels:1″ x 24″ x 24″
- Side panels: 1″ x 22″ x 24″
- Bottom panel: 1″ x 22″ x 22″
Mark the boards according to these dimensions so that you have 2 identical panels for the front and back, 2 identical panels for the sides, and 1 bottom panel. Cut the boards to the desired dimensions and sand each panel to smooth out the sharp edges.
2. Attach the Panels

Holding the front panel steadily with a side panel placed flush against one of its edges, and making sure the tops of both panels are level with one another, drill three or more screws an equal distance apart to secure the two pieces together. Leave no more than 3″ of space between each screw.
Do the same with the other side panel against the other edge of the front panel. Then attach the back panel to the opposite edges of the two side panels to form the four sides of your planter box.
Lastly, set the bottom panel down flat on your working surface and lower the open-ended box you just created over it carefully. If you measured correctly, the box should fit securely over the bottom panel so that you can easily screw in all four sides to attach it.
If the front and back panels of your box are longer than the sides, you’ll obviously need to use more screws to securely bind the longer edges.
3. Drill Drainage Holes
Drill several holes 3/4″-1″ in diameter along with the bottom panel of the box. Space them evenly apart, each one several inches from its neighbors and the sides of the box. These drainage holes are essential to prevent the roots of the plants growing in the planter box from rotting.
4. Add Cleats (optional)
Using cleats is an optional way to allow for the water that drains out of the holes you just drilled to drain completely and not soak the bottom of the DIY wood planter box, which could over time cause the wood to rot.
Cleats are simply rectangular wooden blocks that you screw to the underside of the box, near its outer edges, which act as a stand to keep the bottom panel and edges of the box from resting directly atop any surface it’s placed upon. Unless you’re making a very large DIY wood planter box, two cleats running parallel to the sides of the box should suffice.
If you’re planning on mounting your DIY wood planter box up against the window as a windowbox, cleats aren’t so necessary, as the water will just drop to the ground.
But if you plan on setting your planter boxes down on the surface of the deck itself, then cleats help maintain the clean and beautiful look of the planter boxes, prevent rotting of the surface of the deck beneath the boxes, and prevent the plants from growing inside the planter boxes from getting waterlogged.
5. Insert Liner
Measure the interior length and width of the box and cut the screen to those dimensions. Then lay the screen inside the DIY wood planter box, over the bottom panel. This will act as a liner to prevent dirt and gravel from falling through the drainage holes.
6. Finish the Box
Now is when you can get creative with the look of your newly built DIY wood planter box. You may choose to stain, seal or finish the box or prime and paint it to match the color scheme of the deck or deck furniture near where you’ll place it.
You can paint the planter box a solid color to blend with the siding on your home or the color of your deck or patio furniture, or you can paint it with an elaborate design to stand out as an accent piece in your outside décor.
However, if you decide to finish it, keep in mind the kinds of plants and flowers you intend to plant inside your DIY wood planter box, as you may not want the look of the box itself to overshadow the beauty of the plant life you have growing inside it.
Keep in mind, if you don’t at least use some sort of wood finish, the planter box will not be as water- and weather-resistant on the outside. Linseed oil is great for preserving wood and protecting it from insects and the elements.
7. Mount it in Place
If you wish to mount your DIY wood planter box on the deck (or any other horizontal surface, like a patio or shelf) you need only set it in place. To mount it against a vertical surface your easiest option is to use some appropriately sized mounting brackets that you can pick up from your local hardware store.
Creative Considerations on How to Build a Wooden Planter Box Easy for Your Deck

The preceding gives you the general outline for building a simple DIY wooden planter box. If you’re feeling really creative, however, you can take these instructions and expand on them to create more elaborate designs. Here are just a few ideas to get your creative juices flowing:
- Create contours, like a wave or rounded edges, along with the tops of the panels using a chisel or a jigsaw
- Use a chisel or a wood-burning tool to etch a word in the front panel, like the family name or the names of the plants you’ll have growing there, like “Herbs“ or “Flowers“
- Use wood glue to attach decorative items, like wooden carvings of roses or birds, to the outside
- Screw-in S-hooks along the top edges of the DIY wood planter box and hang it from a beam or a tree branch as a hanging planter box
- Use wooden slats attached to a frame rather than singular panels for each side
- Rather than building a perfectly square or rectangular box, the more carpentry-savvy DIY-er can build a planter box with panels that angle outward as they rise from the bottom, creating a larger opening at the top that narrows as it approaches the bottom panel.
That’s how to build a wooden planter box easy for your deck in 7 easy steps. Other creative DIY wooden planter box designs can be found at the links below in the Resources section.
Resources & Image Credit
- Jim Barry’s WoodworkingWorkshop.com: Planter Boxes at WoodworkingWorkshop.com
- How to Build a Planter – 17 Planter Woodworking Plans; http://www.free-diy-plans.com/plans-planter.html
- How to Build Planters with Step-by-Step Instructions. Build some Planters today; http://www.decksgo.com/build_planters.html
- Planter Box; Simonfilm (morgueFile); https://morguefile.com/p/78653
- Windowbox; Sergei S. Scurfield (Wikimedia Commons); http://commons.wikimedia.org/wiki/File:Windowbox.jpg
- Flower Planters: Green Lane (Wikimedia Commons); http://commons.wikimedia.org/wiki/File:Flower_planters,_Nantwich_-_DSC09201.PNG


