Table of Contents Show
Tired of your current home decor and want to revamp your home? Then consider whitewashing your hardwood floors! Whitewashing, sometimes called “pickling,” is a technique used on hardwood floors that can give them a lighter, brighter look.
This wonderful method is incredibly unique and will give your floors that fresh look you’ve been craving. It can also be a great DIY project if you have some spare time on your hands.

Keep reading to learn more about whitewashing, including how to do it yourself and some aftercare tips.
What is Whitewashing?
Whitewashing, simply put, is when you paint over the material with a whitewash to give it a brighter appearance. Whitewash is a solution that usually consists of latex paint, calcimine, or even bleach and it can be purchased at any paint store — or you can make it yourself!
Whitewashing floors was a popular treatment a long time ago because lime is an antibacterial substance that can protect the wood from mold, mildew, and moisture. If you’re ever seen an old colonial house and wondered why the floors were a white chalky color, that’s why.
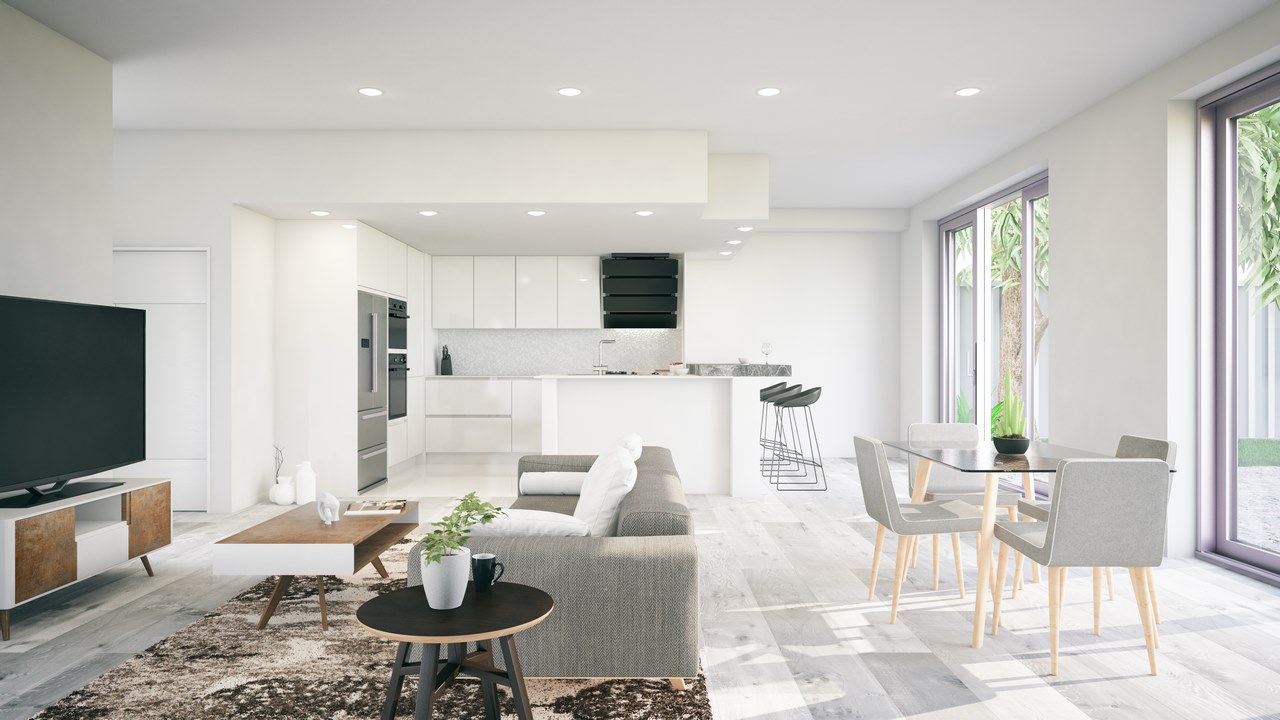
The most popular styles associated with whitewashed floors are Nordic and Scandinavian decor. In general, you see a lot of lighter colors when it comes to Scandinavian decor, so it makes sense that it would also translate to the floors.
Hardwood floors in a lot of Scandinavian households are purposefully left distressed or imperfect, allowing the personality of the floor to shine through. The same look can be found in homes that celebrate beachy or farmhouse decor.
Read Also:
The Benefits of Whitewashing Your Floors
When it’s done right, whitewashed floors can make a space more stylish, professional, and bright. With this treatment, you’re not covering up the grain or knots, you’re only lightening the actual wood.
Imperfections and natural spots will be slightly hidden after whitewashing, but you’ll still be able to see them.
This is part of a trend that’s becoming more popular: a shift away from complete perfection in decor and embracing the parts of our homes that make them unique.
Whitewashing your floors can also make small rooms appear brighter and larger if this is one of your concerns. You can take it up a notch and also make sure the walls are a brighter color, like eggshells or cream.
Another benefit of whitewashing your floors is that it can evoke the appearance of a specific time period. This is especially great if you like to keep things old-school.
How to Whitewash Your Floors
This method of brightening your floors is incredibly easy and can either be professionally done or a DIY project. To make sure you do it correctly, you’ll want to follow these simple steps:
1. Choose the Right Wood
You’ll first want to check to make sure your floors would be well suited for whitewashing. Lighter-colored woods like maple and ash react better to this treatment.
Pine is the best. It’s not recommended that whitewashing be used for darker woods as the floors can turn out gray and muddy looking.
2. Sand, Polish and Clean
The next step is to sand your floors to get rid of any paint or polish. Your floors need to be completely bare so that the paint sticks. Then, make sure to clean up the leftover dust and grits with a vacuum or damp cloth, allowing the floors to completely dry.
Some articles found on the internet might recommend bleaching your floors before applying the whitewash, however, this is not necessary and can even damage your floors.
3. Apply the Whitewash
A white stain or tinted sealer can be picked up at your local supply store. If you want to go a different route, you can mix white latex paints with water using a 2:1 ratio, altering if you want thinner.
The issue with using paint is that it can be hard to maintain and can hide the natural grain of the wood, leaving your floors looking dull, so using paint is not recommended.
If you’re confused about what products to use, or need more guidance on the best whitewashing products out there, then reach out to a flooring expert. They will be happy to point you in the right direction.
When you apply the stain to the floors, you’ll want to work with the grain of the wood in long, thin strokes with a regular 4-inch paintbrush. If you want, you can always do a patch test first.
The stain will dry quickly, so it’s good to work in small sections at a time. You can also use a cloth to rub the whitewash into the wood so the stain bonds with the wood panels.
After you’re done painting, you have the option to lightly sand the floor to take care of any uneven spots, or you can do a second coat if you want a darker finish.
4. Seal It In
The final step after you’re satisfied with the color is to apply a coat of water-based polyurethane lacquer, which will protect your floors and seal in the color. Et voilà ! Beautiful whitewashed floors.
Aftercare
Wait at least 24 hours before applying another coat of polyurethane to the floors and at least 3 days before allowing foot traffic in the room. Some even suggest waiting 4 days before moving small pieces of furniture into the room.
You also don’t want to add area rugs or mattresses at this point, as the floors still need to breathe and cure.
Depending on the humidity of your house, after 7-14 days, the floors should be completely cured and ready for area rugs, larger pieces of furniture, and heavy foot traffic like pets or small children.
As you’d expect, white floors show dirt a lot more than darker floors and require a certain amount of upkeep. To maintain clean whitewashed floors, use a gentle cleanser when mopping preferably something natural.
Abrasive solvents are not a good idea to use on newly whitewashed floors as they can remove all your handiwork.
This brings us to another point that you’ll want to consider before starting any of the above steps. Over time, you might see the whitewash on your floors start to wear off.
This can be seen as either an intriguing patina or an unattractive defect, depending on your style. Understanding that spotting is a possibility might dissuade you from starting this project, so keep this in mind before picking up a brush.
It’s possible to reduce the spotting by using a high-end and reputable top coat, however, there’s no guarantee it will prevent all wear and tear. But to those who love this look, you’re all set to get your paint on!
Whitewashed Floors Are Worth the Hype
If you want to try something new and love the look of Scandinavian or beachy homes, then whitewashed floors are perfect for you. When you whitewash hardwood floors, you’re dramatically changing a room and revamping your home.
They look great in the kitchen, the living room, or even the bathroom. If you want to try whitewashing floors but are still skeptical, try whitewashing outdoor furniture, fences, or even your deck to see if the style works for you.
Sarana Tile is a tile and hardwood floor supplier in Toronto, Ottawa, and Hamilton that specializes in working directly with their customers on exciting projects. If you want more information or are interested in chatting with a professional, reach out today.

