Table of Contents Show
My house was built in the 1970s and hadn’t had any renovation work done on it since that time – it was truly hideous!
My first project had to be the kitchen… think faux slate linoleum floors, heavy timber kitchen doors, and wall panels with a red brick feature archway over the benchtop.
A renovator’s dream! On the plus side, everything was still functional – built at a time when fittings and fixtures were made to last.

I had a quote to get a full kitchen renovation, but at $20,000 it was well out of my budget. So, I decided to do most of it DIY and splash out on a few key items, like the kitchen benchtop, appliances, and sink.
Painting Kitchen Cupboards and Panels

The first thing I did was research how I could paint the kitchen cupboards and panels. This would mean less cost and a more environmentally friendly renovation with perfectly good cupboards avoiding landfills.
I suggested painting the doors to a few friends after seeing it done on some home renovation shows, but they all said I was crazy.
A kitchen designer told me it wouldn’t work because I have handles on my doors and those sections would be easily scratched.
He said the paint would easily bump and scrape in this busy area of the house and I would be investing hours of my time for a DIY disaster.
Not to be deterred, these comments all made me more determined to paint and see if I could prove them wrong.
I watched Youtube videos and started interacting on my local DIY Facebook page and discovered plenty of posts from people who had successfully painted cupboards, tiles, sinks, and bathtubs.
There are a few brands of paint that are specifically designed to paint over cupboards and the projects I saw online looked really professional.
At a fraction of the cost of new doors, the painting was starting to look like a great option! Even if it lasts a few good years that will give me time to save for replacement doors down the track.
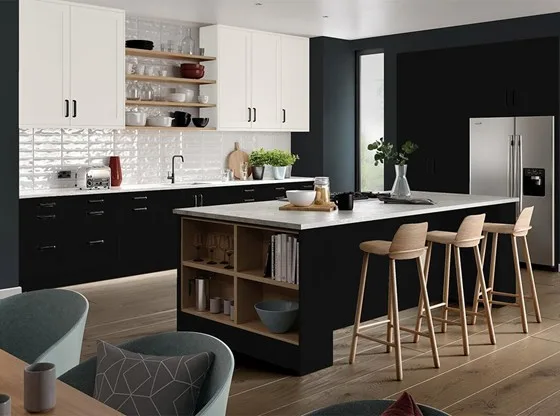
Deciding on the color was the hardest part! I was originally going to stick with classic white, but after ogling kitchens on Pinterest for a few days I opted for the opposite – I went for predominantly black kitchen cupboards with a few white ones along the top for contrast.
This was a big risk for me because normally I love all things light, but I figured if I didn’t like the dark shade I could always paint over them again in a few months’ time.
This color also matched the black ornate windows that I couldn’t afford to replace. I love those windows now and everyone comments on how they look!
The first step was to clean, clean, clean! Prepping the surface seemed to be essential to ensure the painting was a success.
I am a strong advocate that every woman should own a drill and I got to work removing the doors from their hinges.
Then I bought some sugar soap, sandpaper, and a mask and got to work. I removed all the doors and spent a solid day cleaning, making sure to remove any trace of grease or grime from the surfaces and crevices.
With light sand, my old timber doors were ready to paint! I must admit at this point I was thinking new doors would have been a lot easier, but I was committed!!
I had bought quality paintbrushes and a small microfiber roller and got to work applying the primer, which I believe is an essential step to ensure the longevity of the paint.
The people at the hardware store said I could skip this step for timber doors, but I wasn’t taking any chances. I sat my doors on an old camping table in the shade and meticulously set to work.
The primer didn’t take long to dry and with long, clean strokes my first coat of paint was done. So far so good.
I was starting to have a great sense of achievement and was excited to see how they would look when finished and hung in the kitchen.
I left the doors to dry overnight and then did a second coat. I was VERY happy with the result! After cleaning up the hinges they were ready to hang.
Doing it solo it took me a good two weekends to get them done and cost under $200. I was pretty overpainting at this stage, but it was well worth it and I was happy with the result.
I made a couple of little mistakes, like not rolling the primer properly so you could see a few raised sections, but overall I rate it a huge success!
Six months later my DIY kitchen cupboard paint is still going strong, not a single scratch to be seen.
Read Also:
- Top Benefits of Stone Kitchen Benchtop Resurfacing to Transform your Kitchen
- Painting Kitchen Cabinets – Top Tips and Mistakes to Avoid
- 4 Ways to Make the Most Out of Your Small Kitchen
- Benefits of Installing Stone Kitchen Benchtops
Sink and Tapware

I love a sexy sink and I drooled over the beautiful white porcelain sinks in images of country kitchens and I contemplated a black kitchen sink to match my cupboards, but ultimately decided that wasn’t the right look (or budget) for my home.
I opted for a brushed silver sunken double sink with a drainer tray, which fit beautifully under my kitchen window.
It has clean edges that made it look modern and it seemed like a more practical choice… it was definitely a huge improvement to the chunky old stainless steel sink I had in the original kitchen.
For a tap, I stuck with silver to match my sink. I did spend some time looking at black taps and then brushed metal and even gold, which are all very on-trend for kitchens in 2021, but I had to stick to my budget and found an affordable tap and mixer that I was happy with.
Nothing fancy, but a big step up from the original tapware so I was happy!
Remove the Arch
My kitchen came with a very dated brick archway over my benchtop, which really showed the age of my home.
I had a builder friend help me knock this down and patch the wall for a case of beer. This lets in more light and made the room feel much more open and inviting.
Benchtop Resurfacing

I spent a lot of time researching how to get a stone benchtop without breaking the bank. This is when I discovered Granite Transformations my local company for kitchen renovation Sutherland Shire.
They have been around for over 25 years and are a global company (although I think they started in Australia) whose website says they have done over 1 million benchtops.
They were able to measure my benchtop and install it in 2 days with nothing going to landfill – quick, easy, and no fuss!
That was perfect for me and the benchtop is definitely the highlight of my kitchen renovation.
The benchtop cost just over 600 Aussie dollars per meter, which was much more affordable than traditional stone.
I did consider the marble range, but at $800 per meter, I decided I could use the extra money on new appliances.
I chose the classic white stone benchtop to offset the black cupboards and was over the moon with the results.
Granite Transformations were able to fit the stone benchtop overlay around the new kitchen sink and keep a stylish thick square edge.
They extended the benchtop out into the living space to make it almost double the original size. Perfect for the kids to sit and do their homework while I cook dinner!
I was really impressed that they could customize the shape and were not limited to the dimensions of the original benchtop.
I highly recommend benchtop resurfacing for many reasons. The quality of the stone is second to none and, according to Granite Transformations, their benches outperform much more expensive traditional stones.
So far no scratches, stains, or chips and it’s so much nicer in look and feels than the old laminate benchtop.
Flooring
Getting rid of the hideous linoleum floor was a real highlight to this kitchen makeover. It was so ugly!
I wasn’t sure what to get and did plenty of research. There were a lot of opinions about flooring on the online forums and I was left contemplating vinyl plank, hybrid, or bamboo for a timber look finish.
After shopping around I opted for hybrid hoping they would outperform the other options. I also found a color that I loved with the right amount of warmth but not too dark.
I decided to leave the laying to the experts and this was one of my biggest expenses at around $50 per square meter.
Kitchen Appliances
I splashed out on kitchen appliances and bought them all from a popular online store. I opted for stainless steel fridge and dishwasher, which really look great against the black cupboards.
I love them! My new double oven is awesome for baking and the guys from Granite Transformations were able to help with the installation.
I took a risk buying them all online, but overall very happy with how they look and I was able to get them at a really great price by shopping at sale time!
I added a funky black and white clock and a couple of plants for decoration (because that’s what everyone was doing on Pinterest) and they make a big difference too.
The clock adds a bit of sophistication and style that was otherwise missing.