Dream Lands Design
  • Home Improvement
    • DIY
    • Remodeling
    • Woodworking
    • Accessories
    • Home Design
      • Furniture
      • Organize
      • Tips
      • Decor
        • Interior
        • Exterior
  • Design Ideas
    • Bathroom
    • Bedroom
    • Dining Room
    • Living Room
    • Kitchen
  • Gardening
    • Backyard
    • Front Yard
    • Landscaping

Categories

  • Accessories
  • Backyard
  • Bathroom
  • Beauty
  • Bedroom
  • Cars
  • Decor
  • Design Ideas
  • Dining Room
  • DIY
  • Entertaining
  • Exterior
  • Finance
  • Front Yard
  • Furniture
  • Gardening
  • Green Living
  • Home Design
  • Home Improvement
  • Interior
  • Kitchen
  • Landscaping
  • Lifestyle
  • Living
  • Living Room
  • Organize
  • Photography
  • Real Estate
  • Remodeling
  • Tips
  • Uncategorized
  • Wall Improvement
  • Woodworking

Archives

  • January 2023
  • December 2022
  • November 2022
  • October 2022
  • September 2022
  • August 2022
  • July 2022
  • June 2022
  • May 2022
  • April 2022
  • March 2022
  • February 2022
  • January 2022
  • December 2021
  • November 2021
  • October 2021
  • September 2021
  • August 2021
  • July 2021
  • June 2021
  • May 2021
  • April 2021
  • March 2021
  • February 2021
  • January 2021
  • December 2020
  • November 2020
  • October 2020
  • September 2020
  • August 2020
  • July 2020
  • June 2020
  • May 2020
  • April 2020
  • March 2020
  • February 2020
  • January 2020
  • December 2019
  • November 2019
  • October 2019
  • September 2019
  • August 2019
  • July 2019
  • June 2019
  • May 2019
  • April 2019
  • March 2019
  • February 2019
  • January 2019
  • December 2018
  • November 2018
  • October 2018
  • September 2018
  • August 2018
  • July 2018
  • June 2018
  • May 2018
  • April 2018
  • March 2018
  • February 2018
  • January 2018
  • December 2017
  • November 2017
  • Privacy Policy
  • Terms of Use
  • Disclosure
  • Sitemap
  • Contact Us
29K
98K
0
Dream Lands Design
  • Home Improvement
    • DIY
    • Remodeling
    • Woodworking
    • Accessories
    • Home Design
      • Furniture
      • Organize
      • Tips
      • Decor
        • Interior
        • Exterior
  • Design Ideas
    • Bathroom
    • Bedroom
    • Dining Room
    • Living Room
    • Kitchen
  • Gardening
    • Backyard
    • Front Yard
    • Landscaping
Featured of Tips and Steps How to Staining Wooden Window Frames
You're here: Home Woodworking Tips and Steps How to Staining Wooden Window Frames

Tips and Steps How to Staining Wooden Window Frames

  • Perla Irish
  • August 10, 2018
Total
21
Shares
8
0
13
0
0
Table of Contents Hide
  1. Introduction to Staining Wooden Window Frames
  2. Gathering the Materials
  3. Preparing the Frame
  4. Apply the Stain
  5. Some Tips on Staining Wooden Window Frames
    1. Reference

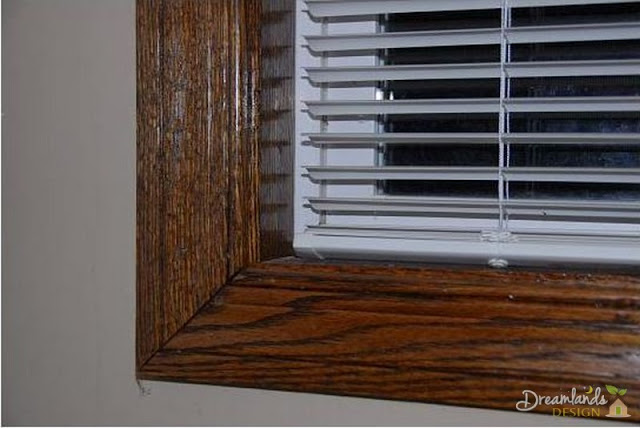
If you want to stain your wooden window frames, to give them that dark wood look, let this guide show you how. I cover everything from preparation to the actual staining and finishing process and throw in some staining tips as well.

Image - Tips and Steps How to Staining Wooden Window Frames
Tips and Steps How to Staining Wooden Window Frames

Introduction to Staining Wooden Window Frames

Your window frames support your window and act as a visual transition between your walls and the outside world. When you first install them, they may look light and cheap, but that’s nothing a good coat of stain can’t fix.

Staining window frames let you give them a darker look while still being able to see the grain of the wood.

Staining is a little different than painting, since you aren’t just covering up the wood, so it requires a few additional steps to get your frames looking good, but these tips on staining windows will help you complete the task.


Read Also:

  • Window Maintenance 101: How to Keep Your Windows in Good Condition
  • Creative Ways to Enlarge the Look of Small Finished Basement Windows
  • Smart Windows & Other Innovative Window Systems for The Home
  • DIY Plantation Shutters Window Treatments for Your Home
  • Best Window Treatments to Change the Look of Your Rooms
  • DIY Repainting: How to Paint Your Old Wood Furniture
  • How to Stain and Brighten Your Wooden Fence

Gathering the Materials

Before you can start on your project, you need to pick out the right stain. If you know that you have a softwood frame (softwood will generally have an uneven or spotty grain) you might want to get a wood conditioner to allow the stain to more easily apply. However, if you don’t mind accentuating the irregularities in your wood, you can skip the conditioner.

You can pick out whatever kind of stain you like. Oil and gel-based stains tend to be the best for window frames, but they will sink in and stain unevenly along the grain of the wood.

You can consider a water-based stain if you are looking for a more even color since water-based stains don’t sink into the wood as much. You also need to pick up a polyurethane sealer, which will protect the stain and give the wood a finished look.

Preparing the Frame

Start by sanding the frame with 120-grit sandpaper. If your frames are already painted, stained or finished, continue to sand until you remove the layer so you can start fresh.

Change to slightly finer sandpaper and sand again, then keep using finer sandpaper until you get to around 220-grit. After you finish sanding, go over the wood with a tack cloth, or just a damp cloth, to remove any lingering debris.

Place painter’s tape along the edges of the window frame. You don’t have to apply it on any vinyl that might be adjacent to the wood since you can just wipe the stain off, but it will make it easier if you apply the tape to other surfaces that might surround the frames.

Apply the Stain

Put on gloves, place a drop cloth under the window and stir or shake your stain according to the directions on the can. Place the stain on a cloth and apply it to the wood in a long, continuous motion going with the grain.

You can use a brush or a sponge if you desire. Try to apply as even an amount as you can. If you get any stain on the window sash, wipe it up quickly with a clean cloth.

Stained Window Frame - Staining Wooden Window Frames
Stained Window Frame (Staining Wooden Window Frames)

Wait about 10 minutes, or 5 if it is very humid where you are. Then take a clean cloth and wipe down the wood. Let the stain dry, the amount of time needed should be listed on the can, then lightly sand the wood and apply another coat if you want a darker look.

Continue until you are happy with the look of the frame. Then apply the polyurethane topcoat with a high-quality brush to finish the project.

Some Tips on Staining Wooden Window Frames

If your stain is too light, you can always add more to darken it. If your stain is too dark, there is nothing you can do. Always make your coats light until you get a feel about how much each coat will darken the wood.

If you have a piece of test wood that is the same type of wood as your frame, practicing on it will give you experience on how to apply the stain, and will also let you see how it will look.

Staining is much easier if you do it before it is installed. This isn’t always possible, and I wouldn’t tear it down to stain it, but if you can you should stain in first, then install the finished product around your windows.

Keep the window open while you work, since the stain and the polyurethane sealer both have strong odors and inhaling them for a long period can be dangerous.

Reference

  1. How to Stain a Wooden Window Sash – https://www.doityourself.com/stry/how-to-stain-a-wooden-window-sash
  2. All pictures are copyright of the author.
Total
21
Shares
Share 8
Tweet 0
Pin it 13
Share 0
Share 0
Related Topics
  • staining wood
  • wood stain
  • woods

Subscribe

Subscribe now to our newsletter

You May Also Like
Featured image - Which Air Conditioner Consumes Less Electricity
View Post

Which Air Conditioner Consumes Less Electricity

  • January 28, 2023
featured image - Mosquito Larvicide - BTI
View Post

Mosquito Larvicide – BTI

  • January 28, 2023
featured image - The Key Benefits of Adding Windows to Your Kitchen
View Post

The Key Benefits of Adding Windows to Your Kitchen

  • January 28, 2023
featured image - The Best Fireplace Accessories of 2022
View Post

The Best Fireplace Accessories of 2022

  • January 28, 2023
featured image - Unlocking the Perfect Palette for Your Home A Guide to Residential Painting
View Post

Unlocking the Perfect Palette for Your Home: A Guide to Residential Painting

  • January 28, 2023
featured image - Asphalt Maintenance Tips You Need to Know
View Post

Asphalt Maintenance Tips You Need to Know

  • January 28, 2023
featured image - How To Know When It's Time to Replace Your Home's Windows
View Post

How To Know When It’s Time to Replace Your Home’s Windows

  • January 26, 2023
featured image - Trenton, NJ Roof Repair by Certified Roofers
View Post

Trenton, NJ Roof Repair by Certified Roofers

  • January 26, 2023
1 comment
  1. Pat says:
    September 4, 2019 at 11:11 am

    Great article! If I wanted to find someone to do this for me, rather than try it myself, who would I go to? A painter?

    Thanks.

    Reply

Leave a Reply Cancel reply

Your email address will not be published. Required fields are marked *

This site uses Akismet to reduce spam. Learn how your comment data is processed.

Dream Lands Design
  • Privacy Policy
  • Terms of Use
  • Disclosure
  • Sitemap
  • Contact Us

Input your search keywords and press Enter.

Add Dream Lands Design to your Homescreen!

Add