• Home Improvement
    • DIY
    • Remodeling
    • Woodworking
    • Accessories
    • Home Design
      • Furniture
      • Organize
      • Tips
      • Decor
        • Interior
        • Exterior
    • Design Ideas
      • Bathroom
      • Bedroom
      • Dining Room
      • Living Room
      • Kitchen
  • Gardening
    • Backyard
    • Front Yard
    • Landscaping
  • Building Staircase
  • Categories
    • Home Improvement
    • Decor
    • Gardening
    • Woodworking
    • Lifestyle
    • Green Living
    • Real Estate
Dream Lands Design
  • Home Improvement
    • DIY
    • Remodeling
    • Woodworking
    • Accessories
    • Home Design
      • Furniture
      • Organize
      • Tips
      • Decor
        • Interior
        • Exterior
    • Design Ideas
      • Bathroom
      • Bedroom
      • Dining Room
      • Living Room
      • Kitchen
  • Gardening
    • Backyard
    • Front Yard
    • Landscaping
  • Building Staircase
  • Categories
    • Home Improvement
    • Decor
    • Gardening
    • Woodworking
    • Lifestyle
    • Green Living
    • Real Estate
Featured of Wood and Tile Transition: Transitioning Ceramic Tile to Wooden Floor
You're here: Home DIY How to Properly Transition Ceramic Tile to Wooden Floor

How to Properly Transition Ceramic Tile to Wooden Floor

  • Perla Irish
  • June 27, 2018
Total
5
Shares
0
0
5
0
0
Table of Contents Show
  1. Wood and Tile Transition: Considerations and Tools
    1. Tools Needed:
  2. Wood and Tile Transition: Color Choices
  3. Wood and Tile Transition: Floor Elevation
  4. Wood and Tile Transition: Installing Molding Transition
  5. Wood and Tile Transition: Installing Transition with Metal Track
    1. Resources

Creating a smooth transition from ceramic tile to wooden floor requires matching wood transition pieces that are either flat or have a curve to them. It is important to choose the right transition pieces based on the elevation of the floors that are being joined.
Wood and Tile Transition: Transitioning Ceramic Tile to Wooden Floor
Transitioning Ceramic Tile to Wooden Floor (Wood and Tile Transition)

Wood and Tile Transition: Considerations and Tools

Joining ceramic tile to the wooden floor properly will give the space a professional finished look even if it was done from beginning to end by the homeowner. Choosing transition pieces needs to take the following into consideration:

  • The color of the wood and tile
  • The height difference between the two floors
  • Gap width between the two types of floors

Read Also:

  • Inexpensive Alternatives to Tile in the Bathroom
  • The Various Kinds of Wall Tiles You Must Know About
  • Points To be Followed While Hiring Tile Installers
  • Advantages of Hardwood Flooring

Tools Needed:

  • Cordless drill and concrete drill bit
  • Screwdriver
  • Tin snips
  • Measuring tape
  • Concrete anchors (if installing over slab)
  • Hand saw
  • Rubber Mallet
  • Liquid Nails (Adhesive)
  • Pencil
  • Molding or transition pieces

Wood and Tile Transition: Color Choices

How do you combine laminate flooring and ceramic tile professionally? You need to match the transition wood piece to the same type of wood and color of the flooring. There are instances in which identical transition pieces are hard to find because they are created from a different lot, the item has been discontinued or the stock is in short supply.

A handy trick to employ is to select a molding of similar wood with the same color and grain pattern. Once installed, the small differences will visually disappear because the transition piece is very small in relation to the expanse of laminate and tile flooring.

Wood and Tile Transition: Standard Molding

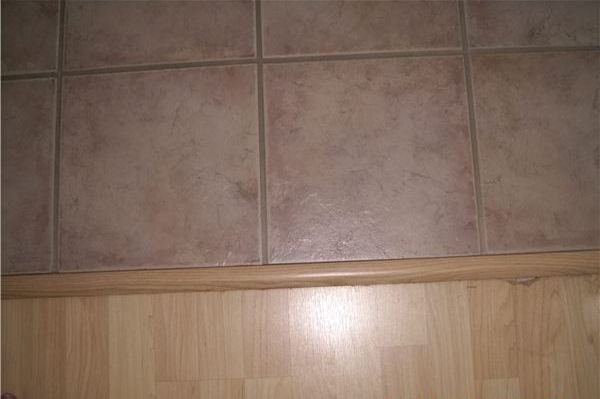
The transition piece used on the above picture is a creative use of standard molding to create a perfect transition from ceramic tile to the wooden floor. Matching laminate transition pieces were impossible to find at the time and there was a pronounced height difference between the two types of flooring.

Wood and Tile Transition: Floor Elevation

The picture below shows a ceramic tile to wooden floor molding piece used instead of a traditional transition piece. (molding does not have a metal track component). The molding is flat on one side and raised on the other. The wood flooring is 1/4 inch higher than the tile and the shape of the molding piece on the wood side is 90 degrees.

Traditional Transition Piece (Wood and Tile Transition)
Wood and Tile Transition: Traditional Transition Piece

A quarter round was used to even out the elevation. The rounded end sits on the low elevation, in this case, on the tile side. By taking into account the difference in floor height, the piece provides a smooth transition between the different elevations.

The molding has been placed directly under the door, so when the door is closed, only tile or wood can be seen from either side. Measuring appropriately is crucial to achieving this finished look.

Wood and Tile Transition: Installing Molding Transition

How do you combine laminate flooring and ceramic tile using mold pieces?

The instructions to cut and install a molding piece are as follow:

  • Measure and cut the transition pieces to fit the desired length and trim appropriately to fit under door jams.
  • Apply Liquid Nails to the full-length bottom of the transition piece and to the 90-degree angle side.
  • Press firmly into place and wipe off excess.
  • Allow drying for 24 hours.

Wood and Tile Transition: Installing Transition with Metal Track

To use a transition piece with a metal track, laminate flooring must be installed with a 1/2 inch gap between the two sections of floor to allow for installation of the metal track to bare concrete. The instructions are as follow:

  • Ensure that there is a 1/2 inch gap between the wood and tile sections exposing bare floor.
  • Cut metal track using tin snips 1/2 inch shorter on both ends to allow for easy installation.
  • Lay track down and mark floor through the holes in the track with a pencil.
  • Use concrete bit to drill holes to install anchors.
  • Place anchors in holes.
  • Lay metal track on top of concrete anchor holes and screw into concrete.
  • Cut wood transition piece to size and snap onto the metal track. You may have to tap it in place with rubber mallet.
Wood and Tile Transition: Installing Transition with Metal Track

Molding and traditional transition pieces in the most popular wood colors and styles can be found at home improvement warehouses. For discontinued lots, contact wood flooring liquidators in your particular area and on the internet. If possible, it is best to get the transition pieces that match the selected flooring at the same as ordering the flooring to make the process easier.


Resources

  • Home Construction & Improvement™, http://www.homeconstructionimprovement.com/how-to-transition-hardwood-and-tile/
Total
5
Shares
Share 0
Tweet 0
Pin it 5
Share 0
Share 0
Perla Irish

Perla Irish, who is more familiarly known as Irish, is the Content Manager at Dreamlandsdesign.com. She loves following trends around home and garden, interior design, and digital marketing. Through this blog, Irish wants to share information and help readers solve the problems they are experiencing.

Related Topics
  • ceramic
  • floor
  • flooring
  • laminate
  • tile
  • transition
  • wooden
Previous Article
Featured of DIY track lighting installation, A Track Lighting Installation Puts Light Where You Want It

DIY track lighting installation, A Track Lighting Installation Puts Light Where You Want It

  • Perla Irish
  • June 26, 2018
View Post
Next Article
Featured of Shower Waterproofing Products for Increasing the Lifespan of Tiles

Shower Waterproofing Products for Increasing the Lifespan of Tiles

  • Perla Irish
  • June 27, 2018
View Post

Subscribe

Subscribe now to our newsletter

You May Also Like
Cozy rustic cabin in a forest clearing with wooden textures, rocking chairs, and a fire pit under soft sunlight.
View Post

Transforming Pioneer Cabins into Guest Houses, Offices, or Airbnb Rentals

  • May 20, 2025
Wooden pergola attached to the house with strong beams.
View Post

How to Build a Pergola Attached to the House: Instructions and Drawings

  • May 19, 2025
Outdoor patio with sleek modern furniture in neutral tones, surrounded by lush greenery, creating a cozy and sophisticated atmosphere.
View Post

A Curated Blend of Beauty: Premium Outdoor Furniture for Elegant Living

  • May 19, 2025
A roofer installing a new roof.
View Post

Is It Time to Replace Your Roof? Here’s How to Tell

  • May 16, 2025
Insulation installation process: Sealing air leaks around windows with caulk and weather stripping during a rainy winter night.
View Post

Boost Home Energy Efficiency with Quality Insulation

  • May 16, 2025
A rustic, farmhouse-style home transformed for a lively party, with a large wooden deck extending into a sprawling backyard during a warm autumn evening. String lights illuminate the outdoor space, highlighting a barbecue area and comfortable seating arrangements.
View Post

How to Transform Your Home into a Party-Friendly Place

  • May 16, 2025
A large metal dumpster sits in a driveway surrounded by blooming flowers in spring, filled with garden waste and old landscaping materials from a yard makeover. A white picket fence borders the property.
View Post

Why DIYers Trust Residential Dumpster Rentals for Home Improvement Jobs

  • May 16, 2025
Cozy outdoor lounge with wicker ottoman, colorful cushions, sunlit patio, greenery, and stylish outdoor furniture.
View Post

Using Outdoor Ottoman Cushions to Create a Cozy Outdoor Lounge

  • May 16, 2025

Leave a Reply Cancel reply

Your email address will not be published. Required fields are marked *

This site uses Akismet to reduce spam. Learn how your comment data is processed.

  • About Us
  • Privacy Policy
  • Terms of Use
  • Disclosure
  • Sitemap
  • Contact Us

Input your search keywords and press Enter.