Table of Contents Show
Asphalt pathways and driveways are very durable. However, like any other standard surfaces, they wear out over time due to lack of proper maintenance or adverse weather conditions. This leads to cracks on the asphalt surface, giving your house an unpleasant sight.

If this is an issue you’re going through, you don’t need to wait any longer to start repairing the asphalt on your own. For the best possible finish, it would also be wise to hire professional asphalt contractors in Albuquerque, New Mexico.
Here are useful tips you should follow throughout the asphalt repair exercise.
1. Carefully Inspect the Asphalt Condition
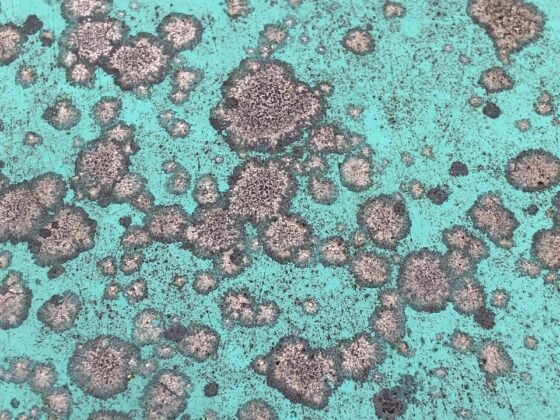
Before you can even start your asphalt repair, the first thing to do is to carefully inspect the overall condition of the asphalt. As you do this, it would be best if you rank the severity of damage from one to five, with this being from very bad to very good, respectively.
Asphalt in deplorable conditions on the scale is labeled one. It’s characterized by severe nuts and alligator patch cracks, which shows that the foundation has an issue.
The asphalt state of two has many major ruts, huge potholes, and big cracks. The scale of three will only have tiny potholes alongside huge gaps.
For a four, it has medium-sized cracks and extremely thin hairline cracks. An asphalt condition with ranked five on the scale is very good, with minimal color fading and hairline cracks.
2. Remove and Replace the Destroyed Section
If the damage is severe, it might be necessary to remove the destroyed section of your driveway altogether and replace it. As you remove this damaged section, make sure to remove it entirely and replace the whole section, including the subgrade.
When replacing the subgrade, make sure to stick to appropriate subgrade preparations and stabilization techniques.
If you observe this, you’ll be able to guarantee that your pathways and driveway can withstand adverse weather. This means it remains durable for many years to come.
Once you’re done installing the new asphalt, give it enough time to set.
3. Filing the Cracks in Asphalt
If your asphalt has noticeable large hairline cracks showing, it would be best to fill them during fall or spring instead of winter or summer. Doing this is vital because asphalt will contract and expand during extreme cold and hot weather.
Therefore, repairing it in the winter or summer months might lead to the patching material detaching from the pavement.
Also, make a point of removing any vegetation and loose debris showing on the asphalt cracks. You can do this by renting an asphalt crack filler machine or heavy-duty vacuum to tidy up the area with the cracks.
By doing this, you’ll be able to ensure that there are no residual debris and dirt present.
When filling cold asphalt filler into the broken space, overfill it by approximately an inch. Heat the asphalt repairing material using a blowtorch to make it malleable.
Doing this allows you to perfectly infiltrate the existing asphalt. After the patching compound is warm and soft, you should give it an entire day to rest in.
4. Clean Up the Asphalt
While this might sound obvious, some people overlook the importance of cleaning the asphalt before starting to repair it. This entails removing any loose and small bits of asphalt and gravel even though this might make the hole a lot bigger.
It’s also advisable to remove all the weak parts of the asphalt before you start filling or patching it.
Make sure to take out the weeds that have grown in between the cracks. You can do this by either manually pulling them out or using a weed killer. The latter option will prevent the weeds from coming back in the future.
Moreover, clean out all the loose bits of dirt by lightly power washing or spraying the asphalt surface with a hose.
5. Consider Using an Overlay
Are the cracks scattered through your entire driveway? If this is the case, replacing the whole driveway or filling each of these cracks isn’t the best solution. Instead, it would be best if you considered setting an overlay over your driveway.
With this repair, you’ll be able to postpone any expensive repairs in the near future and solve the destroyed asphalt driveway. As a result, your driveway gets to serve you for an extended duration.
6. Surface Patching
If you’re on a tight budget, this is also a suitable technique to repair your asphalt surface. It entails covering the specific regions that are destroyed instead of covering the whole driveway.
By doing this, you get to fill the cracks and weakness areas, meaning your asphalt gets to remain useful for a long time before needing massive repairs again.

Conclusion
Repairing asphalt surfaces is a crucial step to maintain your home’s curb appeal. If you had no idea where to start, reading this article has provided you with valuable tips to follow.