• Home Improvement
    • DIY
    • Remodeling
    • Woodworking
    • Accessories
    • Home Design
      • Furniture
      • Organize
      • Tips
      • Decor
        • Interior
        • Exterior
    • Design Ideas
      • Bathroom
      • Bedroom
      • Dining Room
      • Living Room
      • Kitchen
  • Gardening
    • Backyard
    • Front Yard
    • Landscaping
  • Building Staircase
  • Categories
    • Home Improvement
    • Decor
    • Gardening
    • Woodworking
    • Lifestyle
    • Green Living
    • Real Estate
Dream Lands Design
  • Home Improvement
    • DIY
    • Remodeling
    • Woodworking
    • Accessories
    • Home Design
      • Furniture
      • Organize
      • Tips
      • Decor
        • Interior
        • Exterior
    • Design Ideas
      • Bathroom
      • Bedroom
      • Dining Room
      • Living Room
      • Kitchen
  • Gardening
    • Backyard
    • Front Yard
    • Landscaping
  • Building Staircase
  • Categories
    • Home Improvement
    • Decor
    • Gardening
    • Woodworking
    • Lifestyle
    • Green Living
    • Real Estate
featured image - How to Lay Bermuda Grass Sod
You're here: Home Landscaping How to Lay Bermuda Grass Sod

How to Lay Bermuda Grass Sod

  • Perla Irish
  • September 21, 2021
Total
2
Shares
0
0
2
0
0
Table of Contents Show
  1. Clear the Lawn
  2. Prep the Soil
  3. Lay the Sod
  4. Water and Maintain

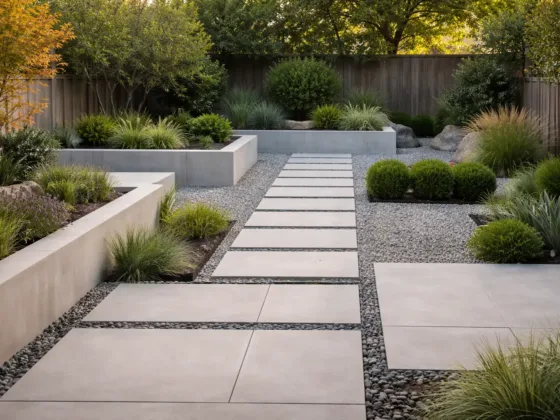
Bermuda grass is a lush and beautiful choice for homeowners in hot and humid climates.  Bermuda thrives in areas that receive ample sunlight and very little shade.

Most golf courses are known for having Bermuda grass fairways, but you can also have course-quality greens on your front lawn. If a homeowner is wanting an instantly beautiful yard, sodding with Bermuda is an excellent choice.

image - How to Lay Bermuda Grass Sod
How to Lay Bermuda Grass Sod

Clear the Lawn

Remove any existing grass, sticks, pine straw, or other debris from the planting areas. Removing obstacles from the yard will allow for a more even planting field in the later steps.

If the grass is present in the area, you can use a glyphosate-based herbicide to kill it. If an herbicide is going to be used, apply it two weeks prior to sodding the lawn. Homeowners should remedy any drainage issues or low-lying areas in the lawn before laying sod.

Prep the Soil

After all grass and obstacles have been removed, it is time to pay attention to the soil. Using a rake, break up any tough or compacted soil that may exist. Sod will not grow well if the soil below it is hard.

Compacted soil cannot absorb water or nutrients well; two things that sod will need to grow. If pH deficiencies or nutrient imbalances exist, conduct a soil sample test at his time. Any chemical, pH, or nutrient deficiencies should be corrected before laying sod.


Read Also:

  • How to Make Outdoor Maintenance Look Easy
  • How to Lay Sod: 5 Essential Lawn Care Steps
  • 5 Basic Lawn Care and Maintenance Tips
  • 5 Budget-Friendly Gardening Tips
  • How do I Cut Very Long Grass?

Lay the Sod

Select the longest and straightest side of the yard to lay sod first. Many homeowners will begin laying Bermuda grass sod along a driveway, walkway, or exterior wall of the home first.

Do not begin in the center of the area and work your way out. Stagger the strips of sod so that they resemble the design of a brick wall. Pieces should be offset from one another.

Feel free to cut pieces of sod to fill in the voids at the beginning or end of a row. Cuttings can also be used to shape sod around corners, bends, or oblong areas.

If strips of sod are going to be cut, so make sure to not cut them into too small of pieces.  Small pieces of sod are less likely to grow successfully.

Fill in any seams that may exist in-between pieces of sod with yard sand or soil. Filling seams with aggregate will allow for better water retention around the edges, helping the sod to take hold. It is important to not walk on freshly planted sod, as the edges may separate, creating gaps in the pattern.

Water and Maintain

Freshly placed sod will need anywhere between two and three inches of water per week. If the weather is warmer, or if drought conditions exist, more watering may be needed.

After four weeks of increased watering, Bermuda grass sod may be watered at a rate of two inches per week. It is important that a homeowner never let new Bermuda grass sod dry out.

Fertilizer may be added after four weeks of healthy growth. It is not advised to use a Bermuda grass weed killer until eight weeks of healthy growth have taken place.

After eight to ten weeks have passed, regular grass-cutting and maintenance activities may resume.

Total
2
Shares
Share 0
Tweet 0
Pin it 2
Share 0
Share 0
Perla Irish

Perla Irish, who is more familiarly known as Irish, is the Content Manager at Dreamlandsdesign.com. She loves following trends around home and garden, interior design, and digital marketing. Through this blog, Irish wants to share information and help readers solve the problems they are experiencing.

Related Topics
  • bermuda
  • grass
  • lay
  • sod
  • soil
  • weeks
Previous Article
featured image - Transform Your Home with Upvc Sash Windows

Transform Your Home with Upvc Sash Windows

  • Perla Irish
  • September 21, 2021
View Post
Next Article
featured image - How to Effectively Clean Ceramic Tiles

How to Effectively Clean Ceramic Tiles

  • Perla Irish
  • September 21, 2021
View Post

Subscribe

Subscribe now to our newsletter

You May Also Like
Bright home interior with shiny hardwood floors, furniture sliders under heavy furniture legs, and protective moving tools nearby.
View Post

How to Move Furniture to a New Home Without Damaging the Floor

  • July 16, 2025
A compact, organized home workshop at night, with essential DIY tools and safety gear neatly arranged on a wooden workbench.
View Post

Troubleshooting Common DIY Home Repair Problems

  • July 15, 2025
A man disassembling a P-trap under a sink to remove hair and debris in a modern, minimalist kitchen.
View Post

Plumbing Maintainance: How to Properly Clean Plumbing Pipes

  • July 14, 2025
Switching to LED bulbs can boost home efficiency easily.
View Post

Energy Heroes – 6 Genius Hacks to Make Your Home More Energy Efficient

  • July 9, 2025
Anti-fatigue mats cushion feet and support balance, helping seniors stay active and independent.
View Post

Why Seniors Should Consider Anti-Fatigue Mats at Home

  • July 7, 2025
Outdoor patio with natural flagstone pavers, surrounded by lush greenery and bathed in soft sunlight, highlighting a rustic garden setting.
View Post

Flagstone Pavers – A Natural Choice for Timeless Outdoor Beauty

  • June 30, 2025
Professional commercial movers save time, money, and reduce risks better than DIY options.
View Post

Commercial Moving Services vs. DIY: What’s Better for Your Business?

  • June 27, 2025
Digital dashboard showing HOA management tools with calendars, documents, chats, and board members collaborating around a table in a suburban neighborhood.
View Post

How Anyhoa is Simplifying HOA Board Management for Communities

  • June 26, 2025
  • About Us
  • Privacy Policy
  • Terms of Use
  • Disclosure
  • Sitemap
  • Contact Us

Input your search keywords and press Enter.