Table of Contents Show
How to Make Stair Stringers — Deck stairways require a solid attachment to the deck framing for safety. We cover the ups and downs of stairway building for decks in this article with two methods for attaching the stringers to the deck frame. Learn more in this comprehensive article on deck stairway stringers.

How to Make Stair Stringers: Attaching Stairs to a Deck
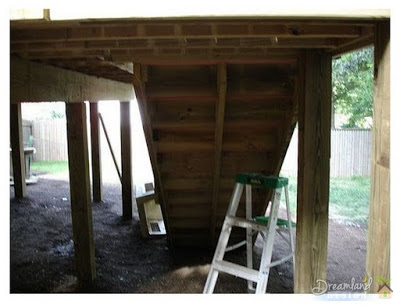
The stair stringers support the steps for a deck stairway and are usually installed with the rest of the deck framing. Many local building departments require a framing inspection for a deck and include the stair stringers in that inspection.
There are two places to connect the stringers to the deck. The first way is with the top of the tread runs level with the top of the deck frame, which makes the first step level with the top of the decking. The second method connects the stringers with the first tread run one step below the deck framing. Let’s take a close look at How to Make Stair Stringers – Attaching stair stringers to a deck.
Basic Installation on How to Make Stair Stringers
If you’ve never built a deck stairway, you might want familiarize yourself with stair building terminology.
The stringers may support considerable weight at certain times. There might be several people on the steps at once or you might carry something heavy up or down the stairs. The importance of a secure connection that insures safety is important.
Use a minimum of 1/4 inch screws or lag screws to attach the stringers to the header or ledger from underneath the deck frame. Use three screws that reach into the stringer a minimum of 1 1/2 to 2 inches. Always drill pilot holes for large screws, lag screws and lag bolts.

Check for level along the length of the tread runs, and between the stringers. Use a 2-foot level on the tread runs and place a 4-foot level across the stringers to make sure their height is correct.
Use stringer hangers even when they are not required. Stringer hangers look like joist hangers, but the cup shaped piece of steel that supports the stringer is set at an angle. Short, heavy nails make most of the connections and put one nail into each hole provided.
Some stringer hangers also include a place to drive screws in at an angle from the side of the stringer, through the stringer and into the header. Be sure to use screws that reach 1 1/2 inches into the header or ledger.
Attach the stringer hangers to the stringers first using the short, heavy nails. The back of the hanger should be flush with the back edge of the stringer.
Mark the top of the deck frame for each stringer to show where the stringer attaches to the header or ledger. Stringers spacing is no wider than 16 inches from the center of one to the center of the next. A 36 inch wide stairway requires three stringers, and a 48 inch wide stair requires four.
Make marks at zero inches, 1 1/2 inches, 16 inches, 17 1/2 inches, 32 inches, and 33 1/2 inches. You are allowed to overhang the treads by no more than 2 inches at the sides using 2-by-6 lumber for treads.
Related to “How to Make Stair Stringers“:
Top Tread Level with Frame
Hold the top of the stringer level with the top of the deck joists and align it between two marks. Nail the stringer hanger to the header with two short, heavy nails. Adjust the orientation of the stringer to the header at 90 degrees with a speed square or framing square.
Drill evenly-spaced pilot holes through the header and into the center of the stringer edge that is against the header. Screw the stringer to the header using 1/4 inch galvanized or screws treated for the type of lumber you are using. Stainless steel screws are suitable for most types of lumber, including treated lumber.
From the front, finish nailing the stringer hangers to the header with nails. One nail in each hole provided is required.
Top Tread Below the Frame
Ledger Between Posts
Attach a ledger board under the header. You can run the ledger between posts, or you can hang the ledger from 2-by-6 lumber. Attaching the ledger to posts is more secure, but may be unsightly or inconvenient. Hold the ledger against the posts and the bottom of the header. Drill two 1/2 inch holes through the ledger and through the center of each post. Attach the ledger to the posts with 1/2 inch galvanized, stainless steel or treated carriage bolts, washers and nuts.

Hang Ledger From Header
Mark the position of the stringers on the header. Hold the edge of a 2-by-6 vertically against the back of the header. Check it for plumb, drill three pilot holes through the header and into the 2-by-6 and lag screw the 2-by-6 to the header with three, 3/8 inch treated lag screws. Use one 2-by-6 for each stringer, but offset the 2-by-6 from the stringer positions to allow screwing the stringers to the ledger from behind.

Place the ledger board against the 2-by-6s and the lower edge of the header. Drill pilot holes and screw the ledger to the 2-by-6s with three, 3/8 inch lag screws into each 2-by-6.
Measure down from the top of the deck frame the height of one step rise and mark the ledger or header. Use a level to extend the line across the width of the stairway.
Attach the stringers to the ledger with the stringer hangers and with screws from behind as shown above in the “Level with Frame” section.
Related to “How to Make Stair Stringers“:
Secure Stringers to Pad
How to Make Stair Stringers — Mark the center to center spacing of the stringers on the pad at the bottom of the stairway. Attach galvanized or stainless steel angle brackets to the bottom of the stringers. Drill holes in the concrete pad using the holes in the brackets as guides. Three holes per bracket is sufficient. Screw the brackets to the concrete pad using concrete screws with hex heads.
If you’re not using a concrete or stone pad, verify the position of one of the center stringers and drive a pressure treated, 2-foot long, 2-by-4 stake into the ground along side the stringer near the bottom. Screw the stringer to the stake with two 1/4 inch screws.
Check the center spacing of the stringers and install a tread on a step near the bottom to hold the stringers in the correct position.
Read more tips on deck building and attaching stair stringers to a deck.
Deck Building 101: You Can Do It Yourself
You can build a deck yourself. We’ve got tips, construction drawings, plans, cost estimating, and more in this series on building decks. You’ll find the information you need to turn your dream of outdoor living space into reality.
- Tips for Deck Building
- Building Deck Stairs: Directions For Building Stairs Railing for Deck
- Make an Easy and Inexpensive Deck
- How to Make Stair Stringers, Stringer Attachment Methods
- How to Determine Deck Framing Lumber Sizes


1 comment
Fsinox provide stainless steel railing tube and component fitting manufacturer in Foshan, which is specializing in the delivery of base cover, bar holder, elbow, end cap, glass clamp, handrail bracket, wall bracket, 25x21mm/ 42.4mm/48.3mm slotted tube fitting and LED Handrail to Europe, South American, and Australia Market. Visit Website