Table of Contents Show
Are you sick of having to look at the unsightly gaps and cracks in your house walls, especially on the trims and moldings and want to do something about it?
Well, read on to find out how you can change the look of your old house walls with caulk tape!
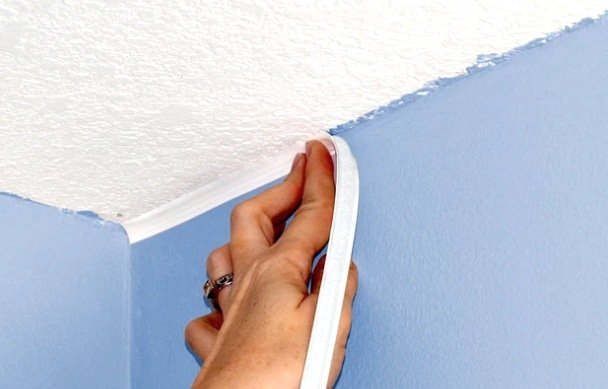
Many homes have baseboards and wall moldings that have unattractive gaps in them. These gaps can affect the capacity of your home to cool and heat as they allow drafts to enter your home.
Moreover, they act as a pretty convenient entryway for dust particles, water, and even pesky insects into your home.
One popular solution is to caulk the wall trims to seal these gaps. However, traditional caulking is pretty messy to apply, gives off toxic fumes during and after application, and leaves an uneven finish if you don’t have the expertise to do it.
This doesn’t make it an ideal fit for home renovation on the go. It also requires a lot of supplementary materials such as the caulking gun, which in itself can be pretty complicated to use.
So, the best way to go about renovating your home and sealing the unsightly cracks and gaps in your wall trims is to use a peel and stick trim molding!
Why Are Caulking Strips a Better Option?
The white self-adhesive caulk strip is so much more flexible than traditional caulking. It’s also pretty easy to use and super versatile; you can use this flexible vinyl edge trim to cover all the unsightly gaps in your home.
What’s more, is that these strips come with a wedge shape that enables them to easily fit in corners and cover different gaps between surfaces.
However, the best bit about these strips is that they are easy to install. You simply have to peel off the backing and stick the self-adhesive caulking stick to the desired area; you don’t need any additional special tools to apply it.
Its easy application is what enables you to create a perfect trim line every single time.
Additionally, it does not leave behind any mess that you would have to clean and does not even need any time to cure like traditional caulking.
Furthermore, these sticks are also paintable and resistant to mold and mildew! They can easily stick to a wide variety of surfaces such as ceramic, tile, vinyl, wood, laminate, concrete, metal, stone, granite, and so much more.
They also easily move with expansion and contraction. You can also easily use these self-adhesive trims to replace your old caulk.
How to Use Self-Adhesive Caulking Strip to Renovate Wall Trims
To ensure proper adhesion of the flexible vinyl edge trim, please follow the instructions detailed below as carefully as possible.
Here’s how you can use these self-adhesive trims to seal the gaps in your walls:
Read Also:
- Wallpapering Tips: Step by step on Installation, Preparation, Removal and Care Wallpaper
- Wondering Why You Should Renovate Your Home? Count on These Five Best Reasons
- When Is the Best Time of the Year to Install Replacement Windows?
- Installing Crown Molding, How to Install Molding by Yourself
- Tips On Installing Replacement Windows The Easy Way
- 5 Common Do-It-Yourself Home Repairs
Prepare the Surface
The first and foremost step that you need to take is to prepare the surface. This is a vital step of the caulking process as it ensures that the caulking strip sticks successfully to the wall trims.
Here’s how you can prepare your wall moldings for the peel and stick trim molding:
- There’s a high chance that your old house walls have already been caulked, so before you go about sealing the trims with the caulking strip, you need to make sure that you have removed all the existing caulk.
You can use mineral spirits, paint thinner, or a trusty caulk remover to soften the caulk before removing it. Then use a sharp putty knife to remove the caulk.
- Once you have successfully removed the old caulking, make sure to thoroughly clean the wall trims with scouring powder. This will remove any residue. Then rinse the area with water.
- Lastly, wipe the previously caulked areas clean with rubbing alcohol. Then make sure to dry the entire surface as thoroughly as possible. You can even give it a day to dry completely before applying the caulk strip.
Prepare the Caulk Strip
The next step is to prepare the caulk strip before applying it to the wall trims. Here’s what you need to do:
- Measure the exact length of the wall trims that you want to cover with the self-adhesive caulk strip and carefully cut the strip of caulk to that length or 3 to 4 inches more so that you don’t run out of the strip while caulking.
Apply the Strip
Here’s how you can apply the peel and stick trim molding to your walls:
- With dry hands, start peeling the backing from the strip and firmly press the peeled strip to the wall trims.
- Make sure that you place the strip properly in a straight line to avoid having to reposition it later.
- Work in small sections to make this task easier. Continue to pull off sections of the backing and press the self-adhesive molding strip to the wall trim.
That’s it! You have successfully protected and sealed your walls.
Perhaps the best bit about these caulking strips is that you can use them to cover a sloppy paint job on your wall corners and ceilings as well as on the gaps around your countertop.
Likewise, you can use them to cover your baseboards and install them around your windows. Moreover, you can also use these self-adhesive strips around the corners of bathtubs and your toilet base.
Author Bio
Greg Amundson is the founder and creator of InstaTrim& have been working in the home construction industry for 30+ years and have always had a passion to make DIYers’ life easier by developing products like white peel and stick caulk, white caulk tape, grey PVC corner trim, etc.

