• Home Improvement
    • DIY
    • Remodeling
    • Woodworking
    • Accessories
    • Home Design
      • Furniture
      • Organize
      • Tips
      • Decor
        • Interior
        • Exterior
    • Design Ideas
      • Bathroom
      • Bedroom
      • Dining Room
      • Living Room
      • Kitchen
  • Gardening
    • Backyard
    • Front Yard
    • Landscaping
  • Building Staircase
  • Categories
    • Home Improvement
    • Decor
    • Gardening
    • Woodworking
    • Lifestyle
    • Green Living
    • Real Estate
Dream Lands Design
  • Home Improvement
    • DIY
    • Remodeling
    • Woodworking
    • Accessories
    • Home Design
      • Furniture
      • Organize
      • Tips
      • Decor
        • Interior
        • Exterior
    • Design Ideas
      • Bathroom
      • Bedroom
      • Dining Room
      • Living Room
      • Kitchen
  • Gardening
    • Backyard
    • Front Yard
    • Landscaping
  • Building Staircase
  • Categories
    • Home Improvement
    • Decor
    • Gardening
    • Woodworking
    • Lifestyle
    • Green Living
    • Real Estate
Featured of How to Lay and Install Drip Irrigation System for your Garden
You're here: Home Gardening How to Lay and Install Drip Irrigation for your Garden

How to Lay and Install Drip Irrigation for your Garden

  • Perla Irish
  • June 12, 2018
Total
11
Shares
0
0
11
0
0
Table of Contents Show
  1. Drip Irrigation System for Healthy Plants and Saving Water
    1. Materials Needed
  2. Step 1. Planning the Layout
  3. Step 2. Connect the Hose to the Water Spicket
  4. Step 3. Adding a Branching Connector (Emitter)
  5. Step 4. Connect the Drip Tape to the Branching Emitters
  6. Step 5. Repair Possible Holes with a Connector
  7. Step 6. Turn the Water On and Decide Which Rows to Run Water Down

Install Drip Irrigation System for your Garden — Installing a drip irrigation system in your garden is easy to do. This is a project you can do by yourself in under a day. In addition, it should cost no more than $150 dollars.

The initial investment pays off in water saved, not having to worry about drought damaging your plants, and in your time spent watering the garden. In addition, it is much more efficient to water at the root then to spray water at the top of the plants.

You do not need advanced knowledge of plumbing or plumbing systems in order to install a drip irrigation system.

Drip Irrigation System for Healthy Plants and Saving Water
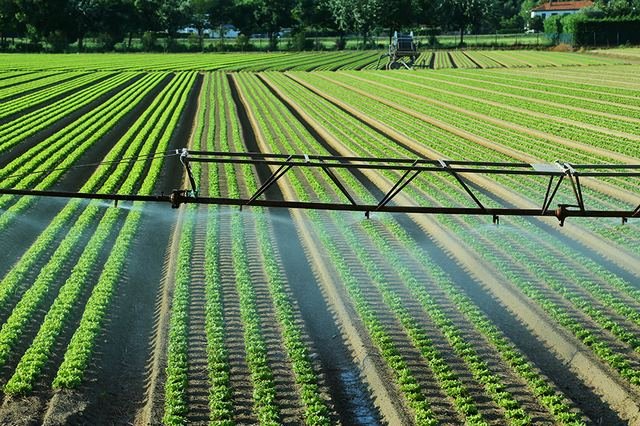
IMG - How to Lay and Install Drip Irrigation System for your Garden
How to Lay and Install Drip Irrigation System for your Garden

Materials Needed

  • Drip tape
  • Hose adapters
  • Main end clamps
  • Emitters
  • Pressure regulator
  • Screen filter
  • Hose
  • Backflow Preventer
  • Hose end clamps
  • Pocket knife
  • Couplers

Step 1. Planning the Layout

The first thing you will need to do is locate your outdoor plumbing source and plan how you will connect this source to a hose that can serve as the initial connector for the drip tape system.

Once that is located, draw a sketch of your garden and decide what level the water flow should be for different types of plants. Plants all require different amounts of water for optimal growth.

This will influence how much drip tape is laid out and where the markings will be made in the drip tape. This will also tell you how much drip tape you need to purchase.

Planning the Layout - Installing Drip Irrigation System
Planning the Layout (Installing Drip Irrigation System)

Must Read:

  • Find a Sprinkler System That’s Right for You
  • DIY Steps for Draining Water Away from the House
  • Grow a Successful Vertical Garden: The Current Trend of Planting And Home Gardening
  • French Drain: Use Drain Tile to Route Water Away from Your House

Step 2. Connect the Hose to the Water Spicket

Make sure that the plumbing to the outside works. The first piece you want to connect to the spicket is the backflow preventer. Then connect a hose to the water spicket. Connect the other side of this hose to the main irrigation line.

Attach a flow regulator in between the hose and the black tube. This line is a long black tube that is normally two inches in diameter. Run this line for as long as you need it, cut it with the pocketknife and use the main end clamps to tie off the line.

Step 3. Adding a Branching Connector (Emitter)

To divert water away from the main line, you need to add in branching connectors that will allow the water to flow out of the main tube and into the rows where the garden is located.

These branching connectors are known as emitters. You will use the knife to create a hole in the main tubing and attach as many emitters as necessary. Make sure that the emitter is designed for drip tape.

Adding a Branching Connector (Emitter) - How to Lay and Install Drip Irrigation System for your Garden
Adding a Branching Connector (How to Lay and Install Drip Irrigation System for your Garden)

Step 4. Connect the Drip Tape to the Branching Emitters

The drip tape needs to be attached to all of the branching emitters. To do this, secure the drip tape around one side of the emitter. The drip tape has holes already cut. When you have laid out the drip tape and it stretches the span of your desired space, tie off the end.

Must Read:

  • Drip Irrigation – Best Irrigation And Automation Options
  • No Money? How to Make a Small Garden Pond Without a Great Expense
  • Key Steps on How to Prepare The Land For a Beautiful Water Feature
  • 3 Tips to Keep Your Garden Green While Conserving Water
  • Automatic Potted Plants Watering System : Keep the Greenery on Your Patio Green – Even When You are Away

Step 5. Repair Possible Holes with a Connector

It is possible that over time you will get holes in the drip tape. You have two options to fix them. First, you can cut the drip tape where it has the hole and reattach the drip tape together using a connector. Second, you can replace the entire line of drip tape.

Step 6. Turn the Water On and Decide Which Rows to Run Water Down

If you have flow regulators at all of the emitters, you can choose to only run water down certain rows. This allows for customization of the gardening. If not, you can control the water flow at the hose connection.

It is important to note that if you have a water filter and softener attached to your water system, this should be turned off when you are watering your plants.

After reading this tutorial on How to Lay and Install Drip Irrigation System for your Garden, you should have a basic understanding of the materials needed and steps taken to install a drip tape system for healthier plants and water conservation.


Author Bio

Leo is a plumber at Northridge-based plumbing company Rooters On Time. On his free time, he enjoys writing tutorials and how-to guides about plumbing to help others.

Total
11
Shares
Share 0
Tweet 0
Pin it 11
Share 0
Share 0
Perla Irish

Perla Irish, who is more familiarly known as Irish, is the Content Manager at Dreamlandsdesign.com. She loves following trends around home and garden, interior design, and digital marketing. Through this blog, Irish wants to share information and help readers solve the problems they are experiencing.

Related Topics
  • drip irrigation
  • gardening
Previous Article
Featured of The Do’s and Don'ts of Decorating With Mirrors

The Do’s and Don’ts of Decorating With Mirrors

  • Perla Irish
  • June 12, 2018
View Post
Next Article
Featured images of Orange Sofa Interior Design

How to Decorate a Home with an Orange Sofa to Inspire Décor

  • Perla Irish
  • June 13, 2018
View Post

Subscribe

Subscribe now to our newsletter

You May Also Like
Wooden pergola attached to the house with strong beams.
View Post

How to Build a Pergola Attached to the House: Instructions and Drawings

  • May 19, 2025
A rustic, farmhouse-style home transformed for a lively party, with a large wooden deck extending into a sprawling backyard during a warm autumn evening. String lights illuminate the outdoor space, highlighting a barbecue area and comfortable seating arrangements.
View Post

How to Transform Your Home into a Party-Friendly Place

  • May 16, 2025
Cozy backyard at dusk with warm string lights casting long shadows, soft path lights highlighting a mossy stone garden walkway, and elegant pendant lights illuminating a simple wooden outdoor dining table, spring evening.
View Post

10 Outdoor Lighting Ideas to Transform Your Backyard

  • May 15, 2025
Tape measure measuring the thickness of a piece of lumber.
View Post

How to Determine Deck Framing Lumber Sizes: A Complete Guide

  • May 13, 2025
Sleek wooden sliding barn door on metal track with drill, measuring tape, and level nearby in a modern home interior, featuring Scandinavian design elements, with a neutral color palette and diffused lighting on a cloudy spring morning.
View Post

How to Install an Interior Barn Door

  • May 8, 2025
Transform your reading area with cozy decor, effective lighting, and technology that enhances your library experience.
View Post

Create Your Dream Home Library: A Step-by-Step Guide

  • May 5, 2025
Modern kitchen corner with sealed sink cracks, eco-friendly pest control products on counter, and ladybugs on nearby green plants.
View Post

Pest Control Tactics for Lasting Home Protection

  • April 28, 2025
fake grass is the best way to make your outdoor area stand out.
View Post

How Fake Grass Valencia Creates a Perfect Lawn for Hosting and Entertaining

  • April 19, 2025

Leave a Reply Cancel reply

Your email address will not be published. Required fields are marked *

This site uses Akismet to reduce spam. Learn how your comment data is processed.

  • About Us
  • Privacy Policy
  • Terms of Use
  • Disclosure
  • Sitemap
  • Contact Us

Input your search keywords and press Enter.